I love these the old sheepherder camps. I’ve seen quite a few parked on ranches from Colorado to Idaho and even a few in Arizona. I know they aren’t highway capable but it seems they could provide a real housing alternative for low-income minimalists who have access to land. Far better than a housing complex or apartment for sure if you can deal with a small footprint.
Originally designed on a narrow wagon box, the builders took advantage of every square inch of space. Since weight wasn’t really an issue, many have large stoves like the one above for heating and cooking. As most of these wagons were homes for ranch workers in the western U.S., they needed to be prepared for extreme cold and windy environments. When I was building my vardo, I took a fair amount of design inspiration from these wagons, adding their vibe to the more European designs I was ingesting. My stove is small and I envy this one above; at least the cook top.
Off-the-shelf or build it yourself? It’s the details of hand-built structures that make them stand out and this chimney cap is no exception. This looks far more interesting to me than the local hardware store option.
The photos are from Ken Griswold’s Tiny House Blog. If you haven’t figured it out yet, I’ve been a fan of his site for a long time now and recommend it for anyone with an interest in Tiny Homes. Here’s a link to the full article about Lorna’s wagon.
Wintergatan – Music, Machines and Homemade Music Instruments from Sweden!
I have a fondness for Rube Goldberg machines and clever design. If it is something that actually makes music as well, then I’m all for it. After watching this video I felt a need to find out more so exploring I went. It was a rabbit hole I fell into and am still learning and watching this amazing work. Have a look and listen to their machine to see what I mean. It has some genius engineering, is mechanically amazing, and even sounds great too. This is the culmination of many trials and failures but is ultimately about the music.
Inspired by earlier mechanical musical instruments, especially those in the Speelklok Museum Martin and Wintergatan were determined to make this thing work. Using CAD and a CNC cutting machine, they created this beautiful human-powered machine that can be “programmed” to play many musical pieces.
I was really fascinated by the way they dealt with time signatures on a program grid (playing triplets vs. 4/4 time for example) and he explains this all very clearly in the many videos. The following video is just the tip of a very big iceberg but is a great overview of the machine and the work that went into it.
I cannot begin to describe what they have achieved so I suggest, if you have a look at their website (http://www.wintergatan.net/) and check out their videos on YouTube where they show that actual design and construction from prototypes to finished products.
In preparation for summer teaching I recently spent some time making a couple new pump drills for demonstrations and hands-on activities. While some modern tools were used in the production, these are entirely hand-made with no purchased parts or plans. As I have only made two of these previously I spent a little time perusing images of old pump drills to find good examples to use as models.
Beginning at the end. The first pump drill of the weekend.
The pump-drill is an ancient technology that was used world-wide for at least the last 5,000 years. As most (sometimes all) of the parts are perishable, archaeologists are often limited to conjecture on the finer points based on a few surviving parts or images available. Despite its immense antiquity, pump drills (and their cousins the bow-drills) maintained their currency in the maker’s tool kit well into the Industrial Revolution and, in some places, into the 21st century.
The components of the basic pump drill: shaft, drill bit, flywheel, cross-arm, cord, and flywheel key.
The components can be easily gathered around the house or the wood pile. The flywheel, in this case, is steatite, a soft soapstone that is easily carved but has a high mass. Wood or other materials can be substituted if they are more readily available. My first drill, many years ago had a flywheel from a mesquite wood log. I chose it for its relatively high mass and availability.
The “chuck” shown here was created by drilling a small hole lengthwise down the shaft and cross-cutting with a small back saw. This allows a square shaft drill bit to lock in place as the shaft is lashed tight.
The shaft for this project was split out from some aged oak and worked into a cylinder with a diameter of just over 1/2″ (13 mm). The shaft needs to taper slightly, widest part at the bottom, to keep the flywheel from sliding off. I drill the flywheel hole 1/2″ wide and slowly reduce the shaft size until it finds a snug fit.
The central hole is “keyed” to keep the weight from sliding around the shaft as it reverses direction.
I learned long ago that through hard use, the stone will sometimes slip around the wood shaft. Cutting a key slot on the shaft with a corresponding one on the stone will solve this problem with the insertion of a sliver of hard wood or “key.”
My fancy oak key is just a sliver wood. You can literally use a toothpick if you have one in the pantry. Imagine the labor it will save.
Someone could create a nifty GIF animation of this but I think the photos below will assist in understanding how the key works.
A small groove on the shaft holds the key in place while the flywheel is slid over the shaft.
A bit of glue would probably help but I don’t think it necessary if the pieces all fit securely together.
The wheel (or whorl) is slid down the shaft holding the key in place will securely lock both pieces together.
Soapstone is easily worked and can be slabbed, by hand with a hacksaw. A rasp or an assortment of sandpapers are all that are needed to shape the stone.
A simple metal bit can be easily shaped from a square masonry nail.
To make a bit from a masonry nail, simply heat it until it is cherry red and let it cool naturally in order to anneal it. This makes the metal soft and easily worked with a file, stone, or grinder. After it is shaped the point can be re-hardened by heating the point to a dark cherry red again then plunging it in water to cool.
What I didn’t document here is the lashing method. After fitting the bit in the shaft, the chuck was secured using heavy cotton thread coated in pine tar. I think that a long-term solution would benefit from using wire but I wanted to keep these simple. We’ll see if they last. If you aren’t concerned with “primitiveness” then a strong and permanent connection could be made with JB Weld or two part epoxy.
Anything fun worth doing is worth doing twice. Here are the sibling projects from the weekend.
The second drill, on the left is rigged in a different fashion. All the connections are made with clove hitches. We’ll see which we like better.
The rain drove me indoors but it seemed like a good time to take one for a test run. Drilling a block of steatite.The drill, which hasn’t had it’s final sharpening yet, made it through about 3/8″ of the stone in about 15 seconds.
Spade bits like this one tend to bind as they come through the opposite side so the hole will be finished by flipping the stone over. Still, the hole is peeking through and ready to finish.
Broken down for storage or easy packing.
Pump drills are an awkward shape to pack when assembled but I discovered early on that they easily disassemble to fit into a very small space.
If you are considering a primitive project as part of your summer “to do” list, give a pump drill a try. Lots of fun, can be made in a day, and it will impress your not-so-primitive friends. As a final note, I put an Instructable up based on this post as well. Have a look if you don’t mind and give comments if you see fit: https://www.instructables.com/id/Primitive-Pump-Drill/
Follow-up. Drilling slate pendants.
While preparing materials for a primitive tools class I decided to test the new drill on a piece of slate. This is a little harder than soapstone and more abrasive. I didn’t have any lubricant handy (e.g., water) but decided to try it out anyway. It cut like a charm! Just a note to those not familiar with these low-tech drills; the hole is generally cut until is just barely pokes through the other side then the object is flipped over and drill from the rear. This keeps the bit from binding as is comes through.
I had this crazy idea about the world and how I’d like to change it today.
Hear me out.
What if folks acted as if they were responsible for their actions? That whatever they did out in the world had a pond and ripple effect? That they are not alone on their computer, on a phone, in their world, entitled to more of everything at the expense of everyone else?
It would be like working at the bench if you will allow me. Where when you screw something up you are the one who did this. You are the one who has to fix it. You can’t turn to your neighbor, the car next to you or the bike rider, big business or the government, or your sad upbringing and history and blame them for it. You have to take responsibility for who you are and where you are in…
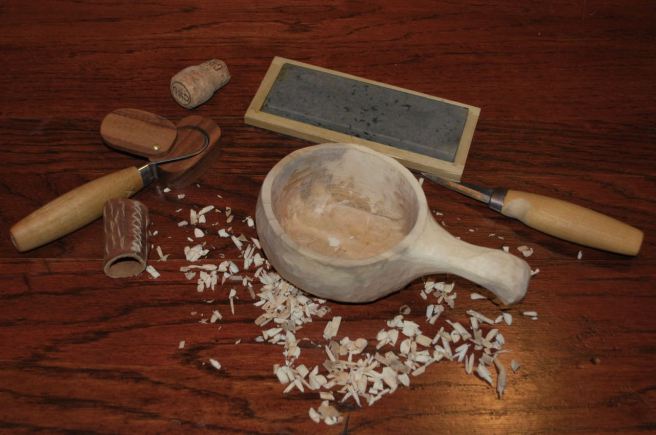
Finally, after stepping away from this little project for two months, I’m nearly finished with this wooden noggin cup. I set it down in despair early on when the block started to check along the radial grain. Luckily though, storing it in a moist bag seems to have saved the project and I was able to remove the cracked ends to reveal this little mug inside.
Canoe cup, noggin, kuksa, or guksi. Whatever you call it, it’s nearly done.
The walls might be a thinner than is really prudent but I believe that once the maple fully cures it will fairly stable wood. I knew of these as “canoe cups” from the historical references and their use by reenactors, but I’ve noticed that they have become very popular among the Bushcraft crowd the past few years. I’ve only made one large size cup like this (many years ago) but it wasn’t a thing of beauty and it is long since lost.
I can’t quite decide where to stop fiddling with it but it is essentially ready to use as is. If I remember, I will post another, better photo, when it is complete.
Greg, over at Hillbilly Daiku is always posting great stuff. There is too much good information out there and not enough time to take it all in while still leading a creative and fulfilling life so it takes me a while to catch up. I was just reading this excellent post about something dear to my heart; handmade music and cigar box guitars (CBGs). I am still a newbie in the low-tech, no-holds-barred world of this iconic American instrument but I am studiously working on my second one now.
My first CBG. Image links to description of the construction.
Not only is Greg a great woodworker and occasional philosopher but is quite gifted as an illustrator and draftsman as well. I suggest you get to his blog and peruse his fine work, starting with this post about how to build a cigar box guitar.
I don’t remember the first time I saw or heard a cigar box guitar. I’m sure it must have been on YouTube though. Like many of my projects, the seed was planted somewhere along the way and finally broke to the surface. So, what is a cigar box guitar? Well, it is exactly what it […]
My friend Bob sent me a link to an excellent video documenting the construction of a Spanish (i.e. Classical) Guitar. The man is obviously a real craftsman with a purpose-built shop and this is definitely not a one-off project. If you are like me and like to see how things are made, this half hour video will more than fill the bill. And there is a nice soundtrack to accompany the work. Sit back and enjoy.
Have any of you made your own musical instrument? Do you want to share the experience?

 I love these the old sheepherder camps. I’ve seen quite a few parked on ranches from Colorado to Idaho and even a few in Arizona. I know they aren’t highway capable but it seems they could provide a real housing alternative for low-income minimalists who have access to land. Far better than a housing complex or apartment for sure if you can deal with a small footprint.
 Originally designed on a narrow wagon box, the builders took advantage of every square inch of space. Since weight wasn’t really an issue, many have large stoves like the one above for heating and cooking. As most of these wagons were homes for ranch workers in the western U.S., they needed to be prepared for extreme cold and windy environments. When I was building my vardo, I took a fair amount of design inspiration from these wagons, adding their vibe to the more European designs I was ingesting. My stove is small and I envy this one above; at least the cook top.
 Off-the-shelf or build it yourself? It’s the details of hand-built structures that make them stand out and this chimney cap is no exception. This looks far more interesting to me than the local hardware store option.
 The photos are from Ken Griswold’s Tiny House Blog. If you haven’t figured it out yet, I’ve been a fan of his site for a long time now and recommend it for anyone with an interest in Tiny Homes. Here’s a link to the full article about Lorna’s wagon.