Here are some throwback photos from Ghillie shoe making classes from 2009 and 2011. The first pair is from a small class at the Bois d’Arc Rendezvous in southwest Missouri (note the lush green of late summer). Maybe not as sexy as the arrow-making class but it is a very real and useful skill. I have been honing the teaching method since I was taught how to fit and make these back in 1986.
One of the appeals this design has for many people is that they require very little sewing. If you don’t work with leather regularly, stitching can be intimidating. Some careful cutting and you can make some stylish shoes in a short time.
An hour of work and you’re ready to walk the world. More importantly, with the knowledge in your head you can always make more and keep right on walking.
These ratty old moccasins have spent a lot of time in the woods. These have been my winter moccasins for over two decades. I can’t remember exactly when I made them but it was a quick and dirty sewing job. They have been re-soled at least twice and need it again. The uppers are an oil-tanned leather I bought from a saddle and boot maker supply house I found while driving through north Texas. As can be seen, the tops can be worn up or down. They aren’t beauties but they are definitely ME.
A while ago I received a request to make a pair of carbatinae (ghillie shoes) for a reenactor. It was the first time I have done this long-distance without being able to measure the foot directly. Luckily, we had good communication and I had a shoe last in his size so with these factors and the fact that this style is a fairly forgiving fit, I was able to create something he was happy with.
Being constructed from 12 oz Hermann-Oak harness leather, these should last for a very long time if not worn extensively on wet concrete.
I really love the simplicity of this design and continue to learn and modify my technique with each new pair. With high quality commercially tanned leather, they can’t be made particularly cheap, but with high quality materials you certainly get what you pay for.
Very little sewing makes this shoe a fairly quick project to complete once the cutting is done.
This was the first time I used a last to make this type shoe but it was a big help in the forming stage.
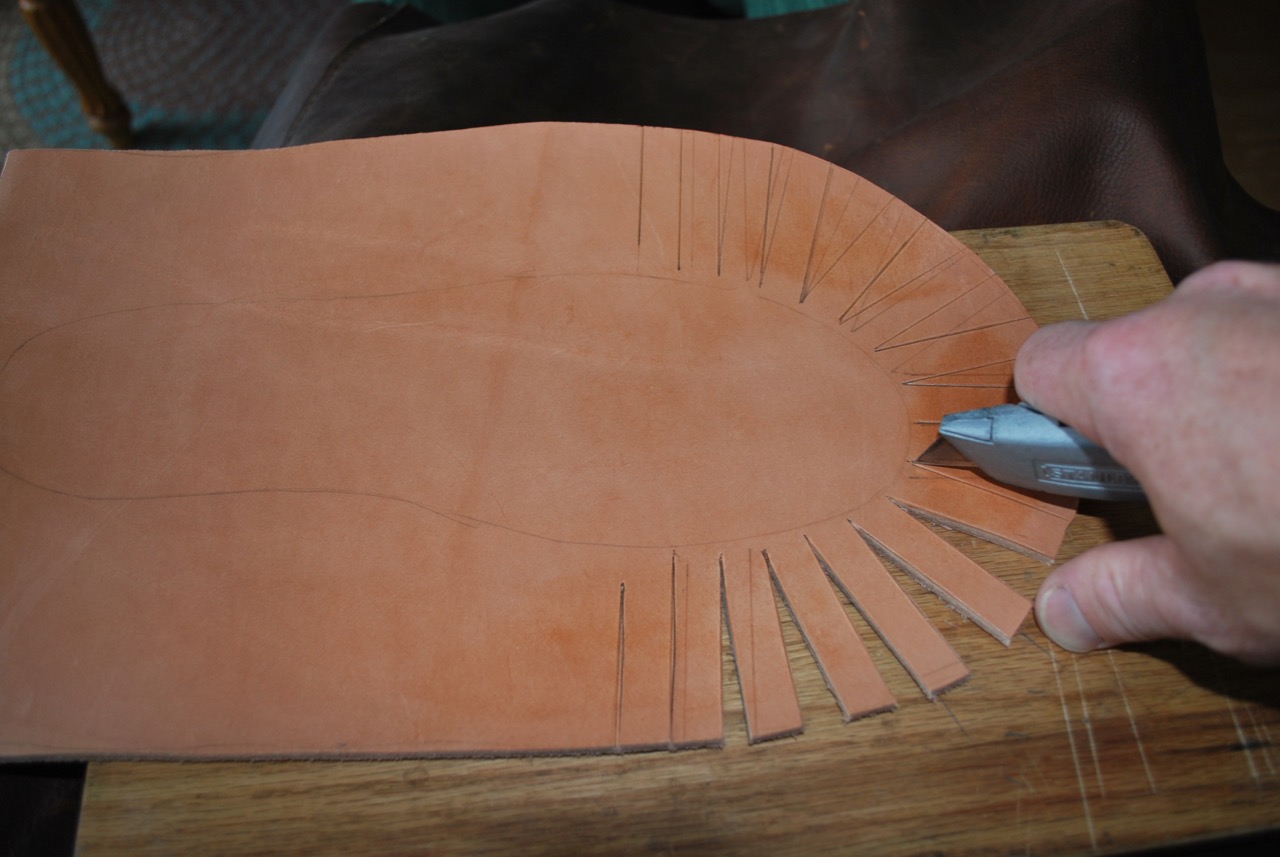
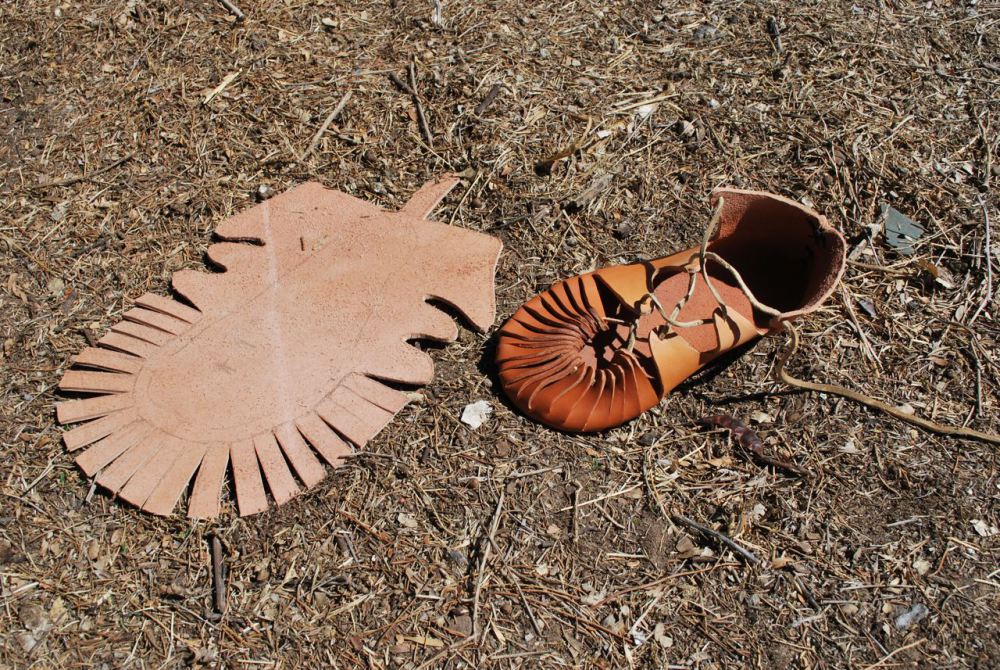
Setting the pattern and cutting them out is most of the battle.
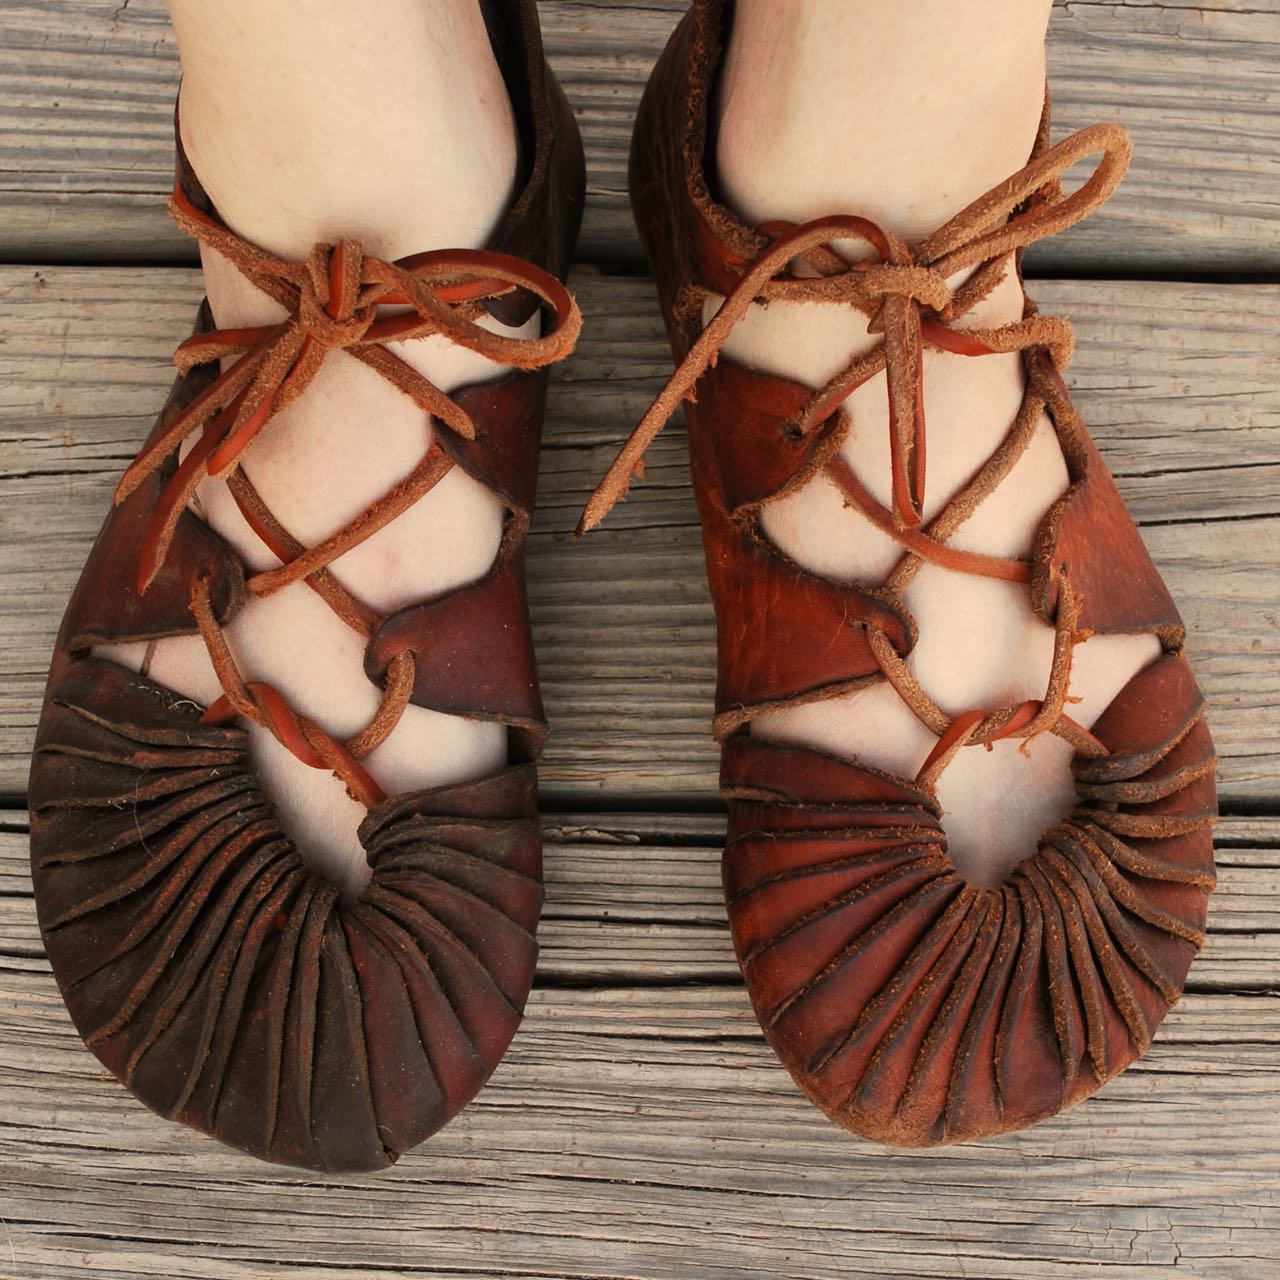
Once they’re broken in, they fit your foot like a leather stocking, allowing for a barefoot, but well-protected feel. I certainly like this shoe.
I’m re-sharing an older post of some experimental turnshoes I made quite a few years ago. These were based on some Scandinavian examples from the archaeological record. They came out pretty good for a first try. My only modification would be to tighten the width through the arch and lengthen the toe area slightly. I have since learned that this problem has been well-understood for centuries by shoe makers and is why modern shoe lasts often look long and narrow to the amateur eye.
Finally “finished” enough. These were rubbed down with a “tea” made from walnut juice, worn dry, and later oiled.
This was my first attempt at a proper turnshoe. Basically a variation on the shoes worn in Europe and parts of Asia from the Iron Age (ca. 500 B.C.) through the early modern times (ca. 1700s). This pair is made without a last (form) so construction is similar to other moccasin-type shoes. There are quite a large number of early shoes found in archaeological contexts in Europe so many designs are known. This is inspired by, but not slavish to, shoes found in the British Isles and Scandinavia in the early part of the last millennium.
I was sorry to not document the pattern making but, as can be figured, the upper is a single piece side-seam make by wrapping the foot, marking a rough outline of the plane where the upper meets the sole, cutting off the wrapping, and cutting to shape. Really, I’ll try to make record of this in the future but, for now, I suspect there are other tutorials out there. Besides sewing, the turning is definitely the toughest job as this was some very thick, tough leather.
Still damp from the turning and shaping.My slightly sloppy side-seam.
“The first rule of Project Mayhem is that you do not ask questions…”
this may be my new teaching mantra
I am considering calling my custom footwear “Mayhem Shoes” (at least until Chuck Palahniuk’s space monkey lawyers make me stop).
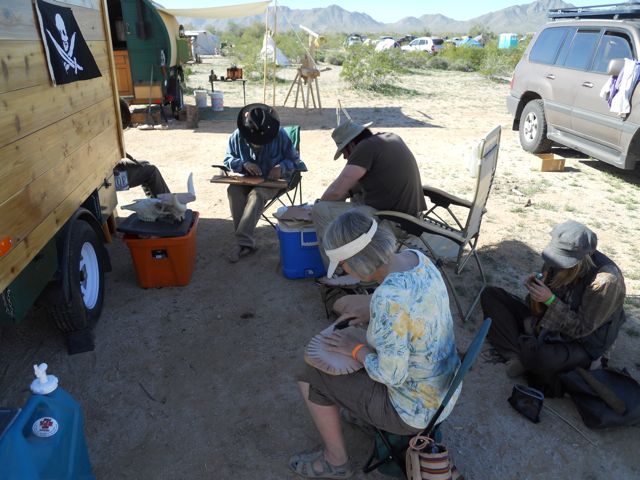
I teach a couple classes about low-tech shoemaking a few times per year in the primitive survival skills community. The designs I focus on are styles that can be made by one person in one day; a popular theme in early historic examples. Some require a lot of cutting, some require sewing. There is an off-grid, neo-Luddite attitude about making your own shoes. In fact, I think I will register the name Dystopian Leather Works as my new business. I’m considering a small business venture to go into custom production of the shoes I teach people to make as well as expanding the custom leather work I currently produce.
The author at work.A dedicated student finishes in a day.
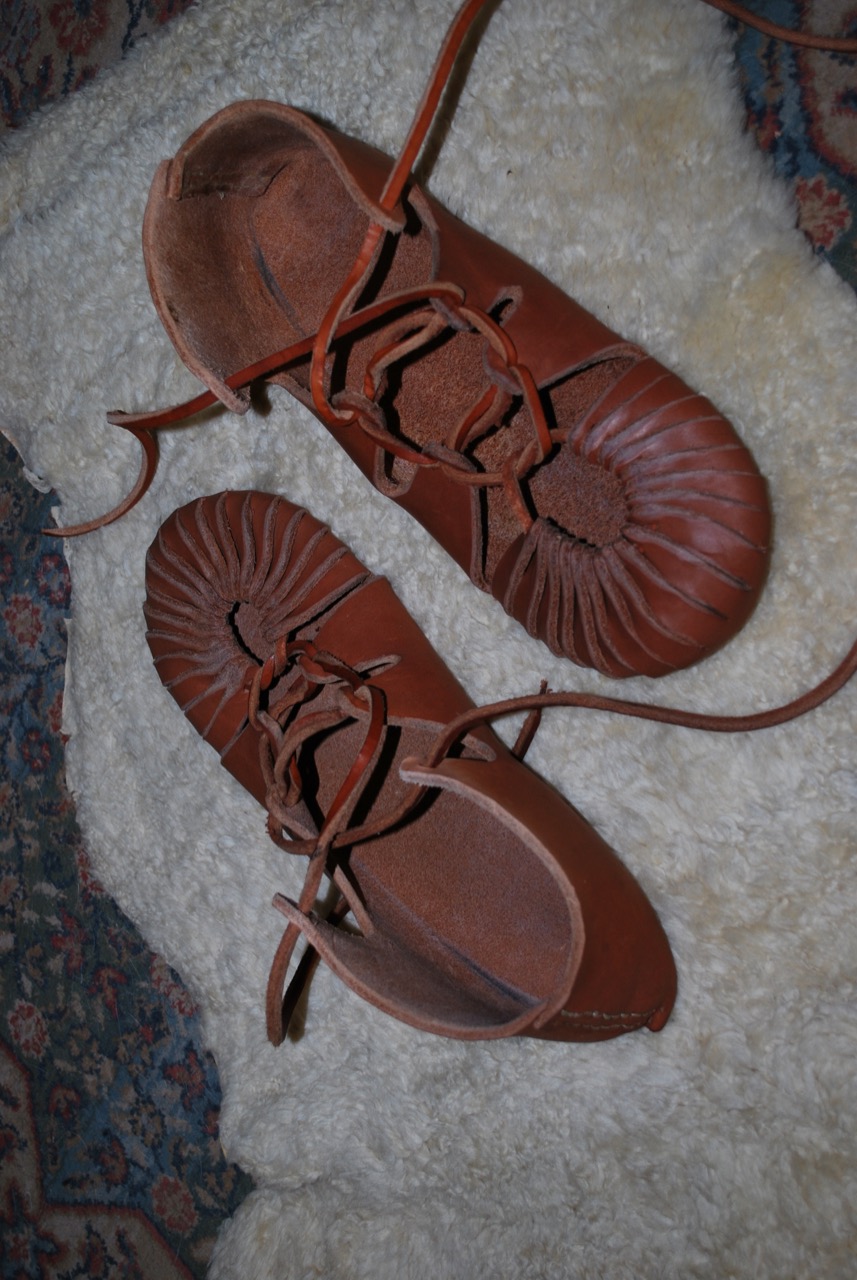
The kinds of people that take these classes are from all walks of life, not just survivalists, historical nerds, or experimental archaeologists, but folks who want to make things for themselves for whatever reason. I’m finding that there are others who might just want the handmade product without the labor of making them. In a day, an attentive student can produce a wearable (and good-looking) pair of serviceable shoes like the carbatina (ghillies) above.
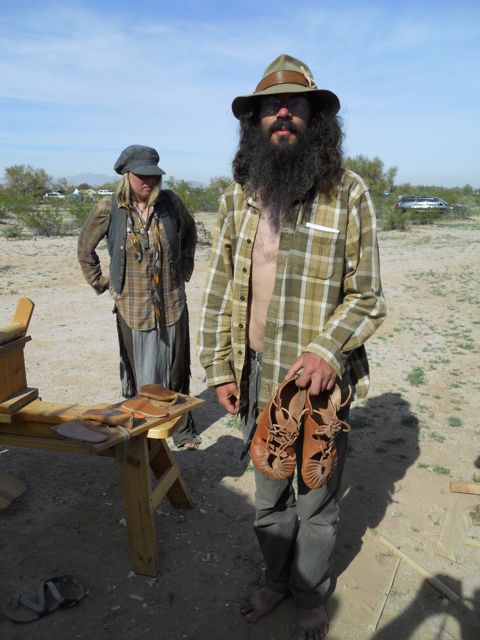
An experienced craftsman creating some new sandals in the class.Another finished pair.
For those looking for a more modern look a fine pair of sandals can be made with just a few hours, cutting and sewing. These are easily re-solable and should last the better part of a lifetime. Look familiar? Chaco and Teva didn’t exactly re-invent the wheel; just updated the materials and outsourced the work overseas. Even in the wilds of Canada, traditional ghillies can be a useful part of the wardrobe. Mike made these two years ago and they still protect his sturdy peasant feet.
As long as you can stick with it while safely using a knife, the class is a cinch.
There is something very satisfying about taking a piece of nondescript, vegetable tanned leather and creating a lasting and useful object with your own hands.
Attention to detail makes a fine finished product.
The beauty is truly in the details. Serious students often bevel and burnish edges to give their shoes a “finished” look, suitable for public wear.
A pair of saintly sandals nearing completion.
Above, a student trial fits the uppers before attaching the outsole. In my classes, the outermost sole on any of these shoes may be a durable Vibram material, a softer but grippy Soleflex, or natural leather. The latter option is popular with those who are interested in treading lightly on the earth or those who are concerned with earthing or grounding.
Learning as community. It is always a very social event to teach these courses. No matter the variety of backgrounds, we are sharing an ancient craft in common.
As in all leatherwork, neatness counts. A good hand with a knife is a great asset for shoemaking.
Test fitting the straps for buckle placement and strap length.
This style sandal may be tied or buckled but I have found that a 3/4″ center bar buckle is about the easiest to work with and adjust.
Bowing to modern convenience. For the classes, we use contact cement to adhere the insole, mid-sole, and outsole. This insures a good connection and will hold up even if the stitching doesn’t last forever.
The author demonstrates the wrong way to rough out a pattern. Cutting out oversize pieces for the sake of time-savings.
Tough rubber soles will make these sandals last years and are easily replaced.
Trial fitting a ghillie after soaking in water. They feel ridiculously thick and stiff for the first hour or two but tend to suddenly relax an become a part of the foot after a soak in neatsfoot oil.
Ready for taking part in the highland games or dancing at a cèilidh
Sometimes it helps in shaping to take a hammer to the leather when it is stiff and wet.
It is important to leave the channels free of glue so that the straps may be adjusted in future. You never know when you might need to wear some black socks with those sandals.
Helping a student skive out some particularly stiff areas.
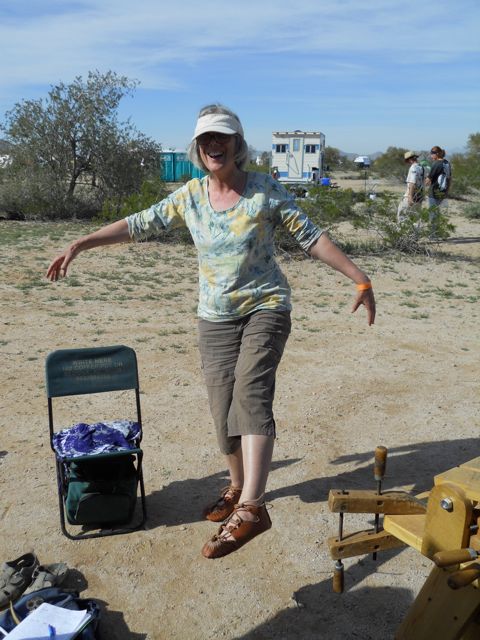
Mom tries on her new shoes before going home to make some for the whole family. Even an old shoemaker is interested in this ancient design.
Happy and diligent students show off their newest creations. These could be directly from the shoe store. But without the satisfaction of knowing you did it yourself.
Above are few photos from previous classes. Thanks to all who come and make!
Here’s a simple shoe design that was made by our ancestors before there were shoe shops or Zappos. Much of the Europe population, both male and female wore a variation of this for many millenia, right up into the early 20th century. They are commonly associated with their Celtic cousins in Scotland, Wales, and Ireland but they are essentially the same as the simplest Roman carbatina. Essentially, it’s a basic European shoe.
I made a set of these around 1986 with a little instruction from an Eighteenth Century reenactor and loved how simple they were to make. My experience up that point was with Native American style moccasins the difficulty I had with sewing in those days. This was a perfect option for me and I find that it is a popular class when I offer it as an introduction to leather working and moccasin making.
While this isn’t exactly a tutorial, it does provide the basic information necessary to get started on a pair for yourself. I would suggest a pattern to be cut from heavy cloth before diving into cutting valuable leather just to get the fit right. It’s a forgiving design so,
Don’t Panic.
pattern and finishedrear viewsewn heellacing the toeafter wetting and shapingdrying before oiling
And finally, six years later, they still function well. The soles are getting thin so it’s almost time to renew them. Fortunately, a pattern can easily be made and adjusted from the old pair by wetting them, letting them dry flat, and using that as a starting point.
“The first rule of Project Mayhem is that you do not ask questions…”
this may be my new teaching mantra
I am considering calling my custom footwear “Mayhem Shoes” (at least until Chuck Palahniuk’s space monkey lawyers make me stop).
I teach a couple classes about low-tech shoemaking a few times per year in the primitive survival skills community. The designs I focus on are styles that can be made by one person in one day; a popular theme in early historic examples. Some require a lot of cutting, some require sewing. There is an off-grid, dystopian attitude about making your own shoes. In fact, I think I will register the name Distopian Leather Works as my new business. I’m considering a small business venture to go into custom production of the shoes I teach people to make as well as expanding the custom leather work I currently produce.
The kinds of people that take these classes are from all walks of life, not just survivalists, historical nerds, or experimental archaeologists, but folks who want to make things for themselves for whatever reason. I’m finding that there are others who might just want the handmade product without the labor of making them. In a day, an attentive student can produce a wearable (and good looking) pair of serviceable shoes like the carbatana (ghillies) above.
For those looking for a more modern look a fine pair of sandals can be made with just a few hours, cutting and sewing. These are easily re-solable and should last the better part of a lifetime. Look familiar? Chaco and Teva didn’t exactly re-invent the wheel; just updated the materials and outsourced the work overseas. Even in the wilds of Canada, tradtional ghillies can be a useful part of the wardrobe. Mike made these two years ago and they still protect his sturdy peasant feet.
There is something very satisfying about taking a piece of nondescript, vegetable tanned leather and creating a lasting and useful object with your own hands.
The beauty is truly in the details. Serious students often bevel and burnish edges to give their shoes a “finished” look, suitable for public wear.
In progress photo with tools of the trade. The authors well worn sandals are on the left of the photo.
Above, a student trial fits the uppers before attaching the outsole. In my classes, the outermost sole on any of these shoes may be a durable Vibram material, a softer but grippy Soleflex, or natural leather. The latter option is popular with those who are interested in treading lightly on the earth or those who are concerned with earthing or grounding.
Learning as community. It is always a very social event to teach these courses. No matter the variety of backgrounds, we are sharing an ancient craft in common.
As in all leatherwork, neatness counts. A good hand with a knife is a great asset for shoemaking.
Test fitting the straps for buckle placement and strap length.
This style sandal may be tied or buckled but I have found that a 3/4″ center bar buckle is about the easiest to work with and adjust.
Bowing to modern convenience. For the classes, we use contact cement to adhere the insole, mid-sole, and outsole. This insures a good connection and will hold up even if the stitching doesn’t last forever.
The author demonstrates the wrong way to rough out a pattern. Cutting out oversize pieces for the sake of time-savings.
Tough rubber soles will make these sandals last years and are easily replaced.
Trial fitting a ghillie after soaking in water. They feel ridiculously thick and stiff for the first hour or two but tend to suddenly relax an become a part of the foot after a soak in the neatsfoot oil.
Ready for staling the game or dancing at a cèilidh
Sometimes it helps to take a hammer to the leather when it is stiff and wet.
It is important to leave the channels free of glue so that the straps may be adjusted in future. You never know when you might need to wear some black socks with those sandals.
Helping a student skive out some particularly stiff areas.
Mom tries on her new shoes before going home to make some for the whole family. Even an old shoemaker is interested in this ancient design.
Happy and diligent students show off their newest creations.
Above are few photos from previous classes. Thanks to all who come and make!
Tuxpan in Southern Jalisco is a small town well known for its Tacos “Tuxpenos” and less known for its unique Mid-Cut Huarache style.
That being nowadays said their is so little demand for the Tuxpan Huarache “Tejido con Talonera Alta” that it can only be made on to order by the only remaining Huarachero in Tuxpan, Armando Ortiz, whose other styles can also be seen in The Huarache Directory HERE
One of the many things taught at Winter Count this year was shoe making in the form of carbatina or ghillies. These are relatively simple shoes notable for their one piece construction and generally involve very little sewing. I am interested in how things are learned and for me, the process is more important than any other aspect. Hopefully, students take away some knowledge that they can apply beyond the class setting and in an afternoon can learn something that they can use for life.
Historical examples vary widely but tend to have a lot of similarity in the complex toe-cap. Shoes are a difficult piece of clothing and protection because the fit is critical and even minor problems with the shoe will impact the feet in a negative way.
The toe cap is formed by strips of leather overlapping which gives flexibility and room for expansion. The simplest forms are one piece but better versions are found with insoles and outer soles to extend the life and create a sturdier shoe.
These were all made from premium oak tanned leather (ca. 8 oz. or 3.2 mm) which proves to be tough to cut but provides a long lasting shoe. It was a great set of students in the classes and I think we ended up with 17 pair of shoes in the end.
An earlier post describing my journey into Ghillies can be found HERE.
It’s time for new shoes. After a soon-to-be-finished commission for a leather satchel, I intend to dive into a brogue-making project in the style of 19th century Ireland. This basic design certainly dates back much further than this as shown by archaeological finds in bogs throughout Europe. Don’t confuse these brogues with the more modern usage such as:
This is a brogue in the Scottish/Northern English semi-formal fashion with decorative holes reminiscent of the drains left in old field shoes. Nor is this to confused with the type of shoe that some modern-primitives call “ghillie-brogues” or more properly, just “ghillie”:
These earned their proper name from Scottish Ghillies; a term used to denote game wardens, hunting and fishing guides, and sometimes, even poachers. A simple shoe style that probably goes back several millenia in Europe.
What I decided to shoot for was a shoe that is relatively simple to produce, is closed for winter use, and can be regularly worn in public without arousing too much comment.
Haarlem, Netherlands, ca. 1300-1350.
To me, something like the “bird shoe” above is very cool but not really acceptable in an unforgiving office environment. I would gladly hunt elk in these but for some reason, modern work culture has a fairly standardized and limited uniform. This style tends to be cut from a single piece and sewn around three-quarters of the sole. This one is punch decorated, probably to show off the stockings inside, a sign of wealth. This is a form of “turn-shoe” or soft-sole sewn inside-out then “turned”. A sturdy high top 12th century Dutch example with a center-seamed upper is seen below. In my opinion, these would make a fine winter shoe.
12th Century center seam shoe from the Netherlands.
I can’t help but see the similarity between these and North American center-seam moccasins.
The style above is a well-documented Irish “Type 1” dating anywhere from the 1st centuries A.D. through the Middle Ages. A little more complex in construction, especially to get a perfect fit, it has been argued that these may be the result of craft specialization in the early Christian period of Northern Europe. I plan to make a pair of these and contemplate them as a possible design for teaching simple shoemaking. There is some real sewing involved, but not enough to intimidate most beginners.
From: Lucas, A.T. (1956). Footwear in Ireland. The Journal of the County Louth Archaeological Society 13(4).
For those who know American moccasin styles the pattern above seems very familiar as a one piece, side-seam shoe.
So, this brings us to the “Irish Brogue” or Type 5 shoe. These are known well up into the nineteenth century and I wouldn’t be surprised to find them in even more modern contexts, especially amongst the poorer populations. There are similar shoes depicted in Colonial America, probably made in the home for lack of money or access to a cordwainer.
Early American shoes from Newport, Rhode Island.
The above brogues appear to be a “built” shoe, having separate soles, multi-pieced upper, and a heel lift; the only difference between these and others from the period is the lack of ties or buckles. Although difficult to tell from the image, they are likely constructed similar to those below:
Lucas, A.T. (1956). Footwear in Ireland. The Journal of the County Louth Archaeological Society 13(4).
Hopefully, updates will soon follow to track the creation of a new pair of shoes.