Here are a couple of photos of the one I still think of as the “new horse.” It is made up of mostly recycled and scrap wood that I was hoarding for just such a project. More than ten years later, I am still quite happy with the size and design of this one. It isn’t perfect for everything, but what is? It has produced bows and darts, spears and walking sticks, and held dozens of other projects along the way. It is a sturdy saw bench and a nice place to sit and have a beer at the end of the day.
The bench itself is made of pine and fir dimensional lumber. The working portions are red oak, white oak, hickory, and popular. The large bolts are salvaged from an old Ford truck spare tire holder.
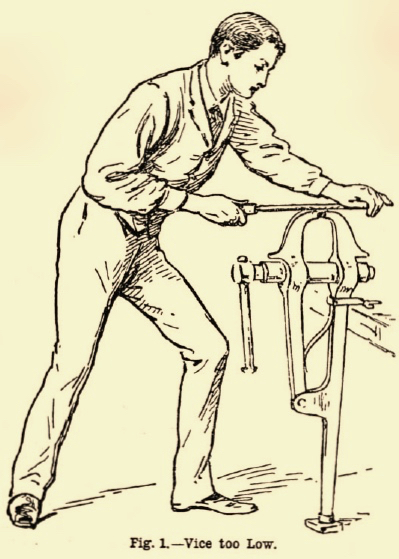
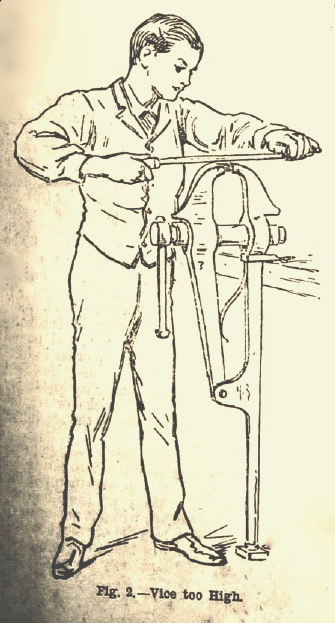
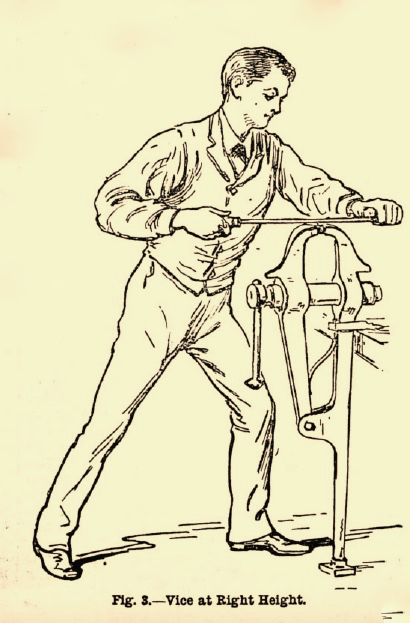
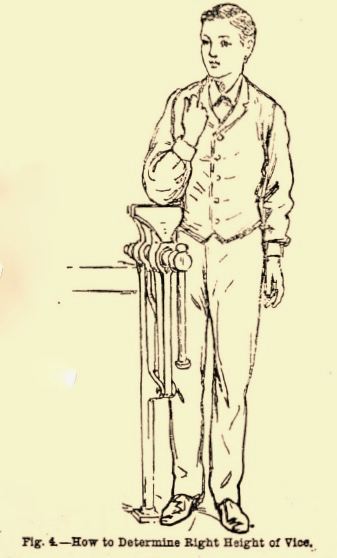
When setting up shop it is important to set your tools and surfaces to the optimal working height. Here is some advice for setting up your mechanic’s vise for best use.
I began version one of my Vardo Caravan eleven years ago this month. As I published updates and details along the way people have for a detailed “how to” for building a vardo. Since everyone’s needs, skills, and resources are different, I will leave the task to others. My suggestions are this. Decide on your basic design wants. Traditional or modern construction? Consider size and weight (I went for the minimum of both). Consider materials. This will determine construction technique. As for traditional or modern? Go look at some used RVs for sale and see how flimsy they are built; not to mention probable issues from toxins in the plywood, pressboard, adhesives, plastic veneers, etc.
Drink in as many details as possible about other wagons. Are they for show or can they take the hammering of bad roads? How do you think they will hold together in a wreck? What kind of long-term maintenance are you prepared to perform? This is why modern RVs are covered in sheet metal or plastic. If you convince yourself that you want to use materials others don’t, then ask yourself why. Are you building an RV that looks “old fashioned” or are you deciding to build with traditional techniques? (Neither is bad, but it may not be practical to mix and match).
Final sketch that built the Vardo.
Above is the written plan I used to create the Vardo. This is obviously not exactly how it turned out as changes were made based upon availability of materials and constant reconsidering of different options. The essentials didn’t change. This is how the arc of the roof was calculated and overall dimensions worked out. I chose to use traditional techniques and plywood only in the ceiling (for ease of building and stiffening the structure). Although glue is used in some areas, the structure depends upon screws and bolts in all critical areas. I decided I was willing to maintain my wagon so the exterior finish is simple oil paint over wood.
Sketch, sheet 2.
The second sheet of the plan was mostly used as a way to gauge sizes, raw materials, and habitable space. I didn’t really build from the sheet.
Figuring it all out.
This is just one of many sketches used to figure out space and arrangements. I looked at Irish Open Lots, Vardos, Bow Tops, and Sheepherder wagons. With so much experience out there, the best arrangements have been worked out many times over. Here’s the link to the rest of the photos from the build: https://paleotool.wordpress.com/plans-projects-and-patterns/the-vardo/
Study and read as much as you can about what you want to build. Make many sketches and plans. Cut out little scale paper dolls to measure out spaces if it helps.
This is a requested repost of a series I did almost five years ago when I took my eight foot single-axle vardo caravan and reconstructed it into a 12 foot body on a robust tandem trailer.
After adding up the mileage from the log book I keep with the Vardo, I see we have clocked over 21,000 miles since she was first put to the road in February of 2010. I have, no doubt, missed some small side trips and there are excursions I know I forgot to record, but this is, more-or-less, where we stand. The trailer frame itself was high-mileage but well-maintained when I acquired it back around 2002 having first been owned by a university, then by a private individual before coming to me.
My “before” photo. Rated at 2,000 lb. gross vehicle weight. It was solid and well-built but already showing some signs of age and life in the salt air of the Pacific Coast.
The real beauty of this trailer is the square tube construction and heavy-duty hitch. Starting small was wise for me as it constrained the build and forced me to squeeze every inch out of the design.
On the way to becoming the “after” photo. The full box body nearly done.
I eventually replaced the original jack with a more heavy-duty model and replaced the jack wheel with a large foot for stability. For safety, the tires were replaced when the trailer was re-purposed due to age, not wear. If you missed it and want to read more about the construction of the micro house we call a vardo, GO HERE.
The Vardo; Where are we now? What do we want?
This little living wagon is great and serves it’s function well. It’s a little beat up and showing it’s miles; living and traveling in all weather, a lot like it’s owner. But still, it’s a little homey shelter from the elements, providing all the necessary comforts, and making travel a breeze. With about 49.5 square feet of living space inside (4.6 sq. meters) it is spacious for one and comfortable enough for two adults who do most of their activities outdoors. However, I have long pondered placing my vardo on a longer trailer, either to gain cargo space for tools and the like OR to extend our living space. Sticking with the Minimalist thinking, I decided long ago that 12 feet was about the maximum I want in a trailer. With a standard 4 foot hitch that makes for 16 feet (4.9 meters) dragging behind the truck or about the length of a second truck. I did the math on the new space and I liked it.
So back to it. What do we really need?
Thinking of the many scenarios we find ourselves in, some added amenities could be handy in certain situations. From wilderness areas in Utah to posh campgrounds in San Diego, highway rest areas in the Midwest and museum parking lots in Santa Fe, or even stealth camping on a city street, our needs are varied. Although the vardo was built as a wilderness base camp, sometimes it feels like a miniature fortress or space station or temple of solitude. When we’re camping in the remote west, beyond the confines of civilization and snooping gawkers, it’s not a problem spending most of our time outdoors, using a campfire or cook stove to fry up some bacon and boil some coffee, but try that in a grocery store parking lot in the city and you will only find trouble. But we still essentially live outdoors. We don’t need a dance floor inside.
Two thing we want that this space can supply:
A simple kitchen. By this I don’t mean a Martha Stewart style, butcher block countertop with rotating spice racks, dual ovens and a six burner ceramic-top range. We need a dedicated space to store our cookware and food, do some prep-work, and make simple meals in any weather, beyond the prying eyes of the local gendarmerie.
Secondly, we want more storage space for our personal belongings when we finally hit the long open road and don’t look back. Tools for making things and raw materials alone take up a lot of our space. Leather, wood, sewing supplies, fasteners, etc. all require more space than we have. On top of this, a large, flat work surface would be a nice addition indoors.
After several (many) sketches and mock-ups… Voila! I think we nailed it, the vardo formerly known as the Snail reborn as Nautilus 78. Even though we know that nothing comes from nothing, our minds like to think of things as having a beginning, middle, and end.
So in that sense, here’s to our new beginning.
The new foundation. Tandem wheels, brakes, breakaway safety system, LED lights and 7,000 GVWR. Let’s hope we’ll never need this much trailer.
Too many badges, certificates and insignia. Still, and excellent buy I think.
First things first. The heavy wooden floor must go.
Every traveler has a campfire has the center of daily life. The hearth has been our home for 1.5 – 2 million years now. No wonder it fascinates us and brings so much comfort.
Nomads in a stationary culture are often tolerated at best and left only marginal space to congregate. This will probably never change.
These high-end vardos with fancy covers are probably “gentlemen travelers,” the antecedents to modern RVers.
Yes, I know that Traveller has two Ls in our title but since we’re looking at Britain and the Continent that’s how we’re spelling it.
Does this mean we should neglect our intellect? Absolutely not.
In fact, the opposite. We should strive to cultivate both mind and body to become the most perfect specimen we can become, daily.
I came across this passage while reading a bit this morning from Amateur Joinery in the Home (1916) by George and Berthold Audsley and thought it would be worthwhile to share.
There is a lot of good advice here but the above sentences stuck with me while taking the morning walk. “One never knows when life or limb may depend on the expert use of the hand and ordinary tools.” This could be applied to so many facets of an interesting life and is the basis of human survival that has put us where we are for a million years.
I have been using the down time afforded us by the events of 2020 to catch up on an ever-growing list of books and articles I have been amassing for decades. When I was working in archaeology full-time, the hundreds of pages of reading most weeks necessary just to keep current pushed many other interests into side avenues. I hope you all are using your time in a way that works well for you. In the mean time, this book is available for anyone with an interest in tools and working with their hands. It may even inspire new projects.
Well this is exciting. I got interviewed at winter count near Florence, Arizona back in February.
It’s heavily edited from a much longer discussion but I don’t think I sound too stupid here talking about the Vardo. The interview is very close-up and tight but you can get a feel for the interior layout. There is a lot of good stuff on the Cheap RV Living website and I’ve been a reader for a very long time. Check it out.
Here’s another small project happening amidst all the “real work” that needs to get done during this quarantine.
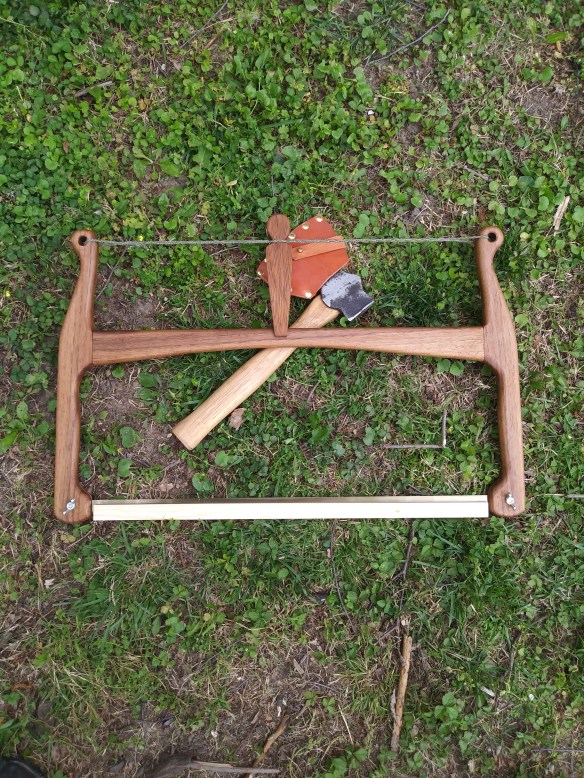
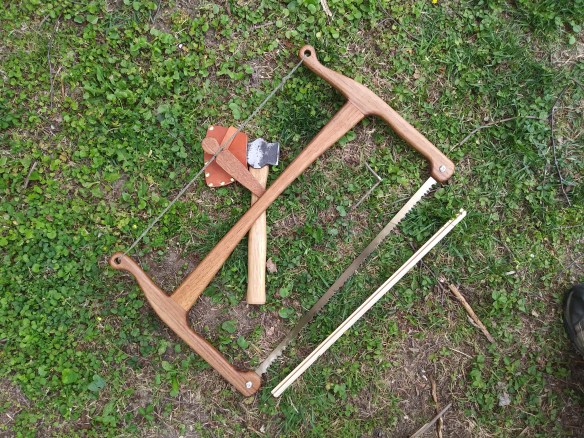
24 inch frame saw made from Missouri grown walnut. The “hanged man” style flapper is a scrap of mahogany from some repurposed shelves. The sheath here is pine.
I seem to sell or occasionally give away the saws I make. I needed a new one. The last one went into the Winter Count raffle as the prizes were looking a little scant this year.
I went into the workshop without much of a specific plan but came out with this little gem. Just a matter of removing the unnecessary bits really.
Finally, the pin sheath is stained and a canvas quiver is made to cover the saw when broken down for travel. This one is from old,, heavyweight canvas salvaged from a truck tarp. It will all fit into a neat 24 inch bundle.
I want to keep this one but after inquiries rolling in, it may go into the shop (or another just like it).
Be Safe!
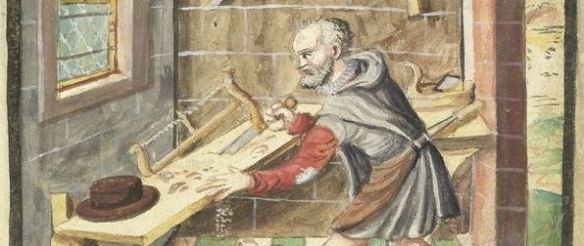
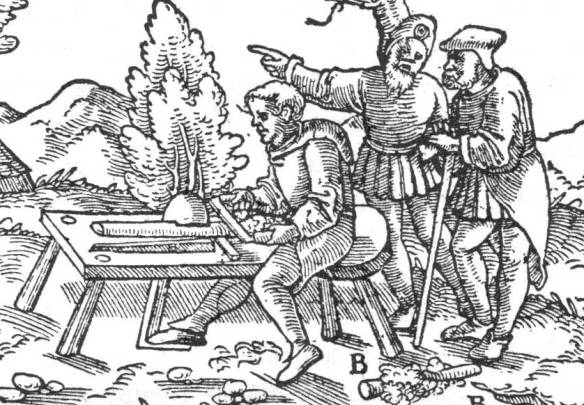
For your enjoyment: a Carpenter from 1589, Mendel Manuscript.
For bow makers and other wood crafters…A shaving horse is an invaluable tool if you create or work with odd-shaped objects that are otherwise difficult to clamp or need to constantly move around.
This simple horse was created in a morning from a large oak branch blown down in a storm and a couple spars from recent clearing.
I don’t know how I would get half my projects done without one. A horse, in combination with a small bench or two of the same height can act as a complete workshop that is reasonably portable and adaptable. Carpenters, furniture makers, coopers, shoemakers, jewelers, and carvers all have their specific designs and no one type will be the best at everything. Some need to be very adjustable, while others have a very fixed purpose. With a little patience, planning, and luck a great horse can be built for cheap or free with just a very few tools.
A Cooper’s Horse.
I’ve collected few images of shaving horse (a.k.a. work horses) images and show some I created over the years. If you are looking for inspiration or information on designing one for yourself, these should give an adequate starting point. I wish I had photos of my very first horse but unfortunately, it existed at a time when I seem to have taken very few photos of my own projects and the internet wasn’t much of a place for sharing this sort of thing.
Click the image to learn what this peasant is making.
In the old days of pre-internet (some of you may recall this with me) there was very little information floating around about these simple but nifty devices. People like Roy Underhill (The Woodwright’s Shop) and Drew Langsner (Country Woodcraft) had them. I recall seeing them rotting in yards in the Ozarks or slowly decaying in the back of family barns as a kid. While researching them later, the one consistency I discovered was the complete lack of consistency on their size, shape, height, length, or actual use. Obviously, every bodger, tinker, and shingle maker had his own ideas and was probably limited by material availability. This ancient tool is as unique as each builder.
“Goodman identifies the (above) relief as a cobbler making a wooden last sitting astride a small bench (‘horse’). The workpiece is held firmly on a sort of anvil by means of a strap passing down through the bench top, and held taut with his left foot. (Photo: Goodman 1964, p. 184, Museo di Civilta Romana, E.U.R., Rome. Reproduced without permission citing fair use).”
While my first horse was designed primarily around dimensional lumber found in my shop an it’s ability to fit cross-ways in a truck bed (F-150) with ease, it was perfectly functional for what I needed; primarily for shaping bows but also for carving things like spear throwers and tool handles. Experience and use taught me the good and bad points about this model and the result has been these better and later designs…
This was a good horse designed for the bowyer. Hickory arm and head, poplar cross-stretchers and a long, adjustable-tilt table to accommodate a wide variety of bow stave thicknesses.
Another of similar design. The base is the same but is has a square head and wider treadle to use easily with either or both feet.
A horse in use. This is how they are best seen. I actually stopped tillering for a moment to take an “action” photo in the old shop.
Here is another action shot fixing the tiller on someone’s bow at Winter Count several years ago. I wouldn’t normally have a giant, heavy stave leaning on the horse but the photographer insisted on it for some reason. I was just hoping it wouldn’t bean me with a very sharp draw-knife in my hand (hence my switch to the rasp for the photo).
This is not my herd but that of a fellow bowyer.
Here are a few others I encountered at a bow making class in the Midwest several years ago. I liked the simplicity of these made for teaching new bowyers at the Bois d’Arc Rendezvous hosted by FirstEarth. You could make one of these with nothing but a few well-chosen scraps and a few bolts.
And my personal favorite…
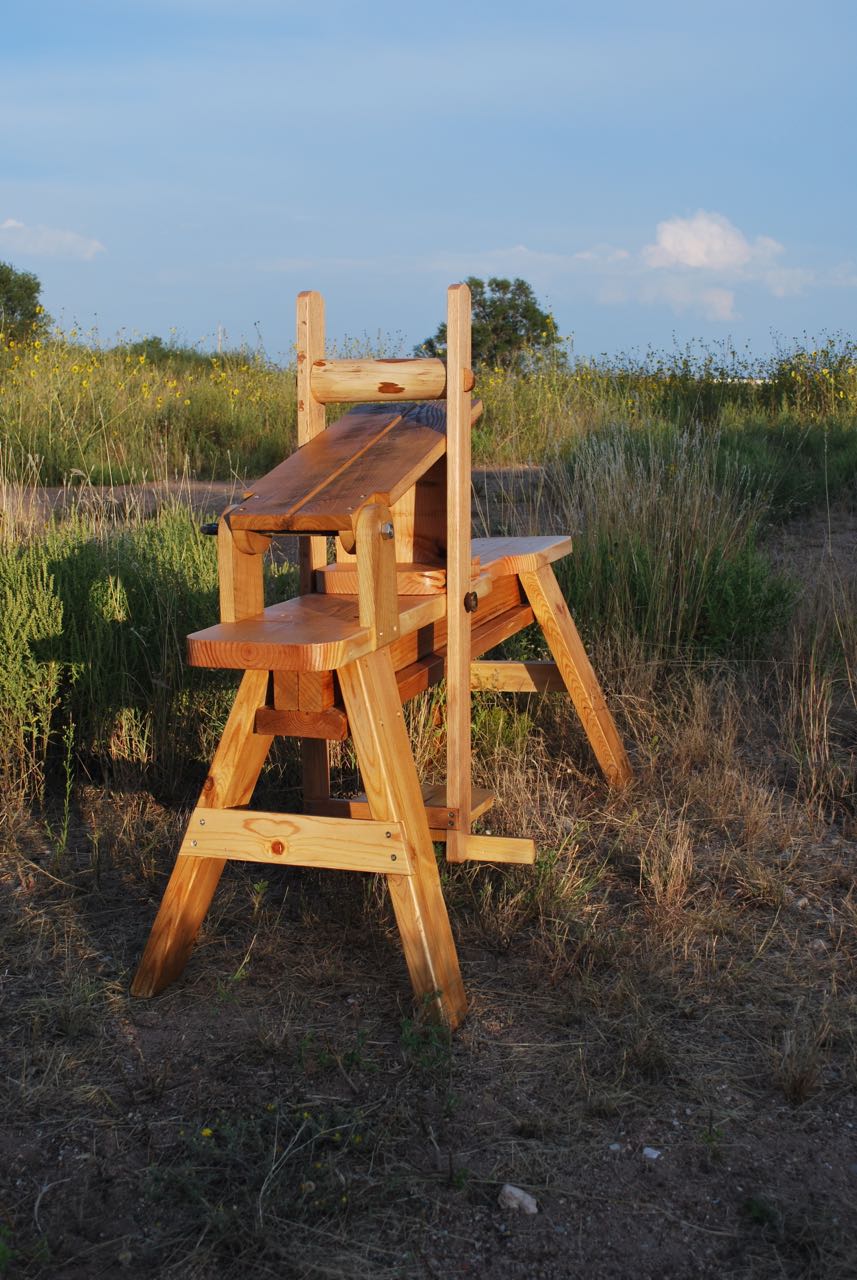
This design was kept as short as possible for transport while still being practical. The cross bolt where the arm hinges is a salvaged from an old truck spare tire holder.
A higher, more ergonomic table and a large treadle area make this one more practical for me.
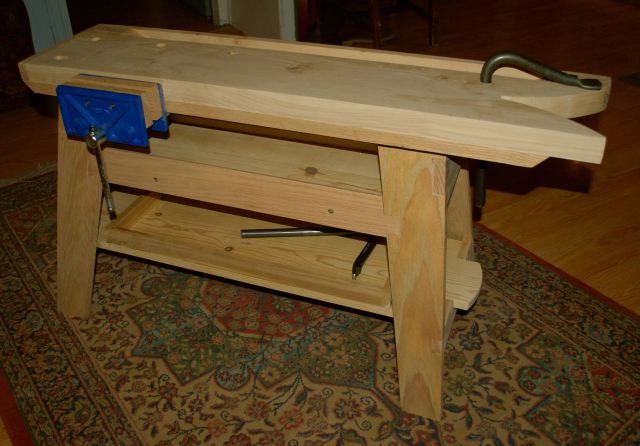
Finally, the horse above has been my more-or-less permanent workstation for the last few years and has traveled many miles around the western U.S. Used in conjunction with a small saw bench (built Winter 2015), I have a very complete work setup that packs into the bed of the tiny Toyota pick-up.
Click the image for more information about this project.
With all the gentrification of woodworking that has grown out of some fine blogs and books of the past few years I think it’s important to remember the roots.
Bench hook and tools. The holdfasts store in the legs so that they are always handy.
Not everyone needs to own every tool, jig, or gizmo… nor should we want to.
Few amateurs can have an enormous, dedicated work space surrounding a one-ton French-style Roubo split-top workbench, nor will he need one. Once you figure out what you want to create, then the tools can follow as needed. Sometimes, the big projects can be goals for the future.
The sawbench in operation with a few years, many projects, and a lot of miles on it.
If you are in need of a sturdy place to work, a portable setup that includes a saw bench and a shave horse will really improve your life.
I’m happy to say that I will be heading to the annual primitive skills gathering known as Winter Count down in the Sonoran Desert. Thankfully, it has moved to a more remote location further into the desert and far away from the Phoenix sprawl.
I will be teaching a course that I have been doing for some time now; Constructing the Ancient Frame Saw. I say “ancient” because this style saw goes back to the very beginning of metal working. It is a way to create an extreme amount of tension, and thereby stiffness, on a very small piece of metal; saving on a very precious resource.
Even though this, in essence, can be thought of as a one-off craft project. I hope that people will take time to learn the skills and take away more knowledge than a simple material good.
I think it might be easy, at first glance, to think of a project like this as a cheap way to get something that you might not be able to afford otherwise; and that is fine. However, learning basic skills like layout, simple joinery, and the use of hand tools are transferable skills that can be used for a myriad of other projects; from constructing a spear-thrower to timber frame building. There is even plenty of opportunity to add one’s own style and artistic flare to the project. Learning to operate even a few simple hand tools, edges and wedges in this case, connect your brain to your body in a way that pushing buttons and looking at screens could never do.


 A shaving horse is an invaluable tool if you create or work with odd-shaped objects that are otherwise difficult to clamp or need to constantly move around.
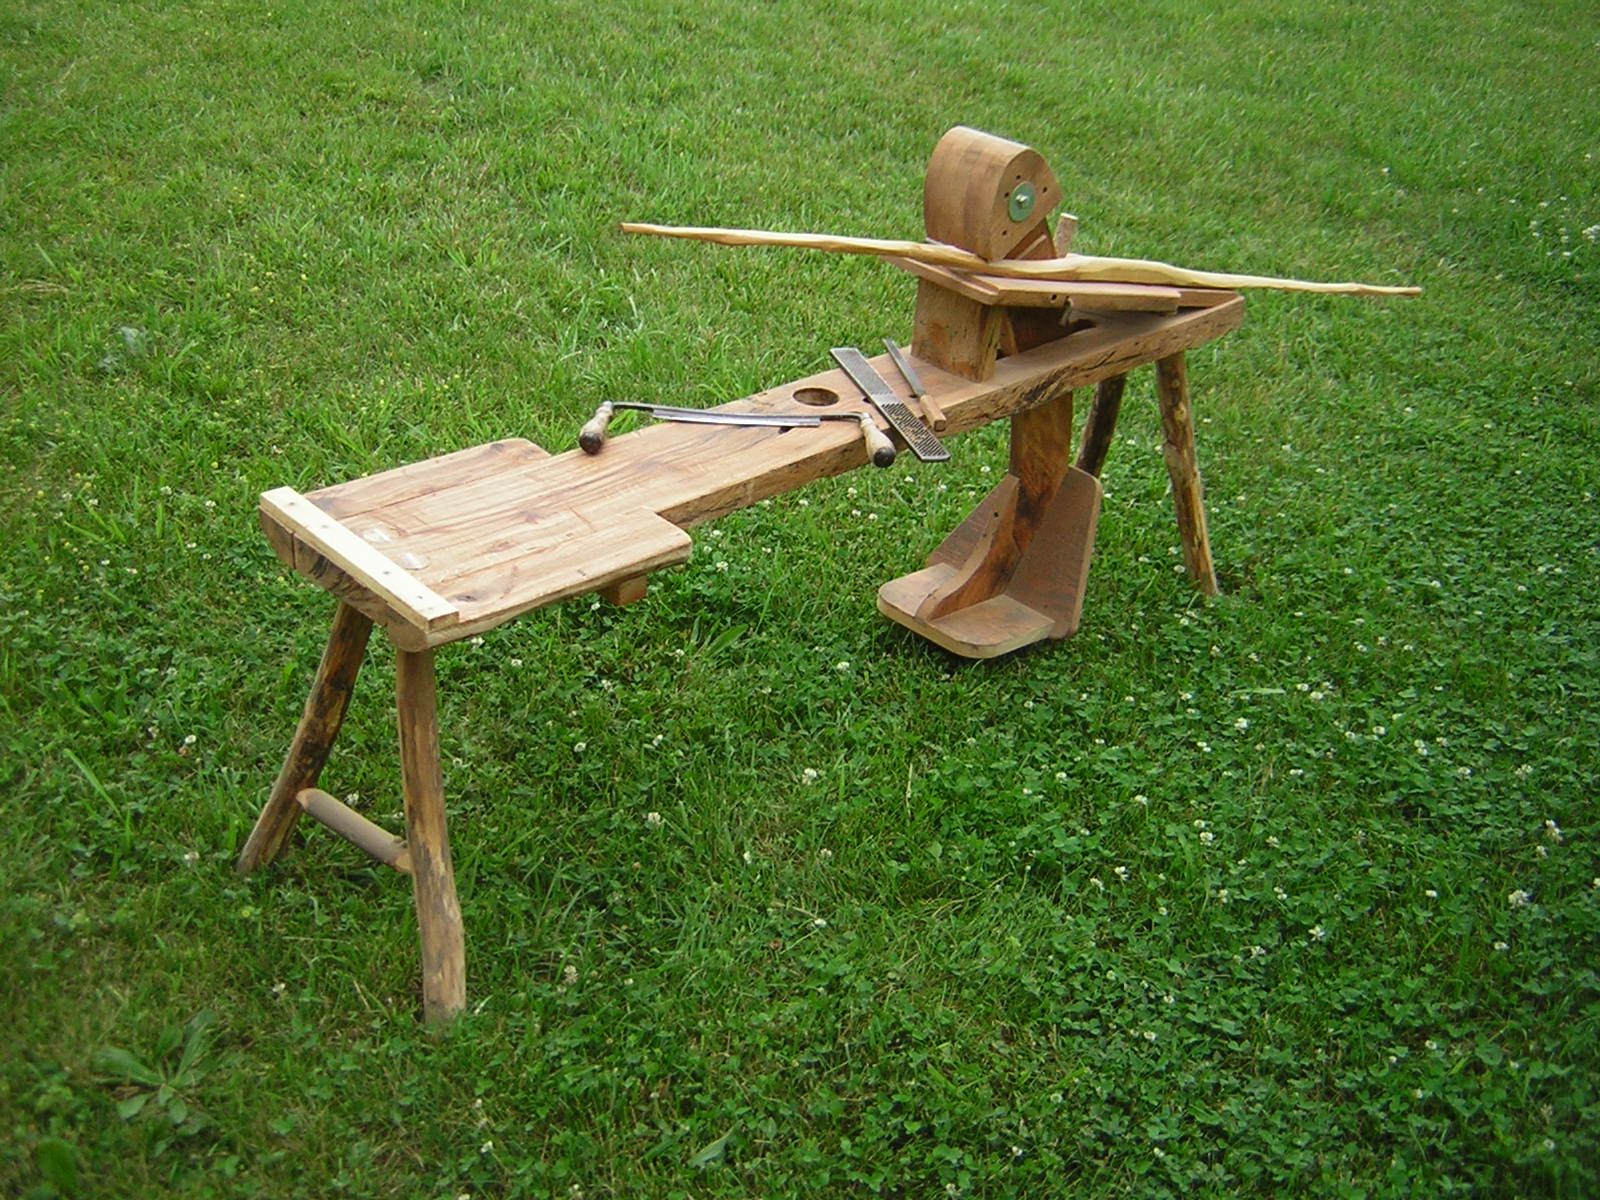


 Here is another action shot fixing the tiller on someone’s bow at