Sandals of the New Kingdom, Egypt (1550 – 1070 B.C.)

Some shoe solutions from the Bronze Age, North Africa.

SandalMaker
This image is virtually a sandal pattern ready to be made.

Sandal maker – New Kingdom, 18th Dynasty from Thebes ca. 1504–1425 B.C.  

Like a Diderot illustration this gives a good insight to the workshop of an artisan with the essentials of his trade.  There’s the stool, which is useful in leatherwork as it gives a good lap to work on.  A beam, probably implying that the leather is made on-site.  A couple of awls in handles are shown and what is probably a curved awl, made from antelope horn, useful when weaving leather (my speculation based on huaracheros and other traditional weaving tools).  The sole of the sandal looks to be leather and is being punched with the awl.  Other sandals are made from fiber, probably by a different artisan specialist, while burial sandals were likely a specialty industry and are often made from wood or precious metals.

Sandals2

Papyrus fiber sandals.  Second Intermediate Period–Early New Kingdom, 17th-18th Dynasty, Thebes ca. 1580–1479 B.C. These are constructed using a coil basketry technique which involves wrapping a soft fiber around a thicker, linear element while “sewing” into the adjacent coil.

Sandals

Papyrus fiber sandals.  Second Intermediate Period–Early New Kingdom, 17th-18th Dynasty, Thebes ca. 1580–1479 B.C.

SandalsRed

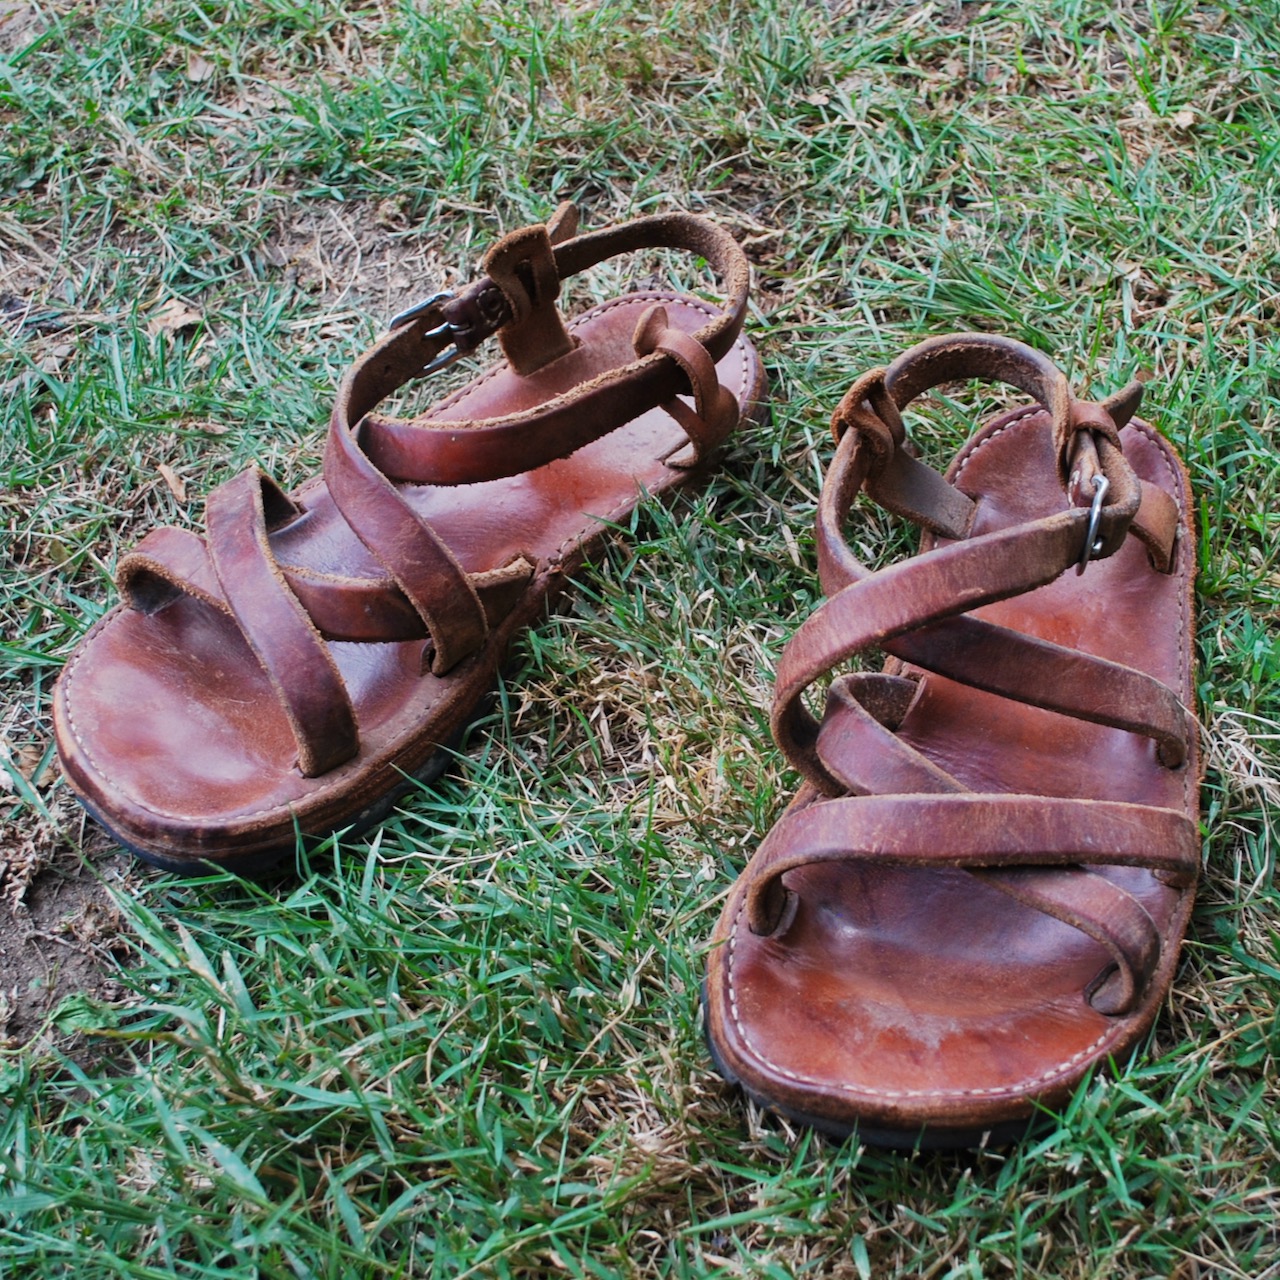
Red ochre stained calfskin leather sandals.  New Kingdom 18th Dynasty during the joint reign of Hatshepsut and Thutmose III ca. 1473–1458 B.C.  These are interesting as they are tooled to look like woven sandals.  The leather might be harder-wearing but the woven style may have denoted more wealth (i.e., flimsy shoes equates to more wealth or less need to labor).  A very simple design used for thousands of years and well-illustrated in the sandal maker panel above.  This is a good survival sandal that could be made quickly in the field from many materials today.

two pair

SandalsAu2

Finally, a couple pair of golden burial sandals (women’s) from Thebes, New Kingdom 18th Dynasty during the reign of Thutmose III ca. 1479–1425 B.C.  Note the embossing to imitate stitching.  A simple design that could be made up in a very short time.

SandalsAu

All of the above images are from the Metropolitan Museum of Art, New York and clicking any of the photos will take you to the appropriate page for the artifact.  I chose these sandals as I believe the best survival solutions are tried and true and generally exhibited in the archaeological record if the material survives.  Make yourself a pair of shoes.  With a little practice, basic footwear can be made that is serviceable and fit for public wear.  Our ancestors did this for thousands of years, we can too.

Handmade Sandals

Sandals in progress…

If you have ever taken a class with me you might know that all the intimidating sewing isn’t as bad as it looks.  The sole is three layers thick but the use of a good, sharp awl makes the double needle sewing go quickly.  A lot more work goes into these than I would have initially thought but I really think they come out great in the end.  It took several pairs to get the pattern just right but research into design and construction led me to this final design.  The sole is three layers thick (or more historically) and have been made this way in Europe and North Africa for more than 2,000 years.

The thickness of additional layers isn’t just to provide safety for the feet but the central layer provides a path for the straps to travel through without lumping under the feet.  The parts consist of an insole (medium weight oak tan leather), mid-sole to allow tunneling the straps through, and an outer sole, in this case, leather.  The straps are 48″ per foot plus the heel yoke.

This is how they looked when I thought I was finished. Shortly after, I added buckles and have since been through a few more soles. Currently they are shod with rubber.

Nine years on and still going strong. The patina that good leather takes on cannot be simulated. They get a coat of dubbin every six months or so but otherwise, need little care. I hope to get back to a time when I can wear them daily again.

Sandals

This post came from looking through a few class photos from Rabbitstick several years ago based on an inquiry. This is one of the years I taught my favorite sandal design, an ancient one though still cleverly marketed as a modern style.

I call them saint sandals as they look like something you would see on a medieval depiction of some holy wanderer from Europe or the Middle East.  To me, these are the greatest sandals I have ever owned.

This design is a good introduction to leather working and specifically, making footwear, which can be a bit more complex than most people know.  Shoes really need to fit well in order to not cause pain or damage to the feet so an open design is a good way to start on this craft.

As I make them, the sewing is fairly minimal and can be eliminated entirely with the use Barge Cement.  The sewing makes them a stronger design and I think adds a sense if beauty and craftsmanship to the final product.  It is also a good introduction to double needle saddle stitching.

With a little dedication, these can be made in a long half day and are ready for use immediately.

Thank you to all the patient students who have learned this and taken home to teach others.  I look forward to this class each time I offer it.

Dép lốp or “Ho Chi Min” Sandals

I was looking up a link for someone and rediscovered the video today showing how to make tough and durable sandals from discarded tires.  This style is well-known in Southeast Asia, particularly in poorer areas.

https://photos.travelblog.org/Photos/20411/111103/f/749561-viet-cong-made-sandals-from-truck-tyres-1.jpg

If you are interested in sandal-making, you can hardly go wrong with this design if you have access to old tires.  I suggest watching the video if only for the remarkably sharp knife this maker is using.  Using tire material is a little heavy but will truly last a lifetime.  The straps fit purely by friction so they are continuously adjustable while the waterproofness of the material makes them perfect for the wetlands and jungle.

I understand this style was created in the 1940s when old tires became abundant and some creative shoemaker had a Eureka moment.  There is also a short write-up on this style on the always interesting Huarache Blog if you are seeking more information about this shoe.

Another step toward self-sufficiency and off-grid knowledge for the Mayhem Shoe Collective.

Learning by Replication

I study the technology of prehistory.  Because of this, I believe strongly in the benefits of experiential archaeology.  It gives perspective on a very deep level.  We can walk in the shoes of our ancestors, so to speak.  I say experiential here not experimental and I’m glad to hear this word coming into the dialog of other primitive technology people.  While not trying to dwell on the words themselves, it is an important distinction.  Experimental generally implies the ability to replicate an actual experiment (i.e., testing a hypothesis to see what you find).

https://paleotool.files.wordpress.com/2011/06/dsc_0227.jpg
Experimental pottery; gathering materials, construction, paint, and firing.  Click the image to see more about this project.

True experiments are things like:

  • Can a tree be cut down using an exact replica of a prehistoric axe?
  • Is it possible to move a ten ton stone over long distances using only the technology and manpower available in the Neolithic? 
  • Can fire be made by rubbing sticks together? 
  • Will a Medieval arrow penetrate 14 gauge armor plate?

You certainly gain the experience through these experiments but you are also testing something specific with something like a yes or no answer.  Experimental archaeology can create some popular misconceptions as well.  Just because something could be done, doesn’t mean that prehistoric people must have done it that way.

Replicated woven sandals from the Southern High Plains and the greater Southwest.  Produced from narrow-leaf yucca.
Replicated woven sandals as found on the Southern High Plains and throughout the greater Southwest. Produced from narrow-leaf yucca (by Stacey Bennett).

Experiential archaeology integrates this and everything else learned along the way.  E.g., How comfortable are these shoes, is there more or less back pain using a tump line on a pack, what kind of wear can be expected on arrow fletchings over time?  This allows us to ask even more questions and have a fuller knowledge of ancient peoples.

DSC_0037
Testing silk lashed goose feather fletching. Clicking the image links to bamboo arrow making.

I really enjoy the various directions replication takes the maker.  Learning the finer points of cutting and scraping with stone flakes or abraders, working with antler and wood, creating glues and mastics, and developing an appropriate paint or sealer as on the spear thrower below.

DSC_0001 (9)
Upper Paleolithic-style spear thrower.  Image links to the “how to” for making this thrower.

Whatever you do and whenever you learn, it’s all good.

Mayhem Shoes for the Dystopian Survivor

“The first rule of Project Mayhem is that you do not ask questions…”

this may be my new teaching mantra

I am considering calling my custom footwear “Mayhem Shoes” (at least until Chuck Palahniuk’s space monkey lawyers make me stop).

I teach a couple classes about low-tech shoemaking a few times per year in the primitive survival skills community.  The designs I focus on are styles that can be made by one person in one day; a popular theme in early historic examples.  Some require a lot of cutting, some require sewing.  There is an off-grid, neo-Luddite attitude about making your own shoes.  In fact, I think I will register the name Dystopian Leather Works as my new business.  I’m considering a small business venture to go into custom production of the shoes I teach people to make as well as expanding the custom leather work I currently produce.

DSC_0111
The author at work.

DSC_0156
A dedicated student finishes in a day.

The kinds of people that take these classes are from all walks of life, not just survivalists, historical nerds, or experimental archaeologists, but folks who want to make things for themselves for whatever reason.  I’m finding that there are others who might just want the handmade product without the labor of making them. In a day, an attentive student can produce a wearable (and good-looking) pair of serviceable shoes like the carbatina (ghillies) above.

DSC_0100
An experienced craftsman creating some new sandals in the class.

Another finished pair.

For those looking for a more modern look a fine pair of sandals can be made with just a few hours, cutting and sewing.  These are easily re-solable and should last the better part of a lifetime.  Look familiar?  Chaco and Teva didn’t exactly re-invent the wheel; just updated the materials and outsourced the work overseas.  Even in the wilds of Canada, traditional ghillies can be a useful part of the wardrobe.  Mike made these two years ago and they still protect his sturdy peasant feet.

DSC_0082
As long as you can stick with it while safely using a knife, the class is a cinch.

There is something very satisfying about taking a piece of nondescript, vegetable tanned leather and creating a lasting and useful object with your own hands.

DSC_0081
Attention to detail makes a fine finished product.

The beauty is truly in the details.  Serious students often bevel and burnish edges to give their shoes a “finished” look, suitable for public wear.

DSC_0092
A pair of saintly sandals nearing completion.

Above, a student trial fits the uppers before attaching the outsole.  In my classes, the outermost sole on any of these shoes may be a durable Vibram material, a softer but grippy Soleflex, or natural leather.  The latter option is popular with those who are interested in treading lightly on the earth or those who are concerned with earthing or grounding.

DSC_0089Learning as community.  It is always a very social event to teach these courses.  No matter the variety of backgrounds, we are sharing an ancient craft in common.

DSC_0087As in all leatherwork, neatness counts.  A good hand with a knife is a great asset for shoemaking.

DSC_0086Test fitting the straps for buckle placement and strap length.

DSC_0084This style sandal may be tied or buckled but I have found that a 3/4″ center bar buckle is about the easiest to work with and adjust.

DSC_0104Bowing to modern convenience.  For the classes, we use contact cement to adhere the insole, mid-sole, and outsole.  This insures a good connection and will hold up even if the stitching doesn’t last forever.

DSC_0119The author demonstrates the wrong way to rough out a pattern.  Cutting out oversize pieces for the sake of time-savings.

DSC_0118Tough rubber soles will make these sandals last years and are easily replaced.

DSC_0137Trial fitting a ghillie after soaking in water.  They feel ridiculously thick and stiff for the first hour or two but tend to suddenly relax an become a part of the foot after a soak in neatsfoot oil.

DSC_0136Ready for taking part in the highland games or dancing at a cèilidh

DSC_0134Sometimes it helps in shaping to take a hammer to the leather when it is stiff and wet.

DSC_0130It is important to leave the channels free of glue so that the straps may be adjusted in future.  You never know when you might need to wear some black socks with those sandals.

DSC_0131 DSC_0133Helping a student skive out some particularly stiff areas.

DSC_0154Mom tries on her new shoes before going home to make some for the whole family.  DSC_0139Even an old shoemaker is interested in this ancient design.

DSC_0180  DSC_0178 Happy and diligent students show off their newest creations.  These could be directly from the shoe store.  But without the satisfaction of knowing you did it yourself.

DSC_0176

Above are few photos from previous classes.  Thanks to all who come and make!

Save

Save

Simple but Ingenious

Tying your own shoes –

Before looking at the ethnographic literature I experimented with tying up some simple sandals with mixed success.  It turns out that it’s not as simple as one might think.  Now I’m a connoisseur and am always making mental notes when I see old depictions, or in the old world, images on statues.  For simple, soft lace sandals, the Tarahuamara style works perfectly.  A single lace does everything you need.

DSC_0139 (1)DSC_0138Learning from the past may save us from losing our future.

Replication

I study the technology of prehistory.  Because of this, I believe strongly in the benefits of experiential archaeology.  It gives perspective on a very deep level.  We can walk in the shoes of our ancestors, so to speak.

Replicated woven sandals from the Southern High Plains and the greater Southwest.  Produced from narrow-leaf yucca.
Replicated woven sandals as found on the Southern High Plains and throughout the greater Southwest. Produced from narrow-leaf yucca.

Huaraches!

There are still Huaraches north of old Mexico.  As I prepare to resole my huaraches I thought it might be good to look back on them as a very viable hand-made shoe.

For a long time while searching for huarache construction techniques, I could only find the simplest tire sandals and many links to “barefoot” style running sandals.  However, a few years ago, I found Markus Kittner’s Huarache Blog and scoured it for inspiration and design secrets from real huaracheros in old Mexico.  He has done excellent work in documenting the process.

My first beautiful huaraches drying after being soaked to shape to my foot.  They were subsequently oiled and slicked down.  I owe much to the Huarache blog for so many great images and descriptions of traditional huaraches.

As a craftsman of sorts, I understand that making a “one-off” of something does not imply expertise.  Only replication builds a real understanding and mastery of the object being produced. However, this is not my first leather working or shoemaking project but a major improvement on a theme.  This style shoe is made on a last.  The shoe lasts I purchased on Ebay have finally been used to actually make a shoe.  I documented the process as it came together as best I could; my mistakes and changes included in the process.  This is not really a “how to” recipe for making a huarache but shows the process I used.

The lasts I found on Ebay.  The sole cut out, punched for strapping and nailed to the last.

The last shown here fits me well but are an Oxford dress shoe style, meaning they run a little long in the toe.  As I am making an open-toe design, I let the last hang over slightly in the front, squaring the sole to the shape of my actual foot.  New lasts are pricey (ca. 50 euros/$70 US), but I think it will pay in the long run to invest in a better design for myself and those people I might make shoes for.

Wetting out the first strap.

I didn’t show the strap cutting process as there is little to be learned about that.  It is a skill in itself, even if you have a strap cutter.  My Osbourne strap cutter can be seen in the upper right of this photo

Since this project was experimental, I used scrap leather, meaning I could only get about three foot (one meter) straps.  In future, I’ll probably use 6 foot or longer pieces (2+ meters).

Nailing the strap to the last.

I pre-punched holes in the mid-sole and away we go.  A little tallow on the straps helps cut the friction of the leather but ended up being not worth the trouble.  They were kept damp throughout the process.

Placing the twining thong.

This is a signature of the style I chose.  The vamp or tongue-like piece was later removed as I didn’t like the way it looked.  I’ll experiment more with that later.

Lacing and twining.

Unlike normal, I completely finished the first shoe and removed it from the last to check size and shape to determine any major changes that would need to be made.

A heel piece was added and laced up the back. I think this step shows the evolution of the strap sandal to the modern huarache.

The straps running under the mid-sole look like a problem here but are ultimately skived down, dampened, and hammered flat.

Straps ends as added in. Longer straps would lessen the ends here.

I used simple wire nails (as is traditional) to attach the soles but sewing would work too.

Ends to be trimmed and skived, and a finished sole.

Pulled from the last, they actually matched.  I don’t know why I was surprised but that made me really happy.

Preparing to nail the sole.

The method I chose to attach the rubber is fast and efficient, and I suspect rather tough.  The nails are pressed through the leather and rubber into a thick leather scrap below.  Otherwise, you would need to pry it up from the work board.  One surprise I learned over time was that the nails actually wore off on the underside before the rubber.

Nailing the sole.

Bending the nails in preparation for clinching.

The nails are bent over (inward) to prepare to “clinch” them.  There are no photos of this part of the process but this was done by setting the shoe back upright on a small anvil and hammering the nails down tight with a punch.  The pre-bending causes the nail to curl inward and back up into the sole.  Voila!  The Huaraches below have about five miles of hiking on them now and they’re beginning to have some character.

Huaraches you say?  Do tough guys wear such things?  In an era of cheap, slave-made garments, its easy to forget how self-reliant our ancestors were for such things as raiment. I include this photo of Capitan Alcantar I found on the Huarache Blog as a great historical image of a man of action wearing his huaraches and ready for war.

Click the image for more historic photos like this.

I hope this prompts someone out there in the world to take on the project of making their own shoes, whether for survival, uniqueness, or just as a challenge.  Making for yourself is a small act of revolution against a bad system.

Project: Mayhem Shoes

“The first rule of Project Mayhem is that you do not ask questions…”

this may be my new teaching mantra

I am considering calling my custom footwear “Mayhem Shoes” (at least until Chuck Palahniuk’s space monkey lawyers make me stop).

I teach a couple classes about low-tech shoemaking a few times per year in the primitive survival skills community.  The designs I focus on are styles that can be made by one person in one day; a popular theme in early historic examples.  Some require a lot of cutting, some require sewing.  There is an off-grid, dystopian attitude about making your own shoes.  In fact, I think I will register the name Distopian Leather Works as my new business.  I’m considering a small business venture to go into custom production of the shoes I teach people to make as well as expanding the custom leather work I currently produce.

DSC_0111The kinds of people that take these classes are from all walks of life, not just survivalists, historical nerds, or experimental archaeologists, but folks who want to make things for themselves for whatever reason.  I’m finding that there are others who might just want the handmade product without the labor of making them. DSC_0156In a day, an attentive student can produce a wearable (and good looking) pair of serviceable shoes like the carbatana (ghillies) above.

DSC_0100For those looking for a more modern look a fine pair of sandals can be made with just a few hours, cutting and sewing.  These are easily re-solable and should last the better part of a lifetime.  Look familiar?  Chaco and Teva didn’t exactly re-invent the wheel; just updated the materials and outsourced the work overseas.  Even in the wilds of Canada, tradtional ghillies can be a useful part of the wardrobe.  Mike made these two years ago and they still protect his sturdy peasant feet.

DSC_0082There is something very satisfying about taking a piece of nondescript, vegetable tanned leather and creating a lasting and useful object with your own hands.

DSC_0081The beauty is truly in the details.  Serious students often bevel and burnish edges to give their shoes a “finished” look, suitable for public wear.

DSC_0092
In progress photo with tools of the trade. The authors well worn sandals are on the left of the photo.

Above, a student trial fits the uppers before attaching the outsole.  In my classes, the outermost sole on any of these shoes may be a durable Vibram material, a softer but grippy Soleflex, or natural leather.  The latter option is popular with those who are interested in treading lightly on the earth or those who are concerned with earthing or grounding.

DSC_0089Learning as community.  It is always a very social event to teach these courses.  No matter the variety of backgrounds, we are sharing an ancient craft in common.

DSC_0087

As in all leatherwork, neatness counts.  A good hand with a knife is a great asset for shoemaking.

DSC_0086Test fitting the straps for buckle placement and strap length.

DSC_0084This style sandal may be tied or buckled but I have found that a 3/4″ center bar buckle is about the easiest to work with and adjust.

DSC_0104Bowing to modern convenience.  For the classes, we use contact cement to adhere the insole, mid-sole, and outsole.  This insures a good connection and will hold up even if the stitching doesn’t last forever.

DSC_0119The author demonstrates the wrong way to rough out a pattern.  Cutting out oversize pieces for the sake of time-savings.

DSC_0118Tough rubber soles will make these sandals last years and are easily replaced.

DSC_0137Trial fitting a ghillie after soaking in water.  They feel ridiculously thick and stiff for the first hour or two but tend to suddenly relax an become a part of the foot after a soak in the neatsfoot oil.

DSC_0136Ready for staling the game or dancing at a cèilidh

DSC_0134Sometimes it helps to take a hammer to the leather when it is stiff and wet.

DSC_0130It is important to leave the channels free of glue so that the straps may be adjusted in future.  You never know when you might need to wear some black socks with those sandals.

DSC_0131 DSC_0133Helping a student skive out some particularly stiff areas.

DSC_0154Mom tries on her new shoes before going home to make some for the whole family.  DSC_0139Even an old shoemaker is interested in this ancient design.

DSC_0180  DSC_0178 Happy and diligent students show off their newest creations.

DSC_0176

Above are few photos from previous classes.  Thanks to all who come and make!