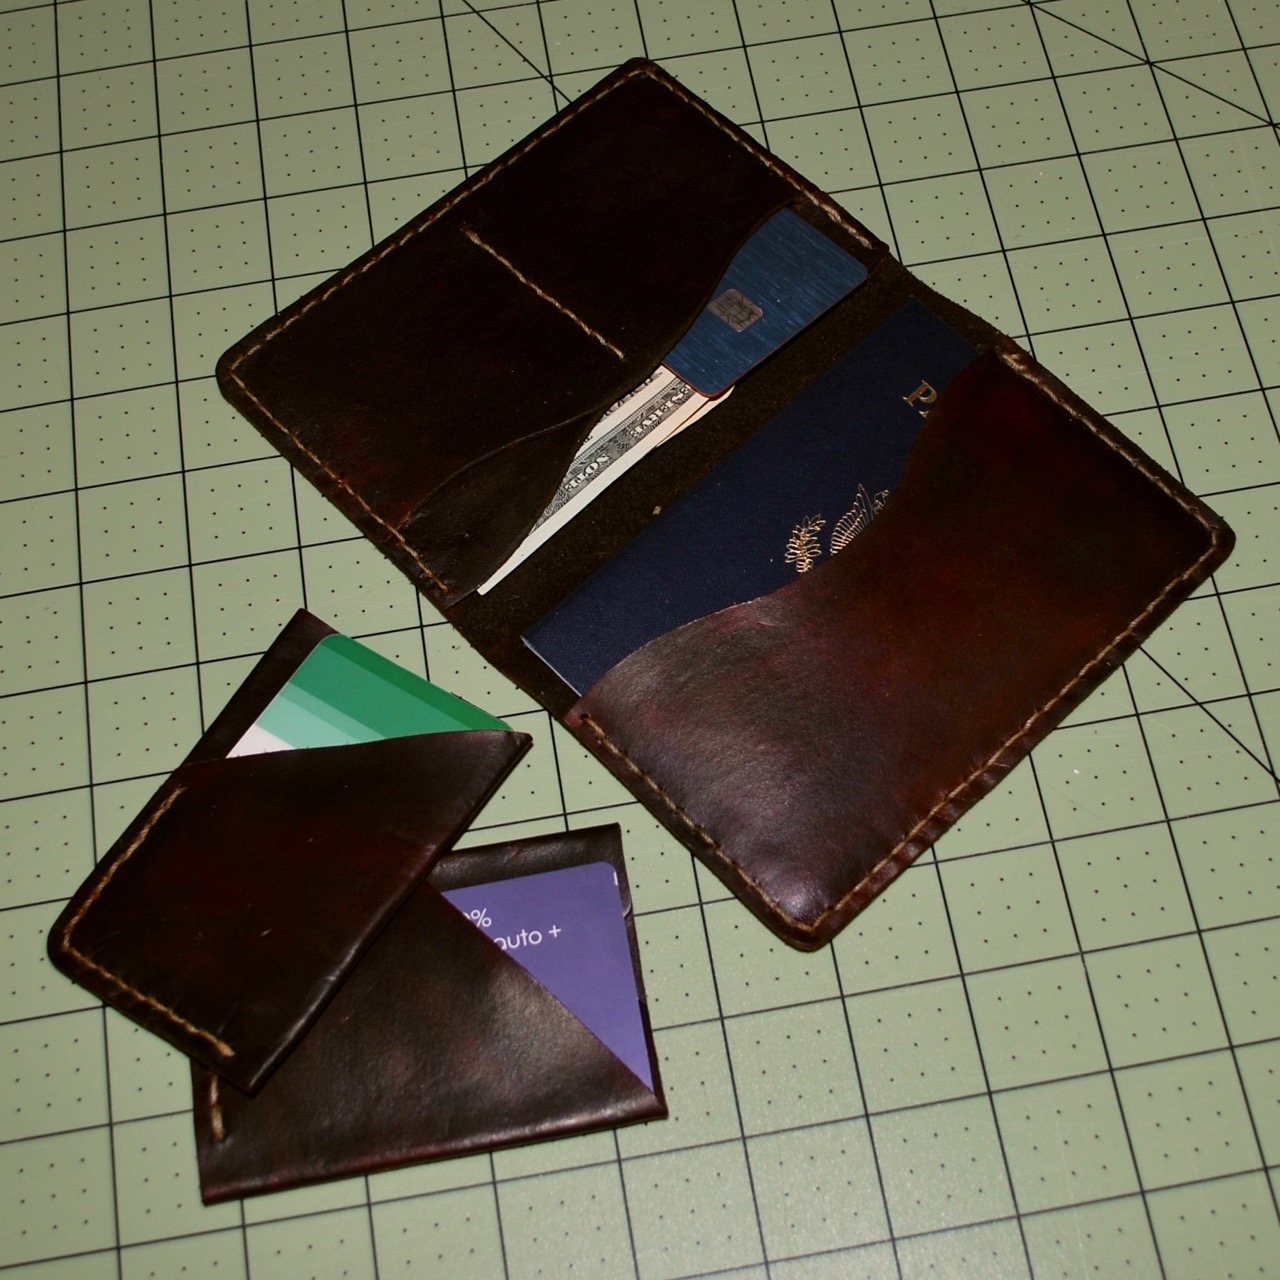
There are some new projects coming off the bench.Here’s a new minimalist traveler’s wallet. I’m still working through the design and construction process but like it so far. Simple three-pocket design; a vertical a horizontal card pocket as well as a large one for bills.
A bucket purse made from an oil-tanned leather. Welted and bound with thin harness-grade bark tanned leather with a heavier leather shoulder strap.
I try to put some sort of bling into projects. This is a historic heart design was cut freehand and balances the antler toggle on the other side.
Fully lined with a batik print my daughter bought for a skirt.
I have needed a stitching pony for a long time now…
The two-hour stitching pony.
Like so many other undone projects, this one has been stirring around in my head for several years. Since my efforts have been so focused on sewing leather lately, the time had come for a new and useful tool in the shop. I’ve looked at plenty stitching horses and ponies over the years and even used a few n person so I understood the basics of what I needed and began eyeing up the scrap pile for obvious parts.
Not absolutely necessary, but it’s nice to be able to open the jaws fully.
I decided to keep the project simple, small, and portable while making as few purchases as possible. I was able to gather up the lumber, leather, hinge, screws, glue, and tacks in just a few minutes and get to work. Power tools make jobs like this easy so the boards were quickly ripped, cut, and clamped up to dry overnight. A little cleanup in the morning yielded a working model suggesting a few minor changes. The opening of the throat was widened by 1/2″and I decided a longer bolt would be useful for fat projects.
This meant a trip to the actual hardware store setting the project bill up to $1.07 with a total work time of about two hours. We’re good to go…
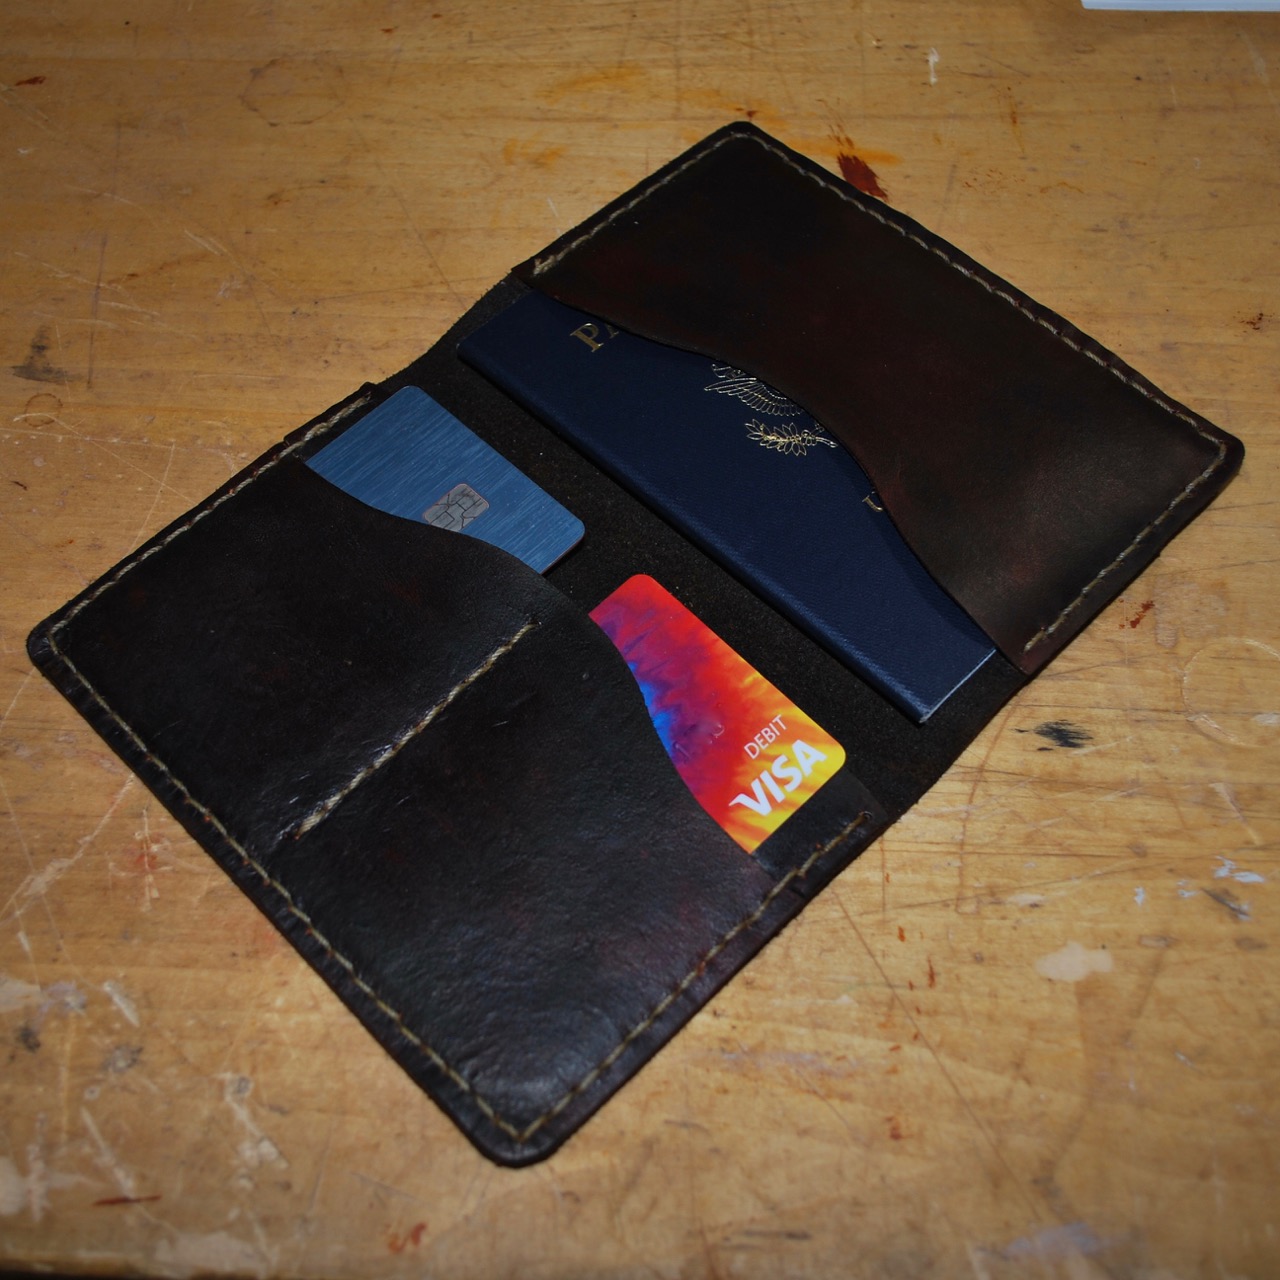
Maybe this is a little mundane but I’ve been using the cold and snowy weather as an excuse to do some cutting and sewing of leather. I completed a passport wallet and finished up another minimalist wallet design. I got the pattern for the larger travel wallet from Tony, the owner/designer at DieselpunkRo. He sells finished goods, patterns, and gives a lot of good advice for makers working from his patterns on his Facebook group page.
My three newest creations.
If you follow his Facebook group, he will occasionally share free, downloadable patterns. I have two patterns from him so far and they are both great.
The large wallet is a handy, four pocket affair that snugly holds a standard passport, cards, and cash.
This is another good starter project that easily yields a great product.
We were acting like shut-ins today because of a surprise snow storm so I’ve been able to jump to another leather-related project. I’ll share some photos soon.
I try to live by the creed of learning and making something good every day.
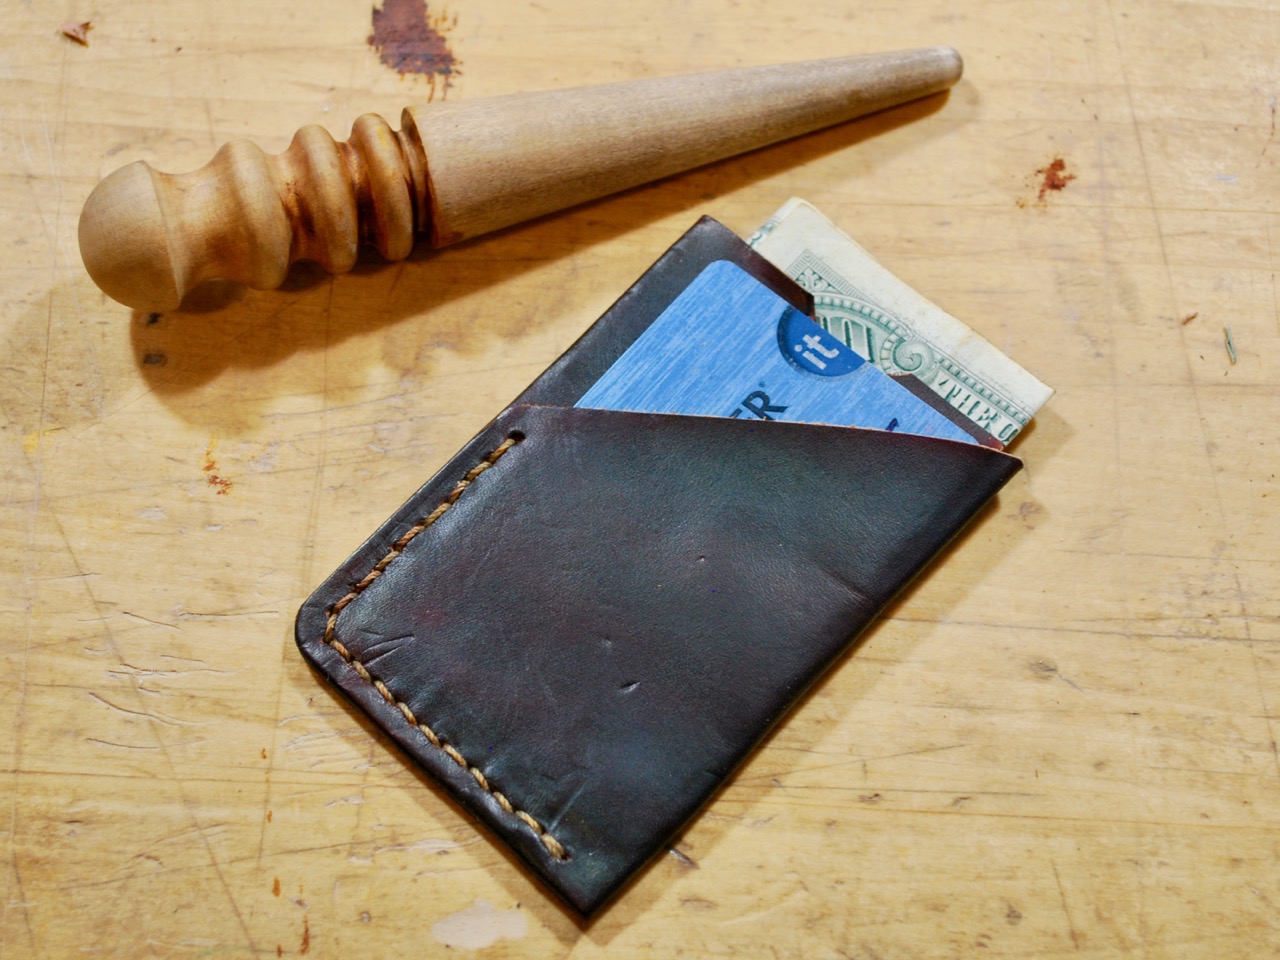
The Minimalist Wallet
As we have been pondering the holiday season it seemed a good time to get a jump on some leatherworking projects I’ve had in mind the past few months. This morning, before getting to work on other chores, I decided to take a little time and work out a slightly modified Minimalist Wallet. If you have followed this blog for long, you may have seen a couple earlier wallet projects we shared HERE and HERE. This isn’t a complicated project and might be a good one to start with if you trying your hand at leatherworking for the first time.
The All-Encompassing Symbol of the Age
Making the Pattern –
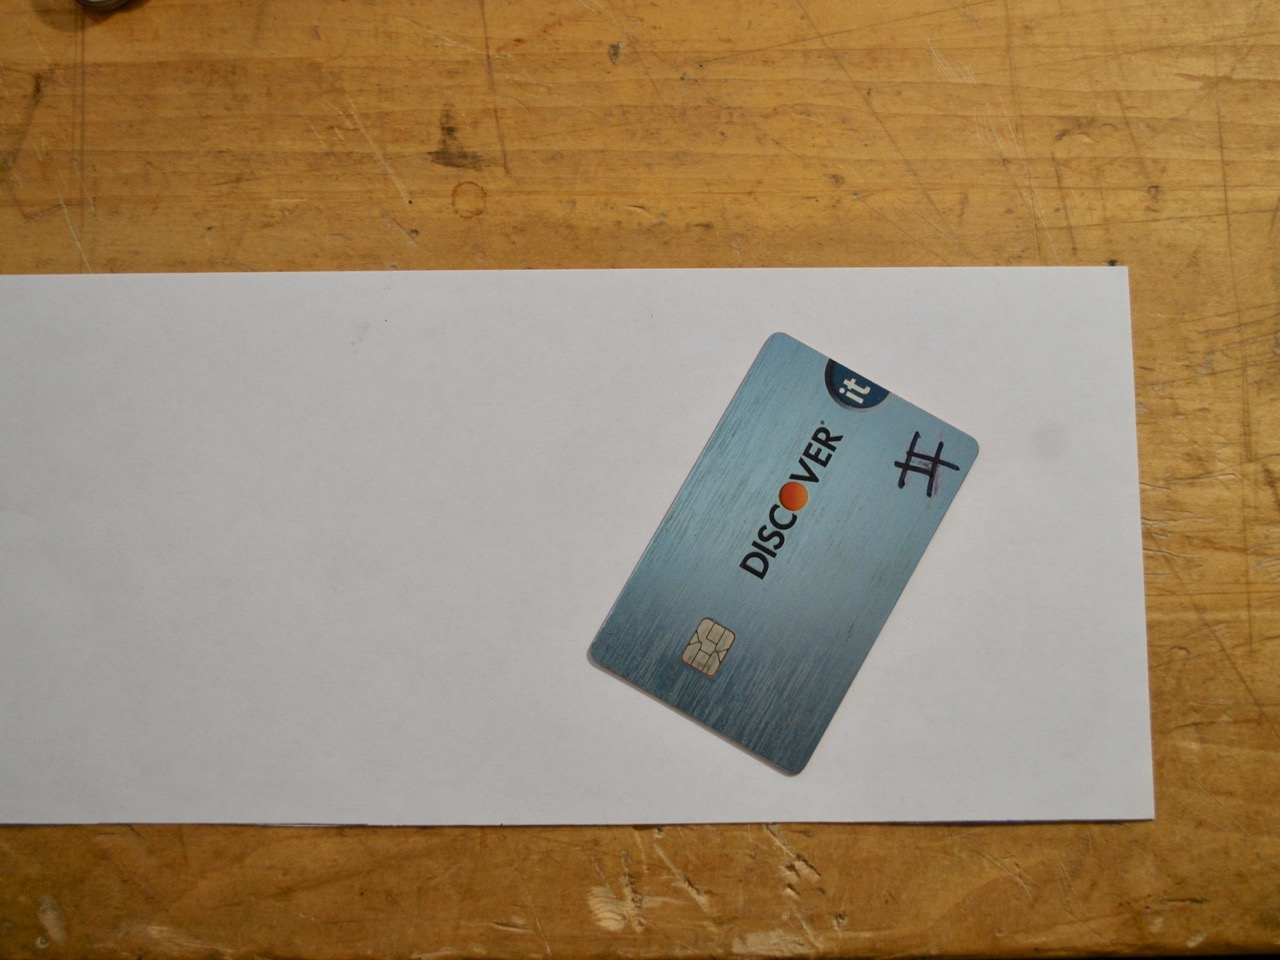
It would be pretty optimistic to just dive in and start cutting out a wallet without knowing what needs to fit. I used a debit card for scale as there will inevitably be a couple of these in just about any modern traveler’s pocket. I didn’t put a lot of time into the pattern as I have made a similar style before and knew the basics of what I wanted; essentially two pockets and very little sewing.
A Bit of Sloppy Origami to Test the Dimensions
To create two pockets, there needs to be three layers; two on the outside and one to divide. To make the cards more accessible, the outer pocket will be a “reveal” and I chose to do this the simplest way possible, by a diagonal straight line.
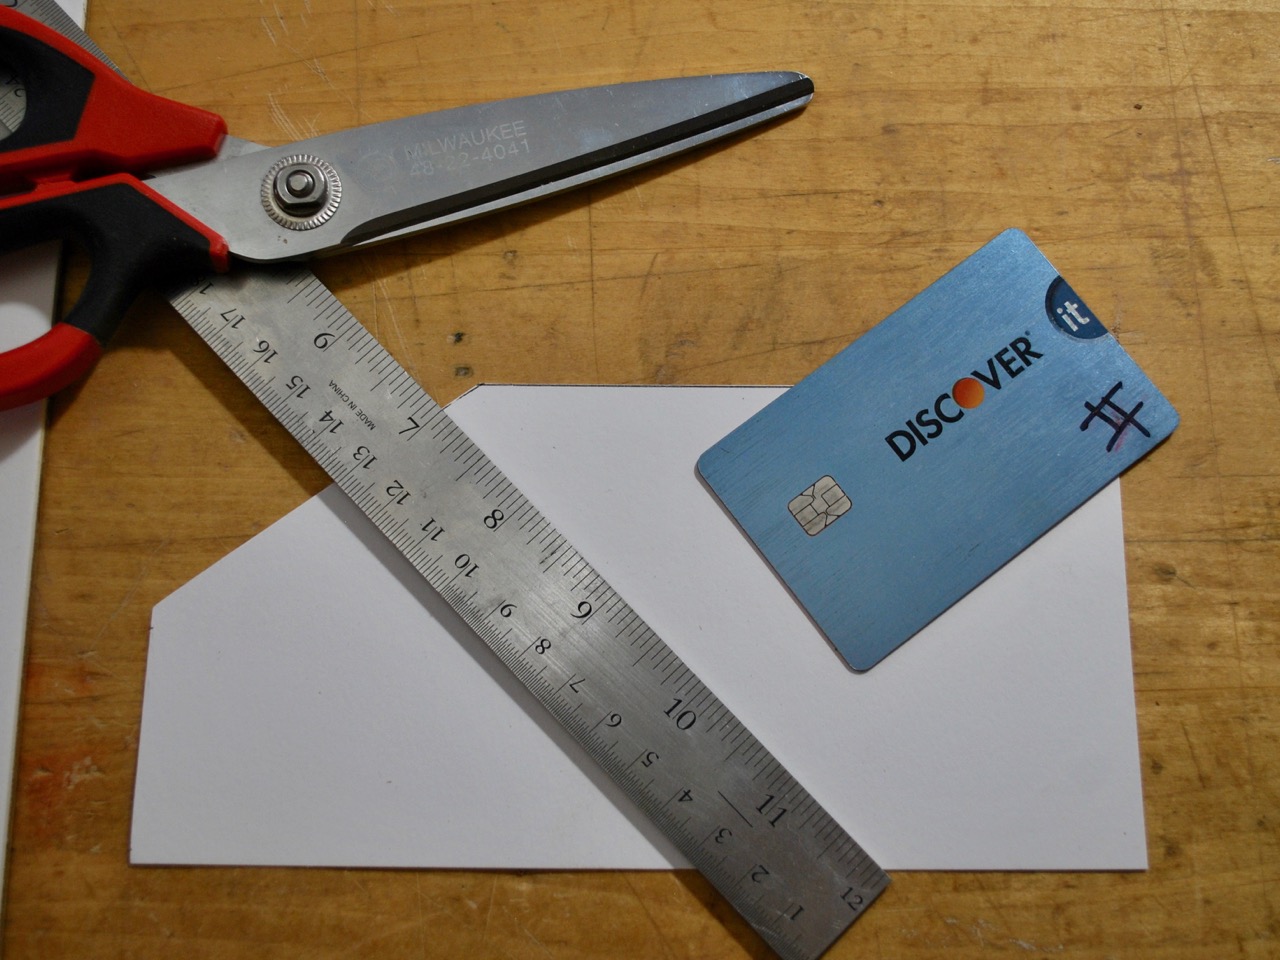
Test Fitting and Trimming the Draft Pattern
I ended up tightening the width and lengthening the entirety just a bit from my original estimates for a better fit. The difficult part is over.
The Draft is Transferred to Stiff Bristol Board for Multiple Uses
After the pattern is transferred to the card stock, it can be used many times without fuss. It is a good idea to label your patterns before storage as they begin to look alike when you amass a large folder of them (was this a pocket, part of a shoe, some sort of handle cover?).
Getting Down to Business –
The next step is to cut out the pattern on appropriate leather. I’m using Hermann Oak 1.5 mm tooling side that was leftover from an earlier project. Neatness in cutting is very important as it will affect the look of the entire piece if the cuts are even a millimeter or two off or wavering in any way. Since most people seem to prefer dark leathers for this sort of thing I chose to dye it Medium Brown with Fiebings Leather Dye.
Wet with Dye
After the dye sets you’re free to move on. I started by marking and awling the stitching holes at about a 5 mm increment. I will admit, this was not my straightest set of stitching lines ever.
Punching the Holes
I almost always use a double needle saddle stitch when sewing leather as it is the best and strongest choice in most cases. I chose a contrasting thread to give it a fine finished look.
Finishing Up
And finally, the edges were dyed again and burnished to create a smooth, finished look. Overall, I’m quite satisfied with the outcome. This one will be the prototype to work from and I’ll be able to take a little more care now that I have learned from this one. If I ever get around to making enough to sell, I’ll put them on my Etsy Store.
To view this project on Instructables, click the link here: Minimalist Wallet
I have a slightly more complex project laid out for later. If I take the time to document it, I’ll post it up here.
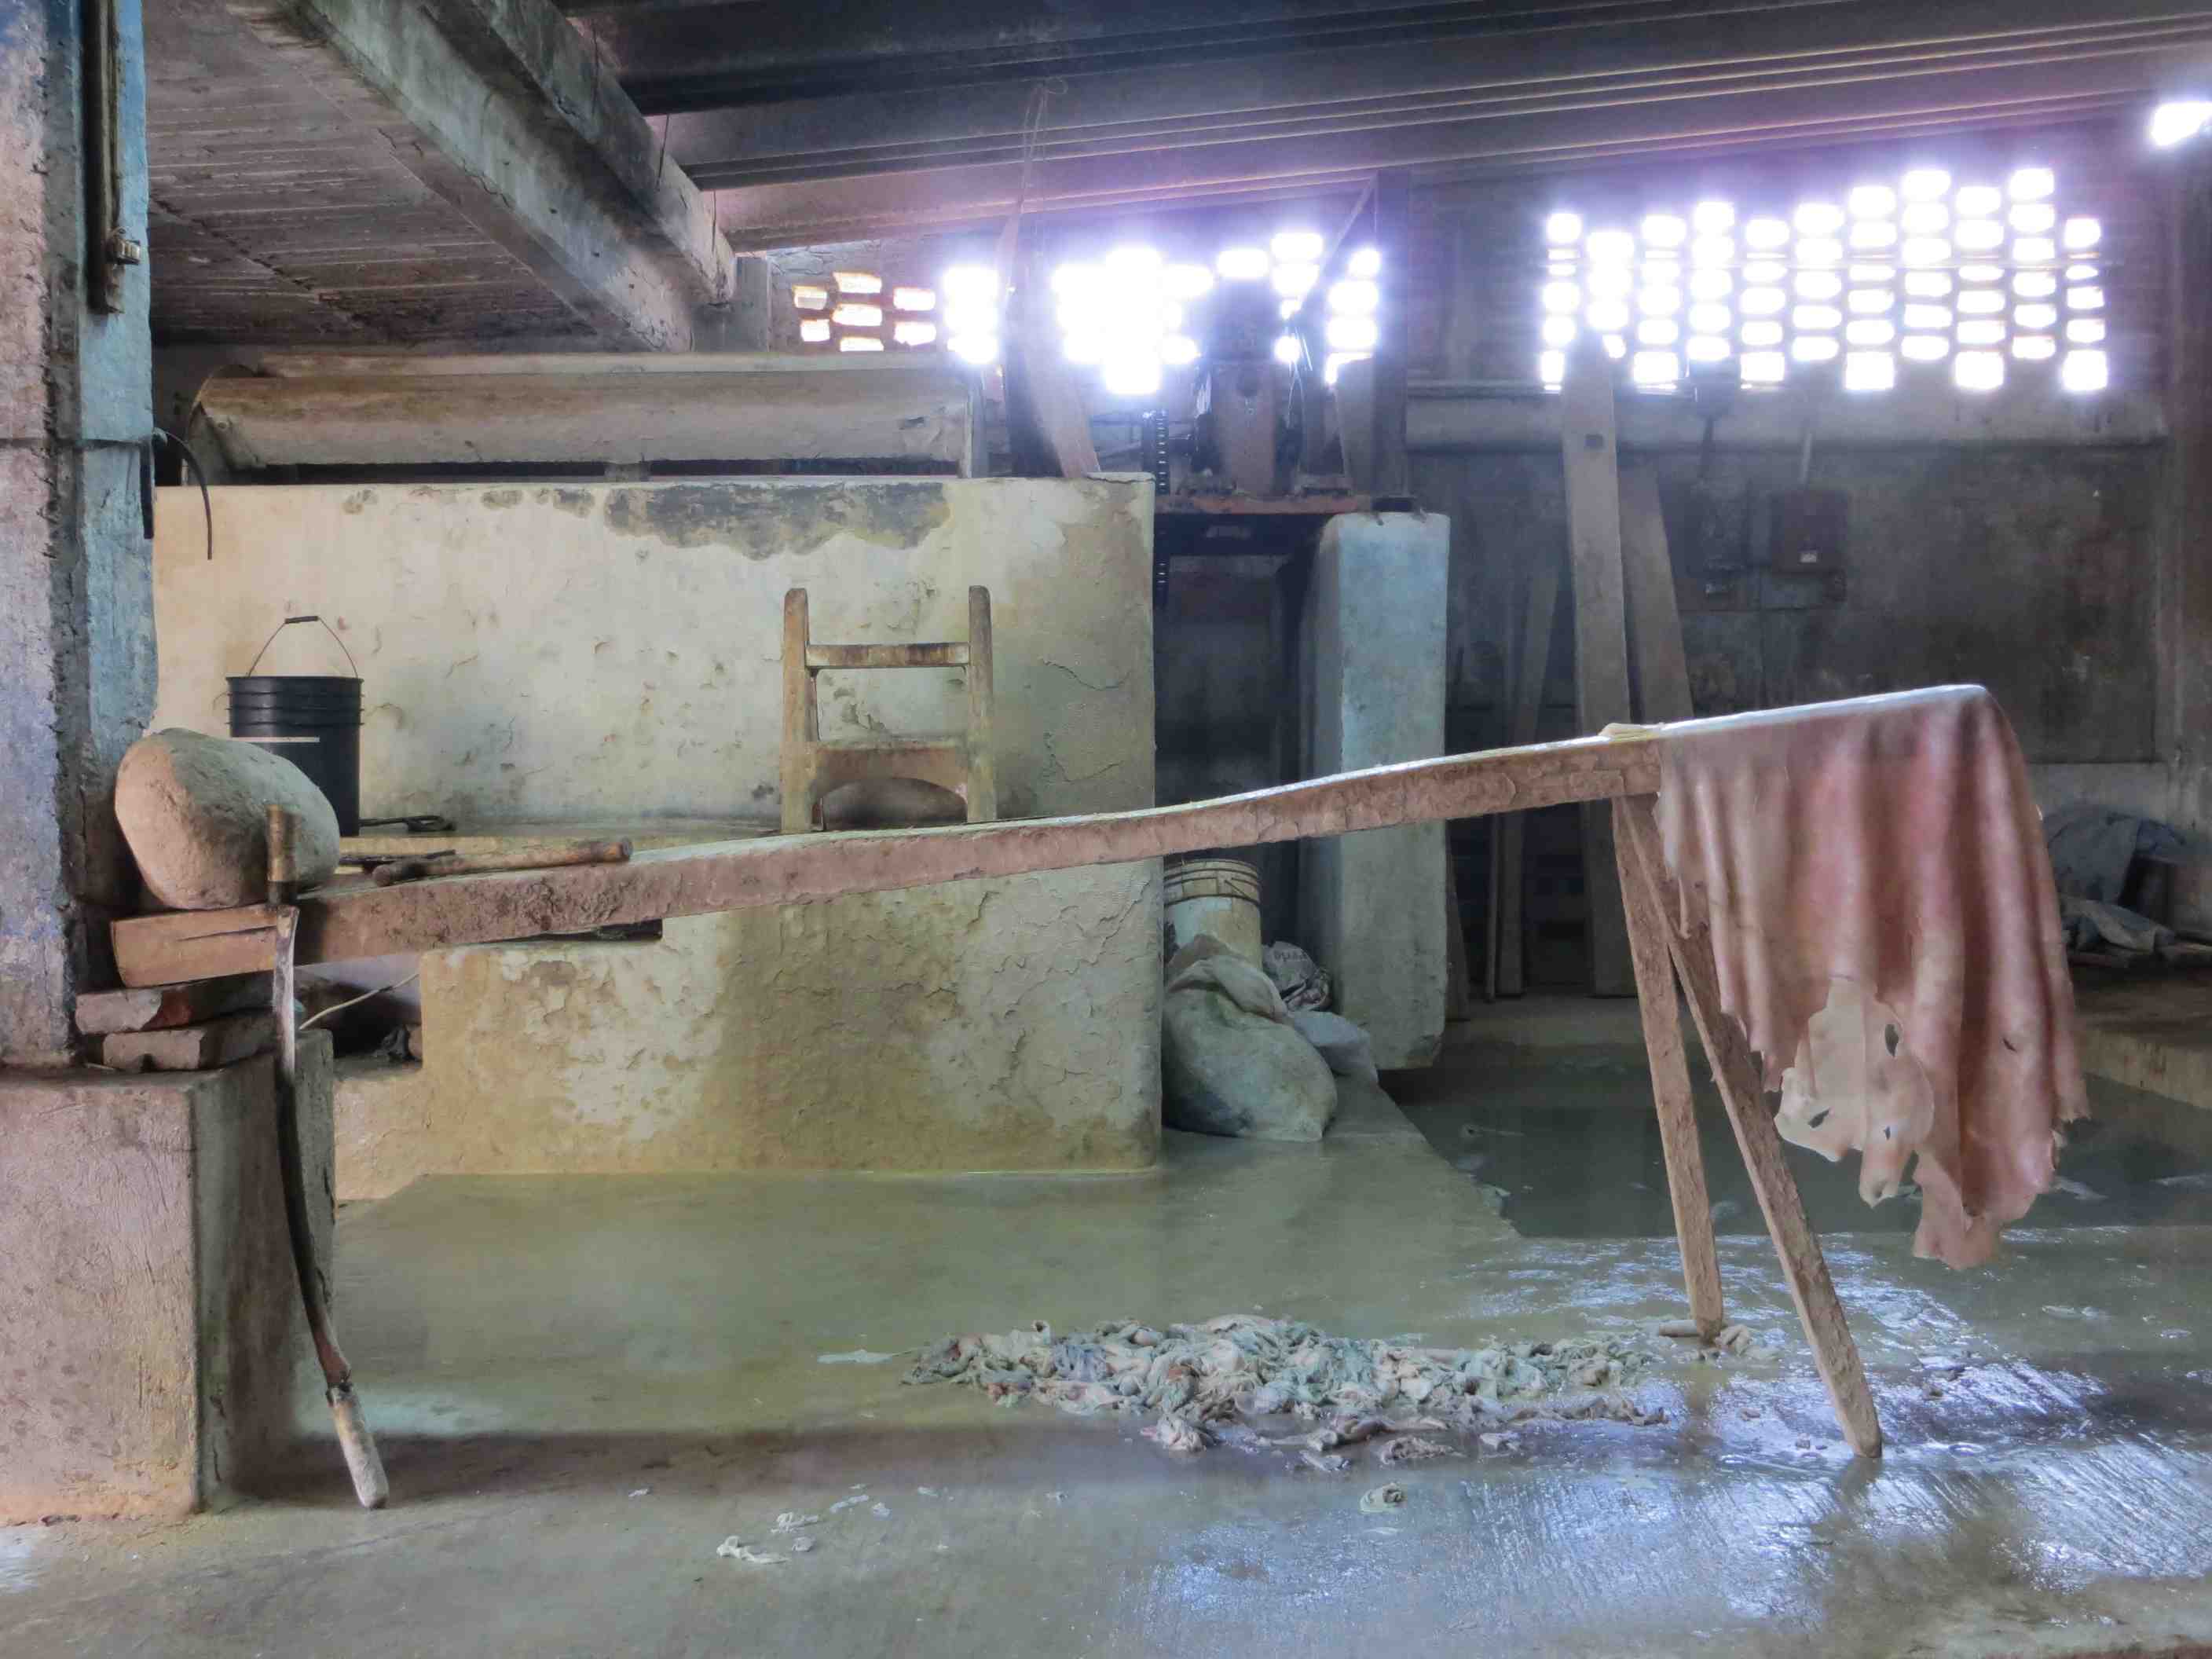
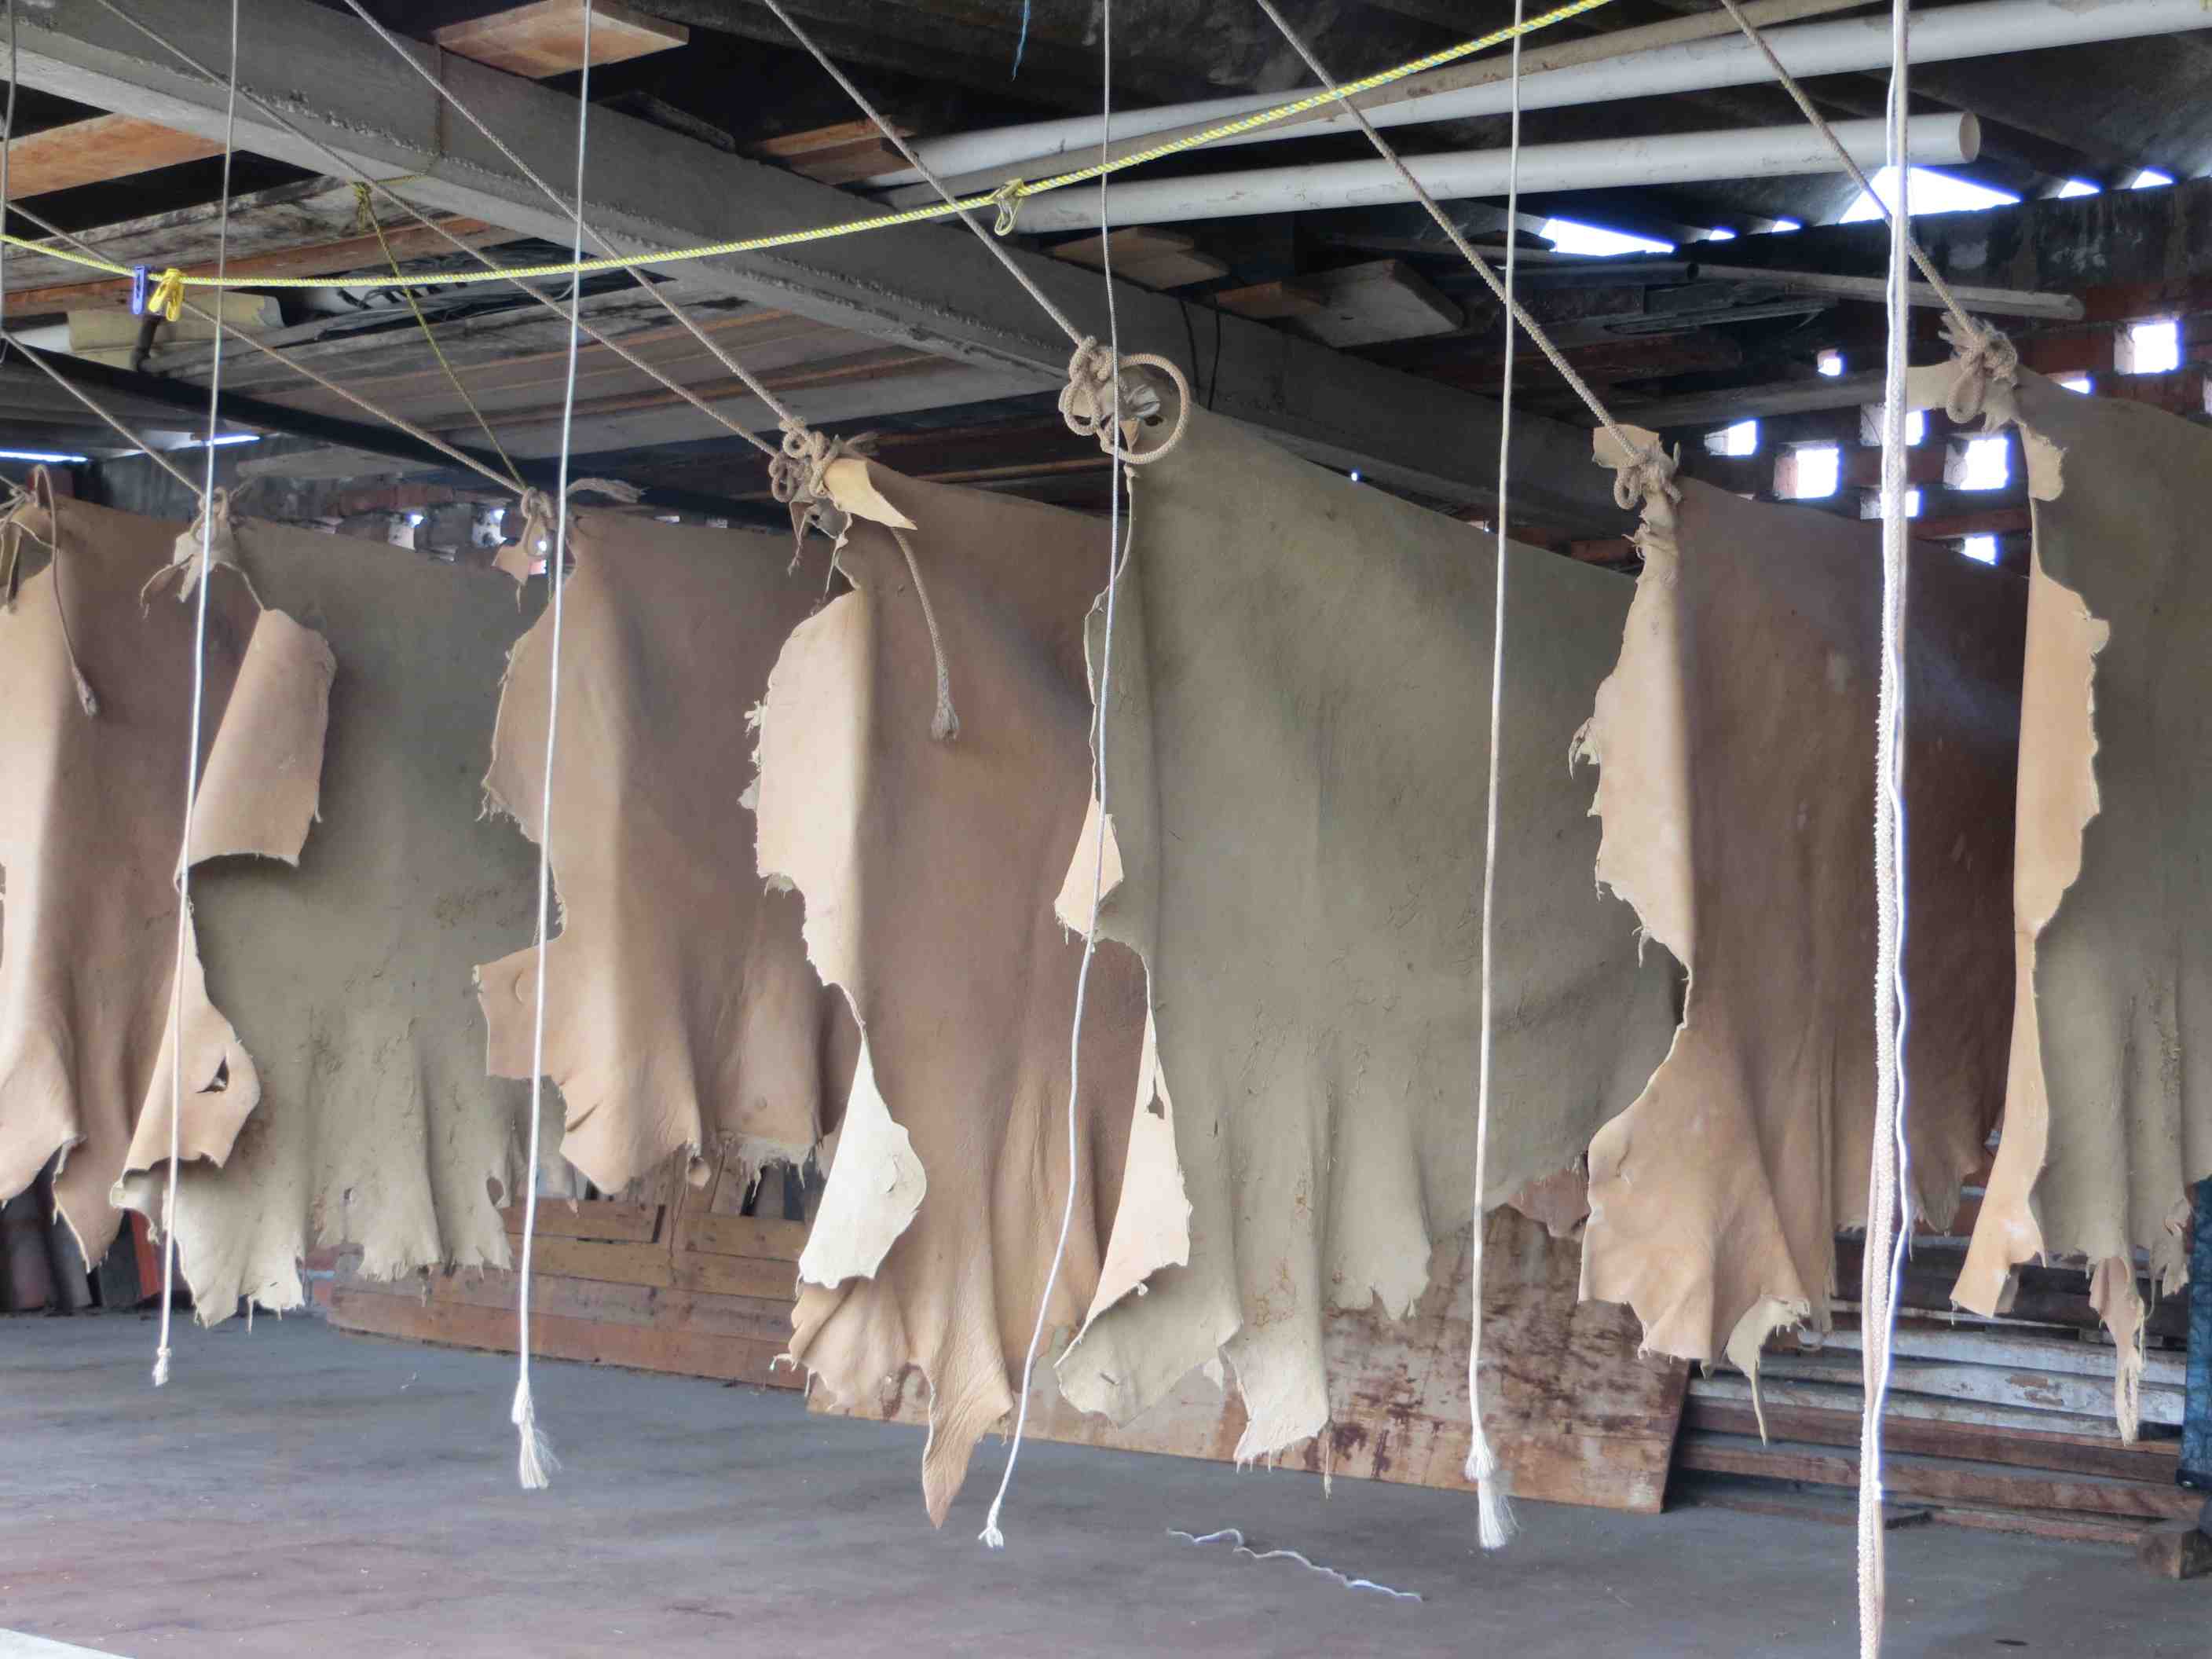
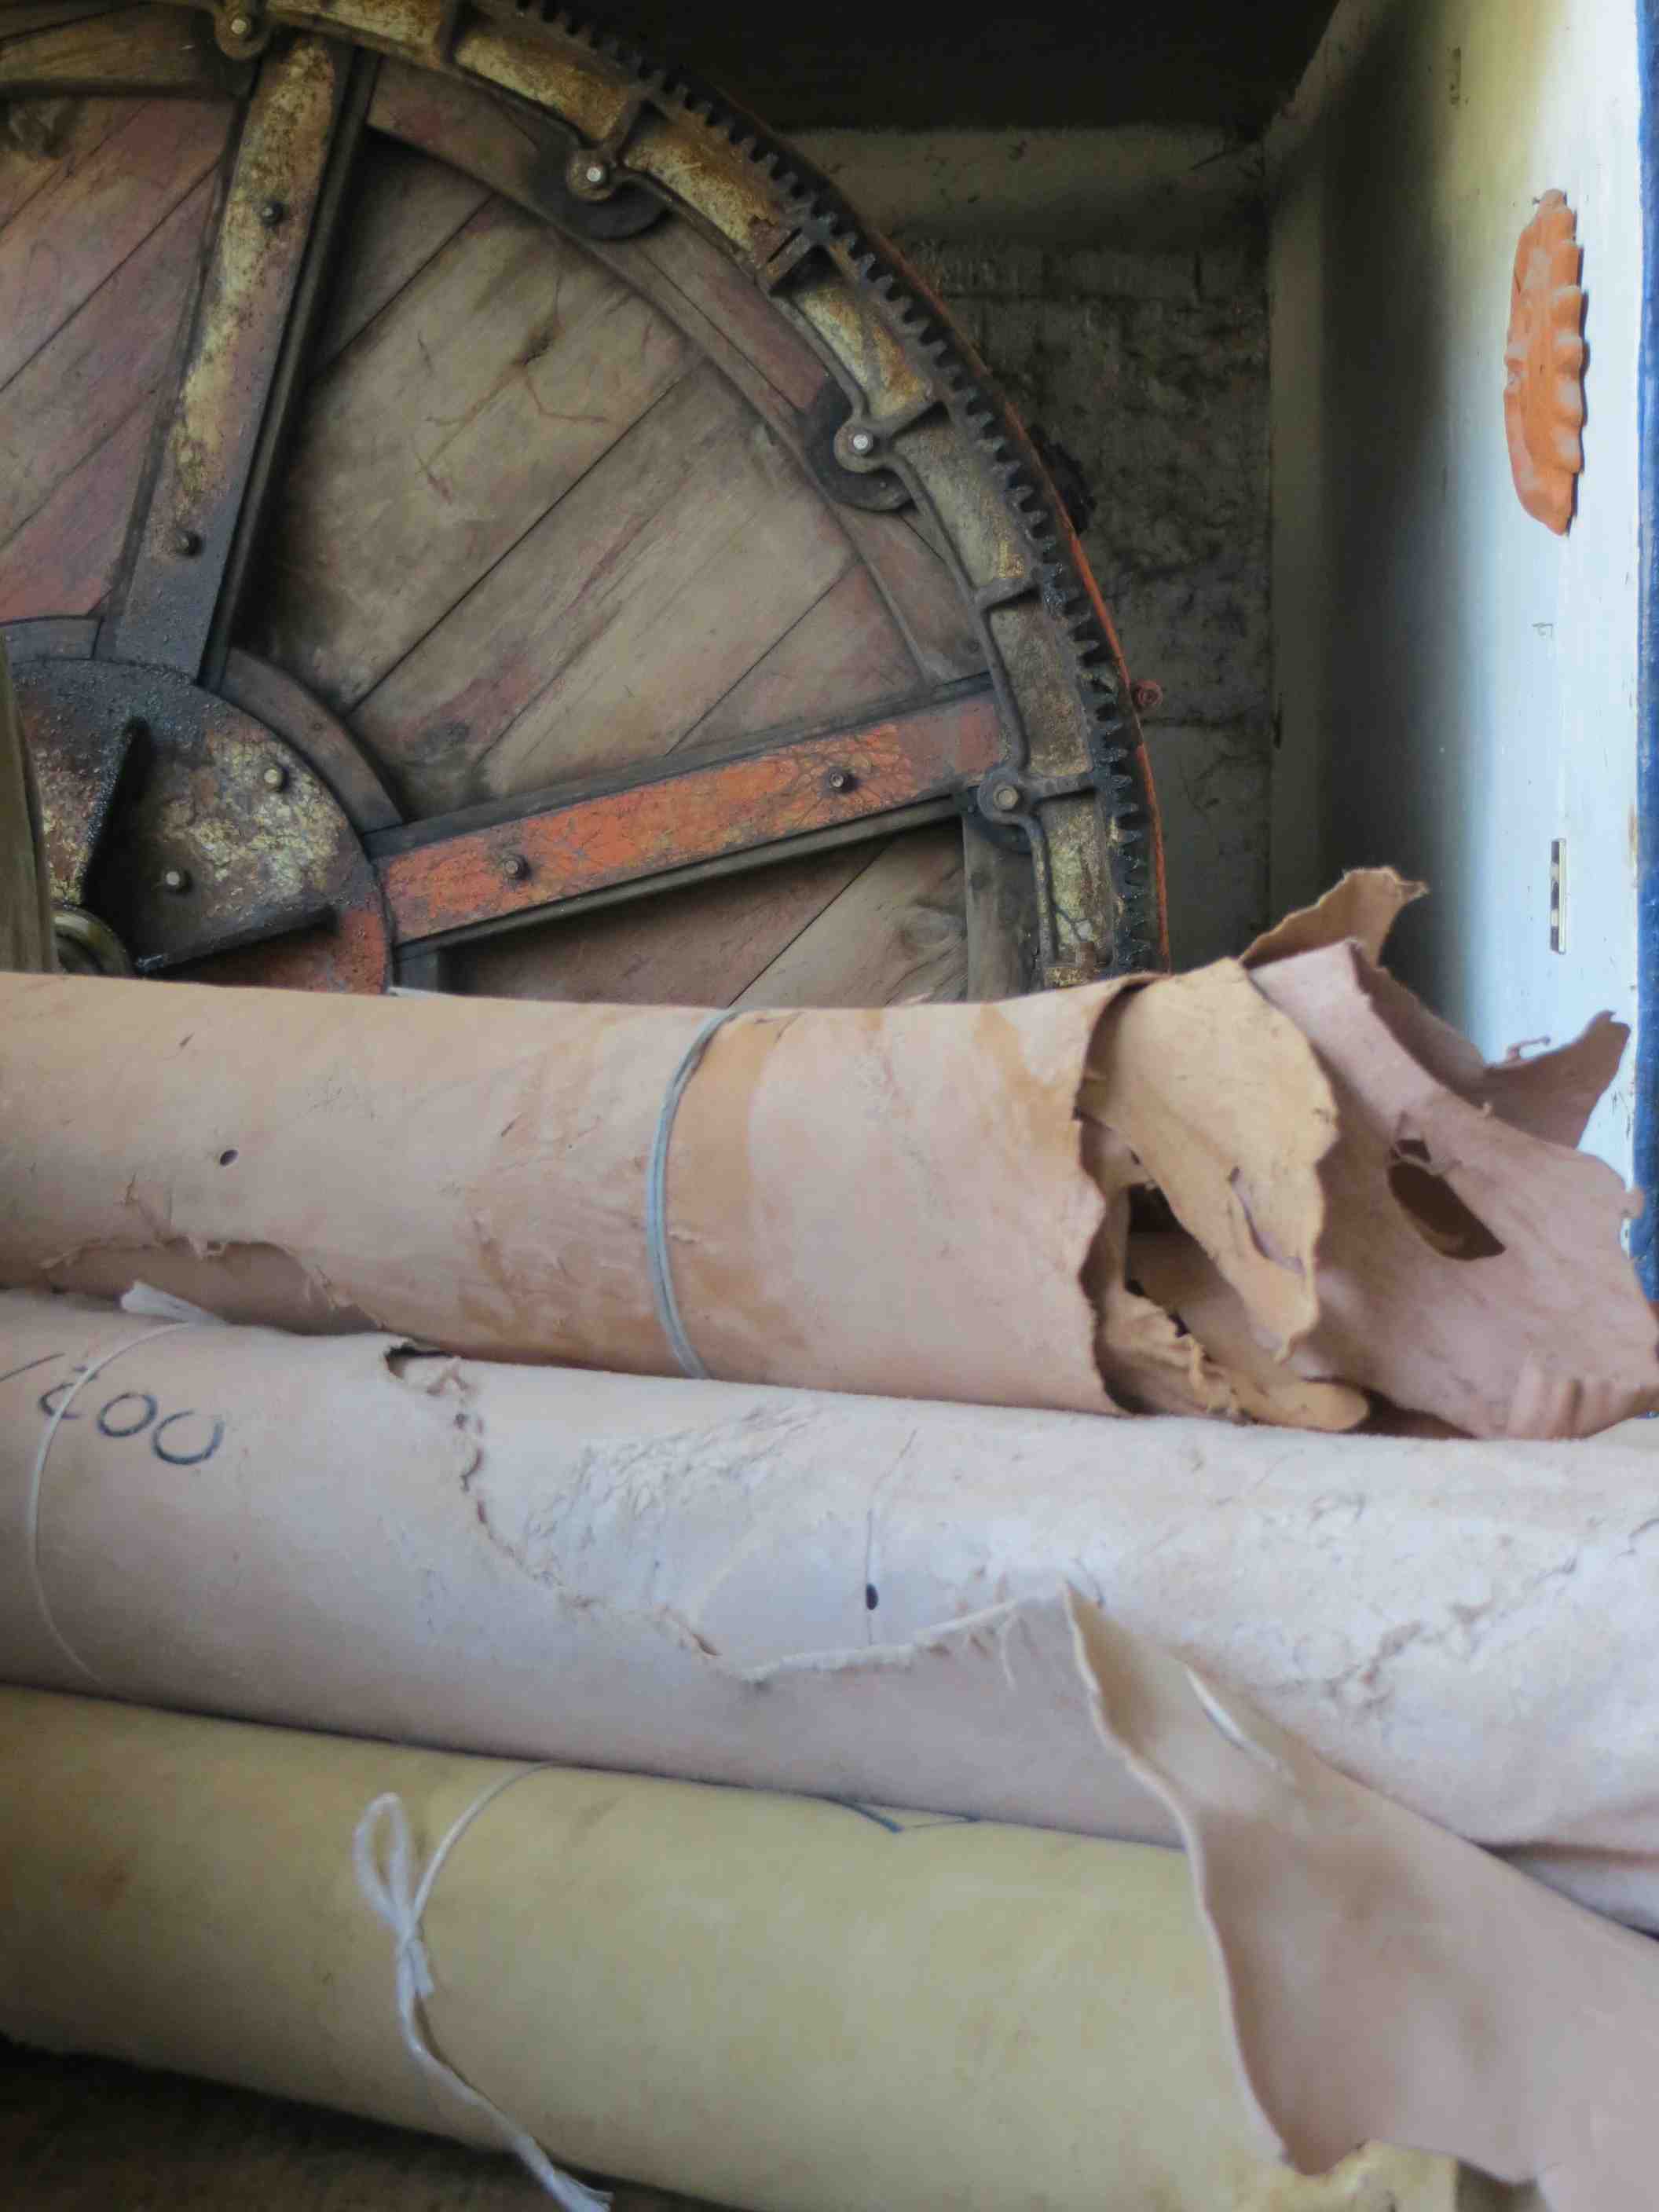
Many years ago, in Morocco, I was able to tour an ancient tannery and see some of the process of creating beautiful leather. I use leather for many projects and although I do some brain tanning myself, I purchase all of my truly “tanned” leathers from others.
Click the image to visit the Moroccan National Tourist Office on Facebook. If you are interested in a description of the tannery at Fez, have a look at Becca’s post about it over on AlwaysCarryOn.
One very important lesson about tanning I learned in Africa was that I never want to work in a African tannery when it’s 100 degrees in the shade. The smell makes a feed lot in Texas almost seem habitable and hits one in the face like a dense fog.
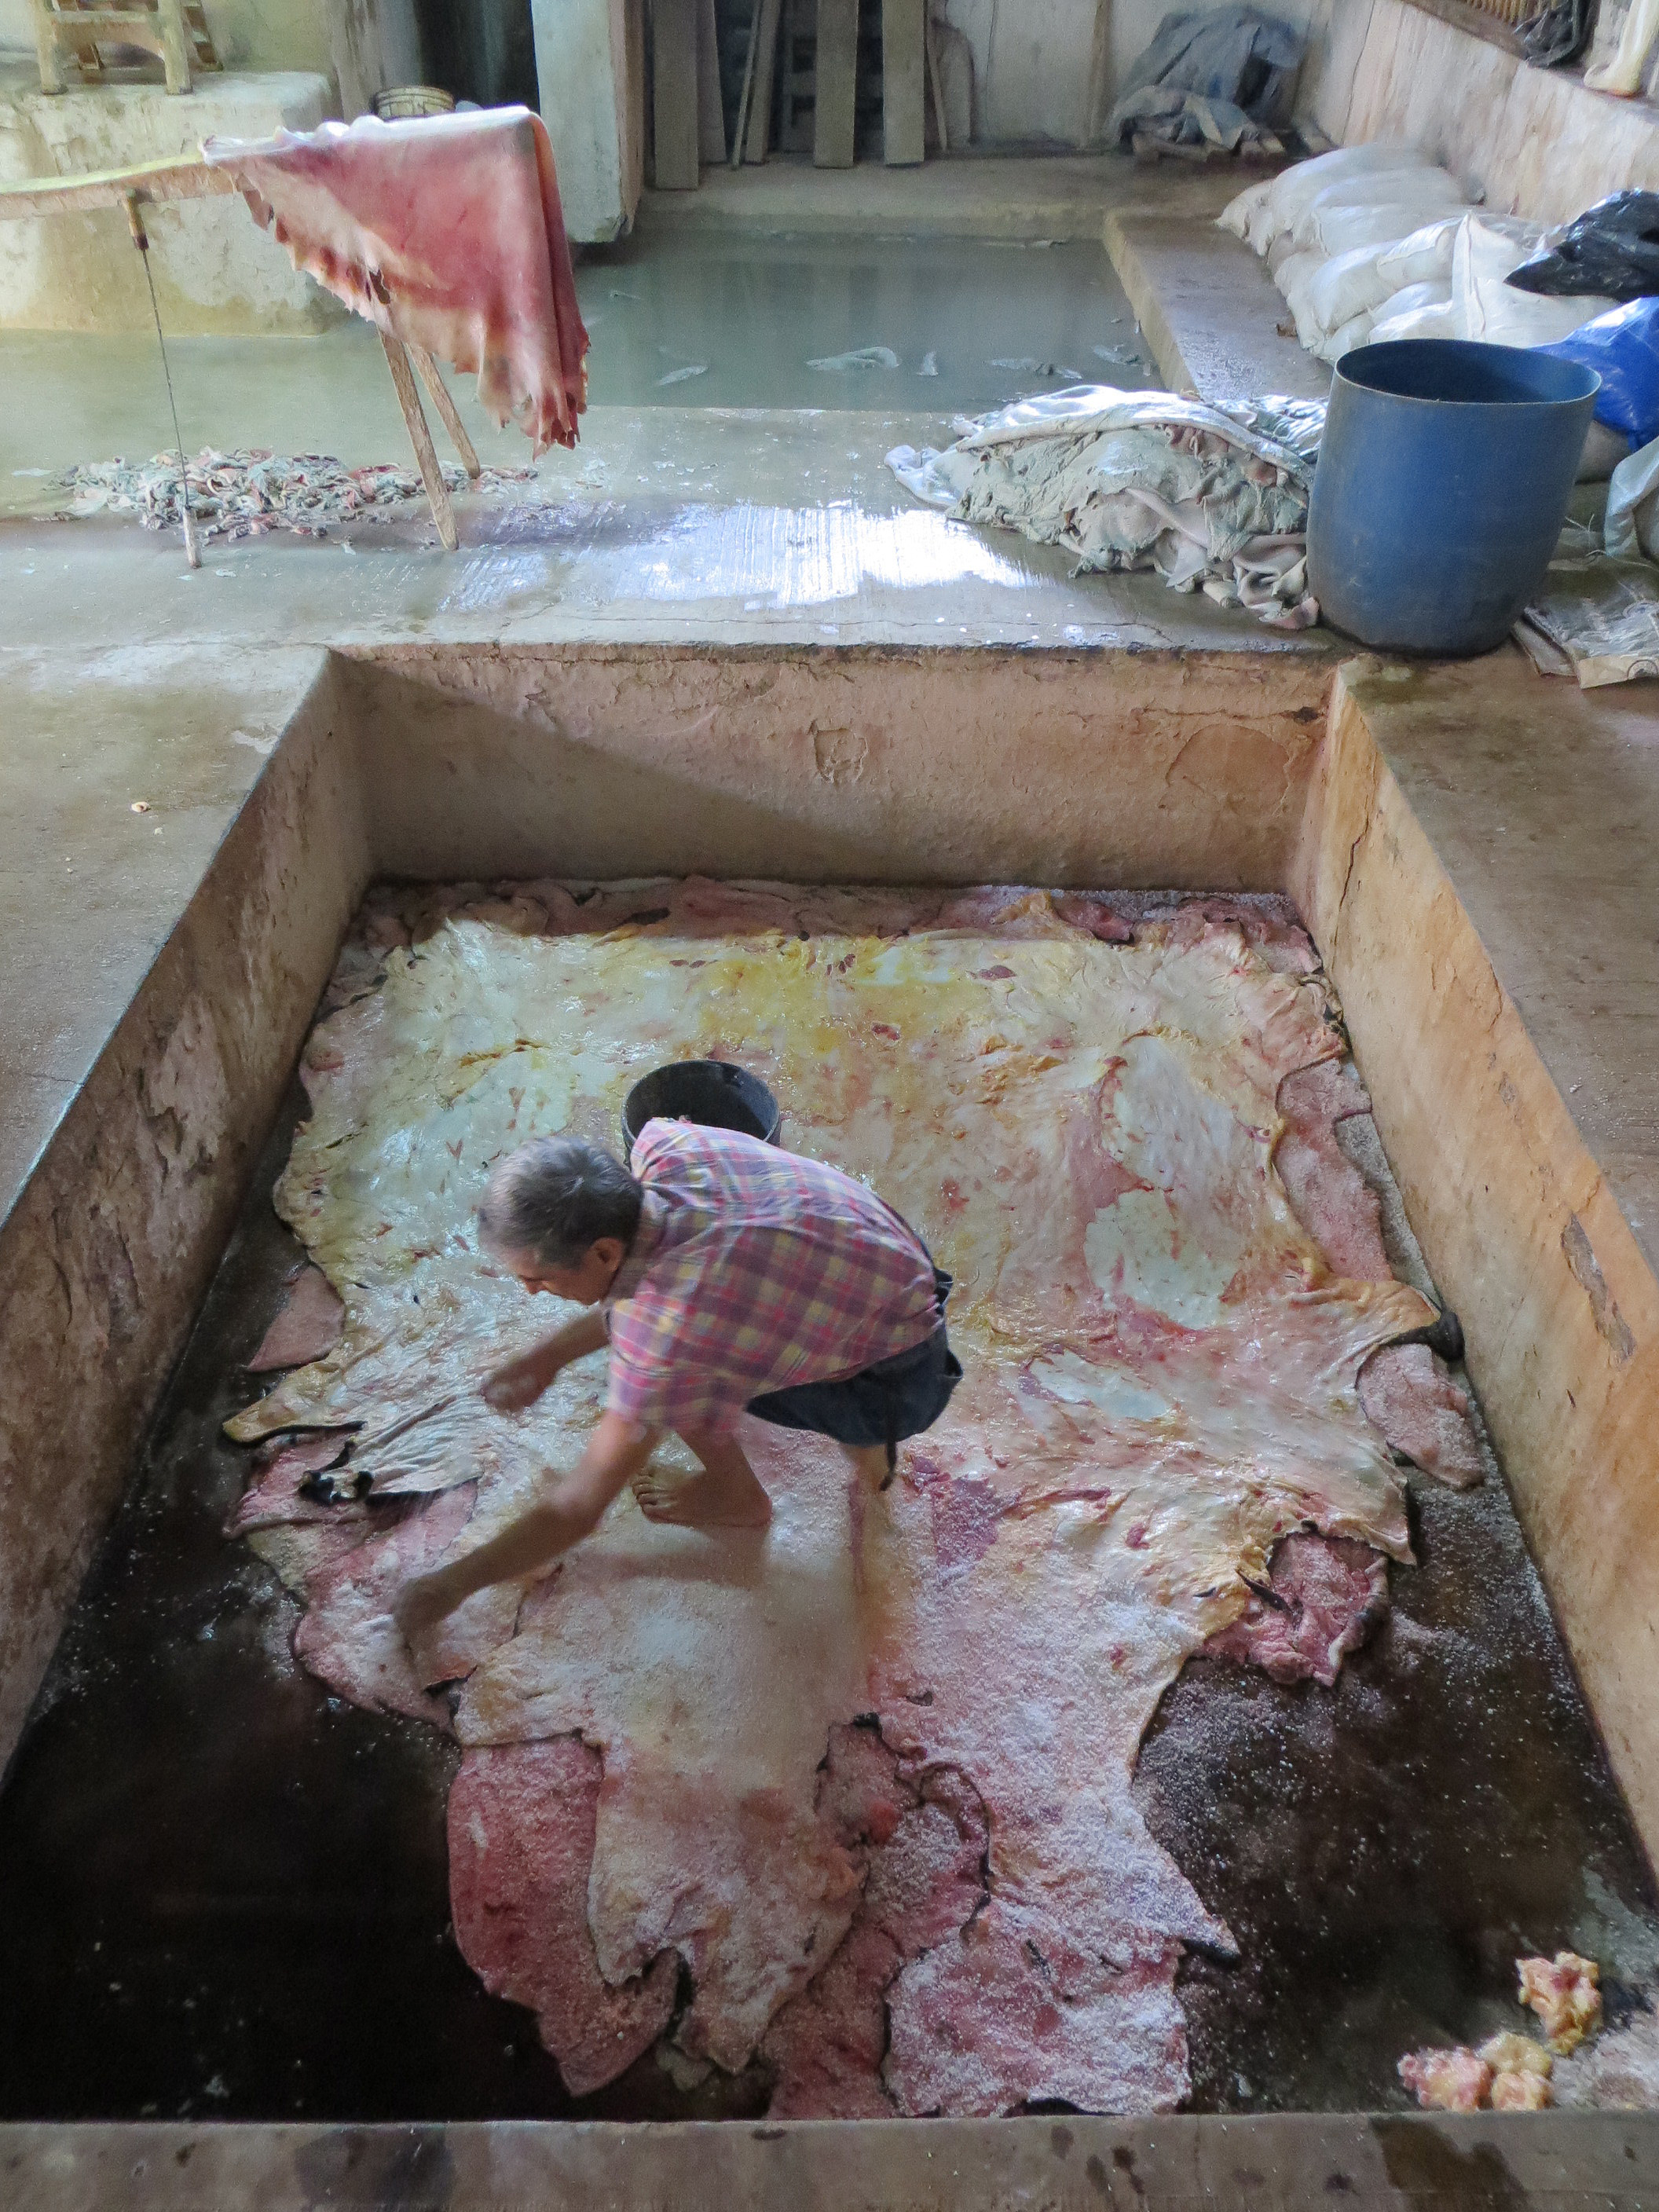
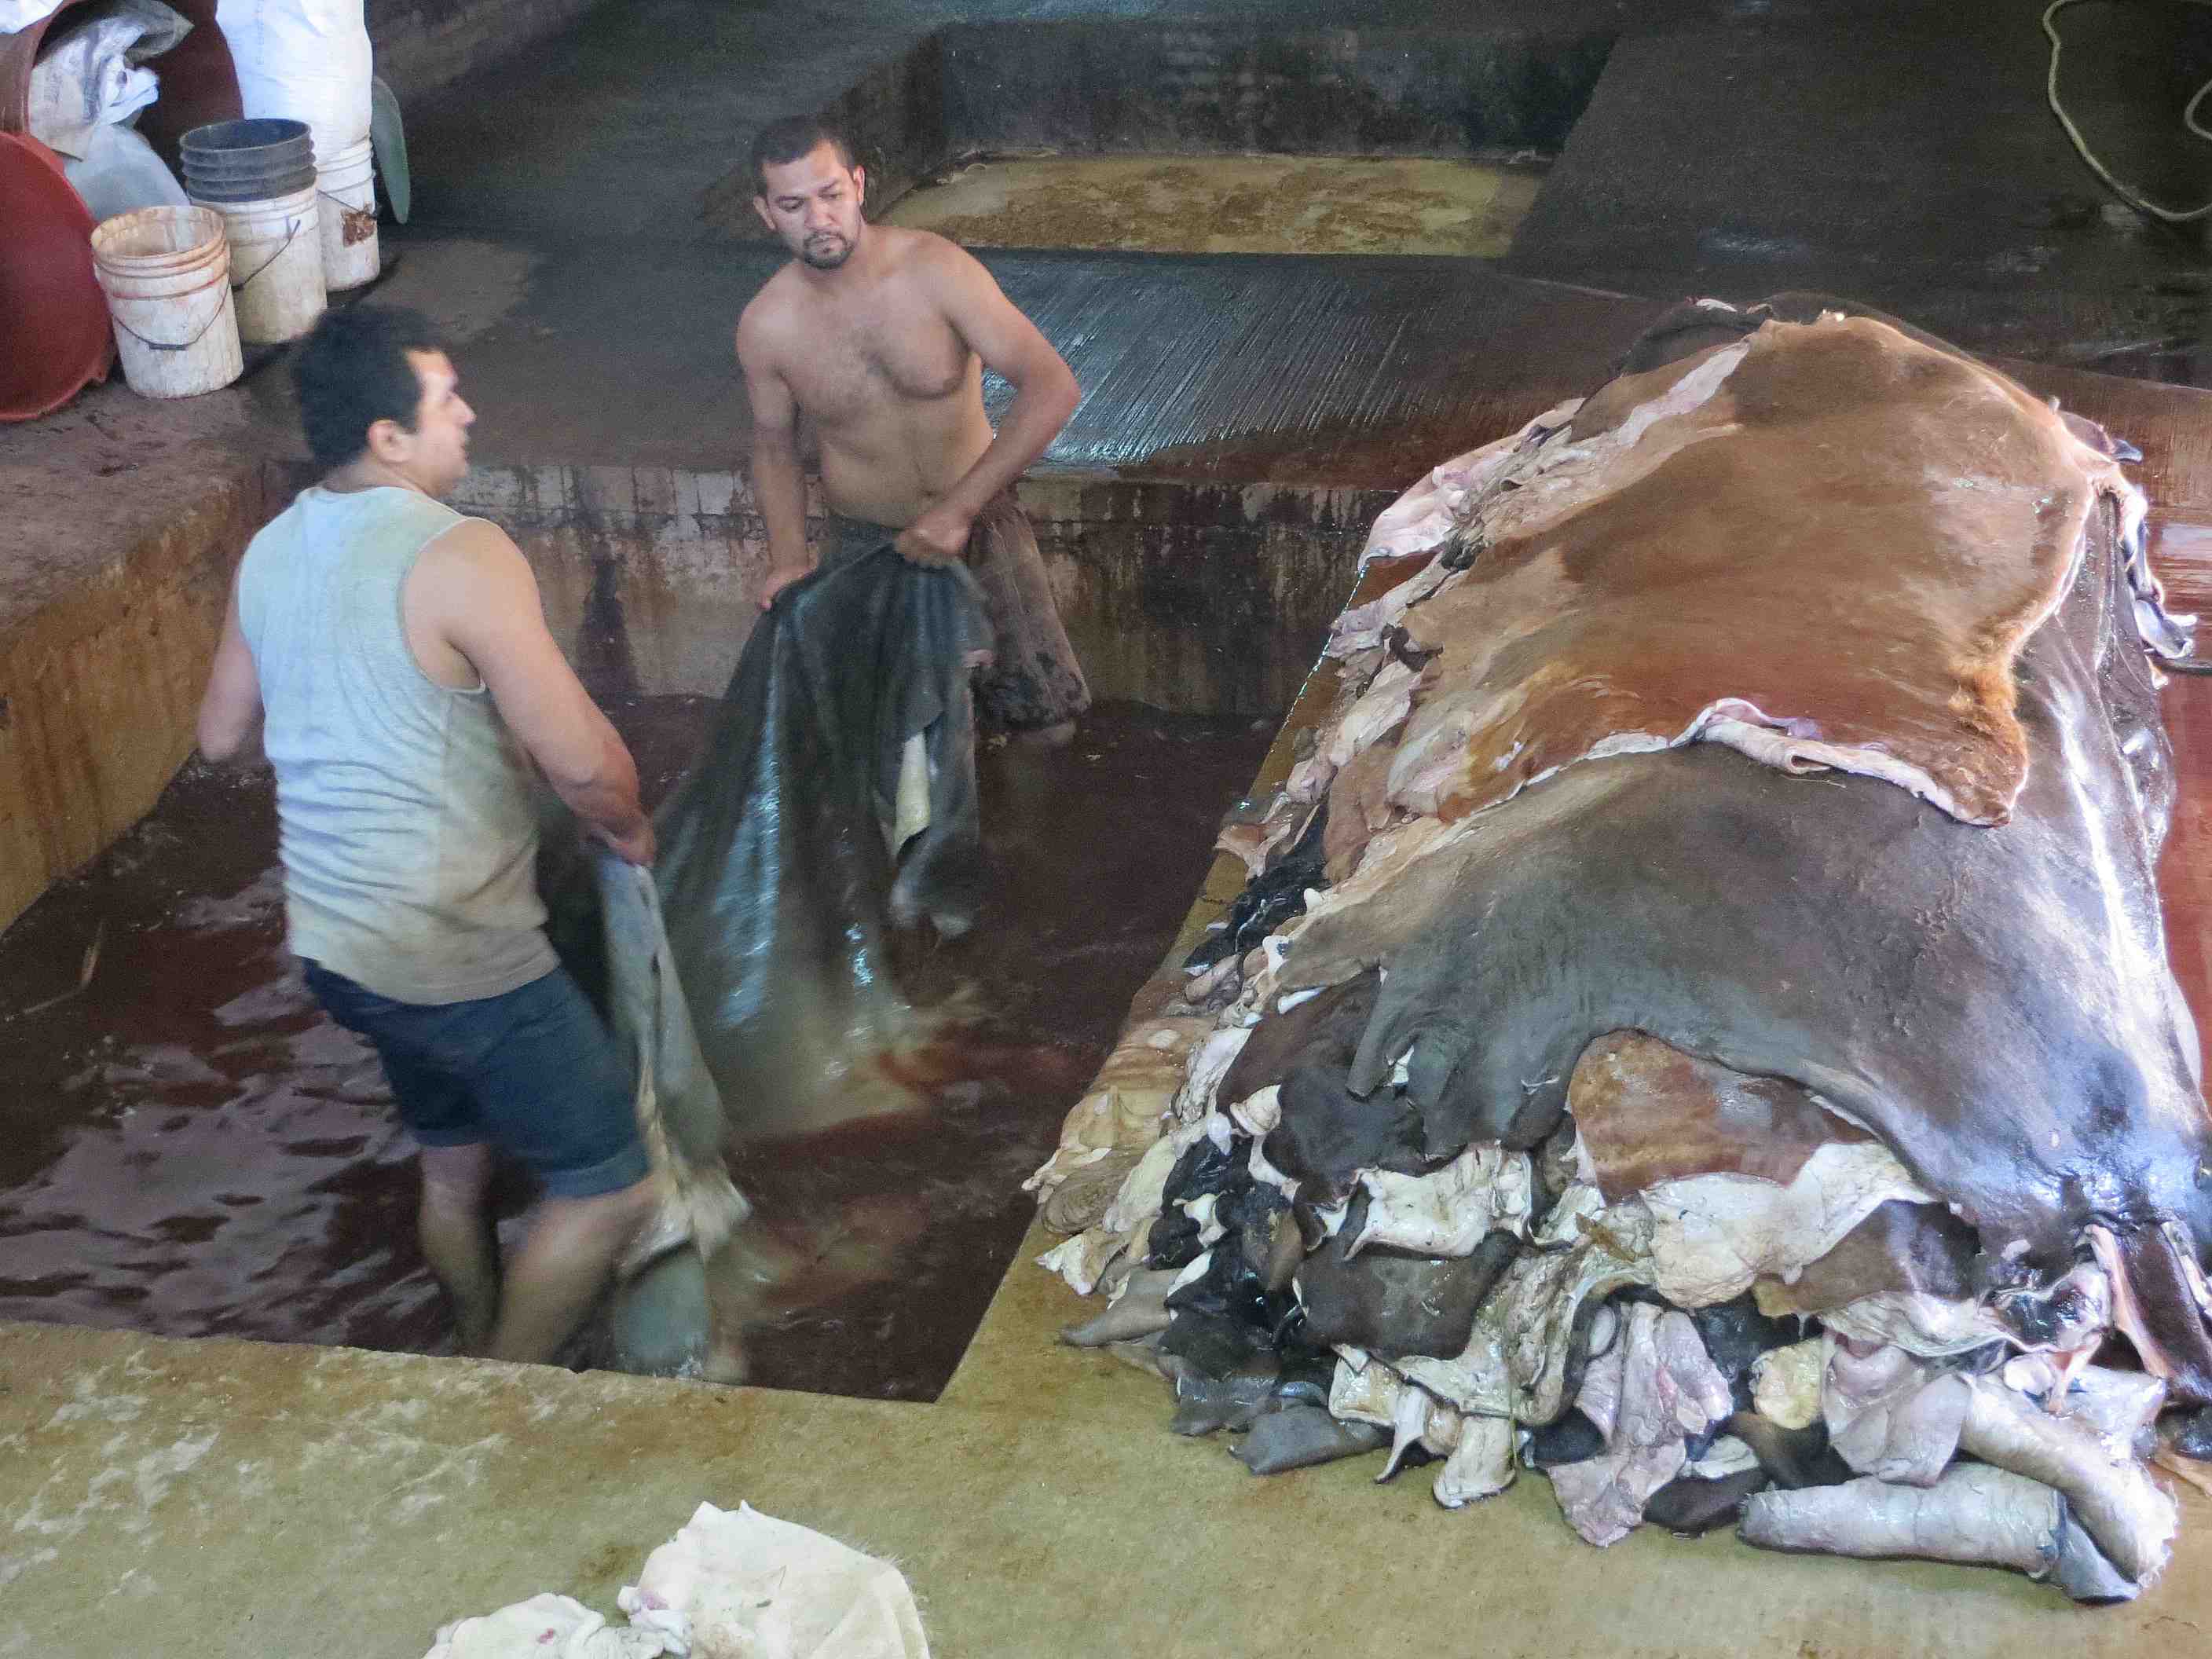
Well anyway, Markus at the huarache blog has done it again… forced me to steal his excellent article and link to his great research in Mexico. The post gets a very close inside look into the tanning process; a somewhat secretive business in my experience.
Great set-up for the beams. Spacious, indoors with a cleanable floor.
I think anyone who has tanned hides will appreciate this solid set-up.
This is just a picture preview. For much more in-depth information, have a look at the article on the Huarache Blog by clicking here.
I appreciate this work so much for having done some myself. Tanning hides is tough, back-breaking labor that goes unappreciated. It’s good to know that there are still folks out there keeping these important skills alive. More importantly, to know that there are alternatives to corporate factories producing little more than garbage and waste. It must be tough on these small family businesses but I hope, for all our sakes, that they find a way to survive.
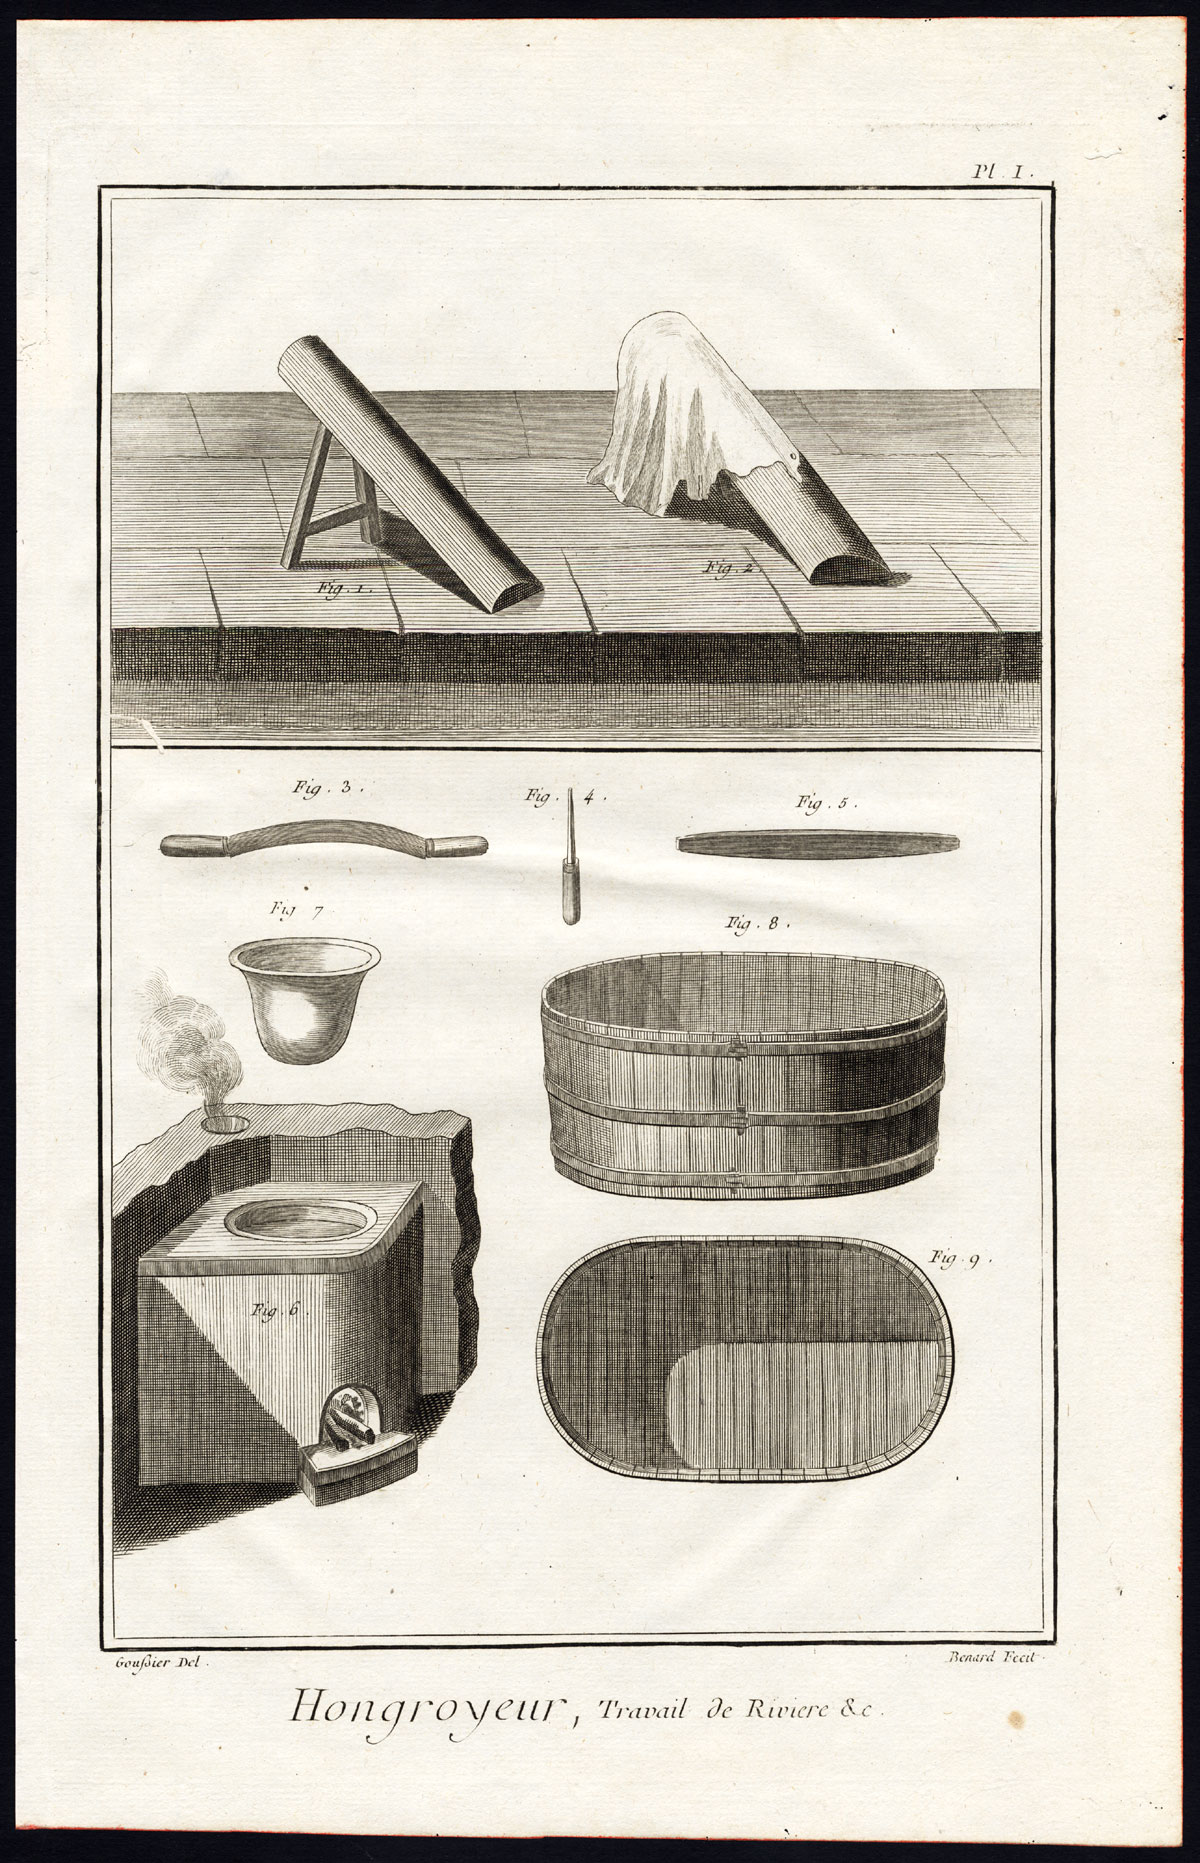
Here are some images from hide tanning workshops from Diderot’s Encyclopedia, 1769 that I found interesting as a leather worker and occasional hide tanner.
Tools for the tanner, the beam, currier knife, slick, tub, and the heater. From the Encyclopedia of Sciences, Arts and Trades, Diderot and D’Alembert.Chamoiseur, From the Encyclopedia of Sciences, Arts and Trades, Diderot and D’Alembert.
If you have done any hide tanning you’ll recognize the tools of the trade. Not much changes for the small-time home tanner.
From the Encyclopedia of Sciences, Arts and Trades, Diderot and D’Alembert.
I suspect this is some hot and smelly work and judging by the way they’re dressed it is a hot room. The only large traditional tannery I have visited was in Morocco and it had an odor on a hot summer day that hit you like a brick wall. I’m not sure what they’re doing with the fire at this stage but maybe adding some amount of smoke rather than heat.
Several years ago, I made a shoulder bag that I still often carry today. It is the perfect size for a small field bag or hunting pouch. It was a lot fun looking at various designs, mostly from the 18th century to try and come up with something that would fit my needs.
My bag, several years and many miles later.
When I first joined Boy Scouts at about age eleven, I envisioned myself as a mountain man-explorer who was going to learn to live off the land. The first merit badge book I bought with my little money was Wilderness Survival and it spoke of the possibles bag that early explorers carried that kept everything they needed to live off the land and cover every emergency. At least, that’s how I remember it. Later, as a an actual wilderness explorer, traveler, and archaeologist, I learned to appreciate the “kit” bag on a more realistic level, and how this bag transforms for different purposes and places one travels. It is the unsealed* survival kit to be used and replenished as needed based on the situation. My current favorites, though too big for general daily wear, are the Mountainsmith Approach pack and my Filson Medium Field Bag. I can live out of either almost indefinitely and both make handsome weekender bags.
On to the Shoulder Bag
After much deliberation and review of mostly 18th century gear I decided I wanted a small outside pocket, a small inside pocket, a larger, closable outside pocket for important things like a compass, and main compartment large enough to hold a notebook and daily essentials. I decided to make the main flap in a stitched-down style so that it would keep things in, even if it wasn’t buckled shut.
In the end, I went with a fairly standard English-American shooting bag style as seen above. It works well for me and after using it for several years now, I don’t believe I would change anything about it.
Large external pocket with button.
Outside open-top pocket
Closed for travel.
Dimensions: the body of the bag is 9 x 10″ with a gusset exposed at 1″. Reinforced ears, riveted for strength. All stitching is two needle saddle stitch, except the body, which is laced. Three pockets, and a 1 1/4″ shoulder strap, adjustable by about 12″.
All the parts of the body except the main gusset.
When laying out a complex sewing project like this, you need to decide in what order to begin the assembly. The back wall of the bag has an internal and external pocket that were sewn down first (beginning with the smaller one inside).
Outer pocket attached.
The outer pocket has a gusset that was sewn inside-out before being sewn down to the front wall of the bag. You’ll probably notice that the edges of the flaps are raw but if I were using thinner leather I would bind them with a soft buckskin or something similar. The raw edges were smoothed and burnished to create a nicer look than just a sharp cut edge.
The assembled bag.
Finished! It’s hard to gauge work time but since that is generally the first thing anyone asks I will estimate about eight hours of stitching and assembly for this project. There is one inside patch pocket, an outside rear pocket, and a gusseted pocket under the flap. Eleven pieces plus the strap (four pieces). Hardware includes a one inch bridle buckle, a 5/8″ buckle, and two solid one inch “D” rings.
The back-side with simple pocket.
Internal pocket just showing.
Now, what to keep in it…
*The modern sealed survival kit was developed for conscripted soldiers and airmen to keep them from rifling through and using up the goods and having nothing when they truly need it. This has carried over into survival-skills-for-morons programs world-wide and creates a product to be sold and consumed by the inept. If you cannot trust yourself to update, change, use, and modify the contents of your personal survival kit, by all means make or buy one and seal it up, awaiting the day it will come in handy. If nothing else, you can enjoy all the surprises you will find while you wait for someone to rescue you. ~GTC
I’m re-sharing an older post of some experimental turnshoes I made quite a few years ago. These were based on some Scandinavian examples from the archaeological record. They came out pretty good for a first try. My only modification would be to tighten the width through the arch and lengthen the toe area slightly. I have since learned that this problem has been well-understood for centuries by shoe makers and is why modern shoe lasts often look long and narrow to the amateur eye.
Finally “finished” enough. These were rubbed down with a “tea” made from walnut juice, worn dry, and later oiled.
This was my first attempt at a proper turnshoe. Basically a variation on the shoes worn in Europe and parts of Asia from the Iron Age (ca. 500 B.C.) through the early modern times (ca. 1700s). This pair is made without a last (form) so construction is similar to other moccasin-type shoes. There are quite a large number of early shoes found in archaeological contexts in Europe so many designs are known. This is inspired by, but not slavish to, shoes found in the British Isles and Scandinavia in the early part of the last millennium.
I was sorry to not document the pattern making but, as can be figured, the upper is a single piece side-seam make by wrapping the foot, marking a rough outline of the plane where the upper meets the sole, cutting off the wrapping, and cutting to shape. Really, I’ll try to make record of this in the future but, for now, I suspect there are other tutorials out there. Besides sewing, the turning is definitely the toughest job as this was some very thick, tough leather.
Still damp from the turning and shaping.My slightly sloppy side-seam.
While looking through my image archive I came upon some leather working illustrations dated to the early 15th century. All but one of the images below is from the extremely informative Mendel manuscript dated 1425 created at Nuremberg, in what is now Germany.
Nuremberg ca. 1648
Creating leather from animal hides has been an important process for many thousands of years with various types of leather created dependent upon the intended use (e.g., shoes, belts, gloves, parchment, shields, ties, lariats, etc.). Creating quality leather from a hide not only requires in-depth knowledge of the process, a little chemistry, and a little bit of hard labor.
These illustrations are an invaluable snapshot in time and space of tradesmen plying their skills. We can learn from these. I’ve arranged the selected images below in an order that makes sense to me from the processes I have used or seen over many years. In my short journey to Morocco many years ago I was lucky to wander through the ancient tannery there and see leather being produced and products made on a remarkable scale in ways that have probably not changed in several millennia. That is what we see below.
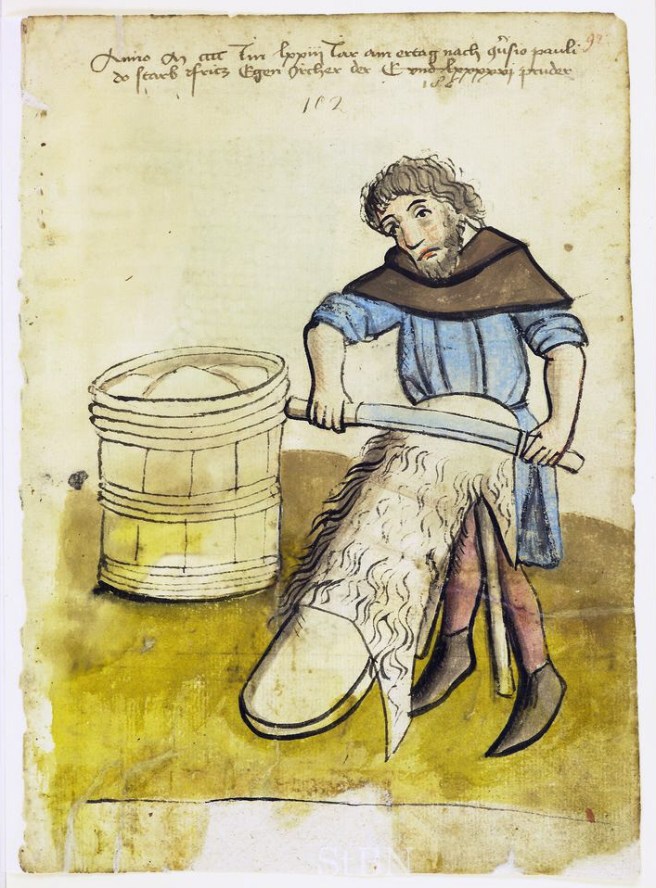
Furrier – The furrier is sorting what appear to be “hair on” skins either for sale or for making warm clothing. This was northern Europe after all. The tradition of trapping or hunting fur-bearing animals is probably as old as human’s time in cold climates.
Soaking the hides – The first step in making leather often involves soaking the hide to hydrate it, sometimes even promoting a brief spell of bacterial growth to “slip” the hair. Most leather manufacturers, however, want to prevent any contamination and use other methods to swell the hide by adding caustic lime (a.k.a. slaked lime, slack lime, limewater, or Ca(OH)2). This tub might be a tanning tub containing tannins from plant material (hence the name “tanning”).
De-hair and fleshing (a.k.a. drudgery on a pole) – The man above is de-hairing a sheep skin on a fleshing beam; a fairly dull and not very fun project for me. My face probably resembles his when I do this task more than a few times in a row. He will then flip the skin over and clean the membranes, fats, etc. from the flesh side before a second bath in the caustic solution. For parchment, I understand that there was only a partial rinse after this but for soft and supple leathers, the skin is rinsed thoroughly to neutralize the pH then treated in a low pH (acidic) bath to make true tanned leather.
Final Scraping in the Frame – Skins are often stretched on a frame to dry and further scraped for a consistent and smooth surface. The hide above is destined to be parchment so it must be a perfect as possible.
What does all this become?
Just as today, people need and use leather for its plasticity, strength, and durability.
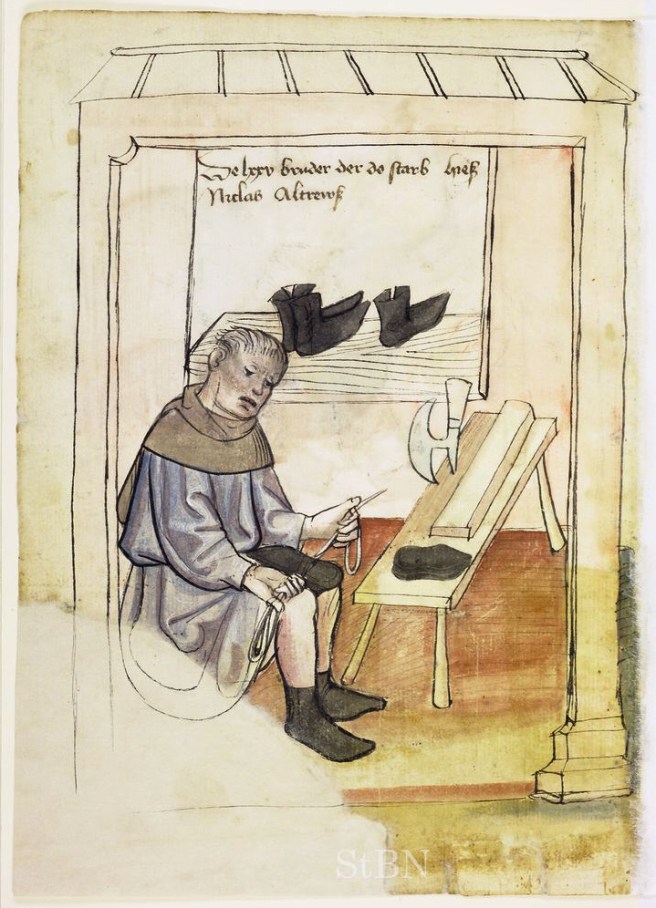
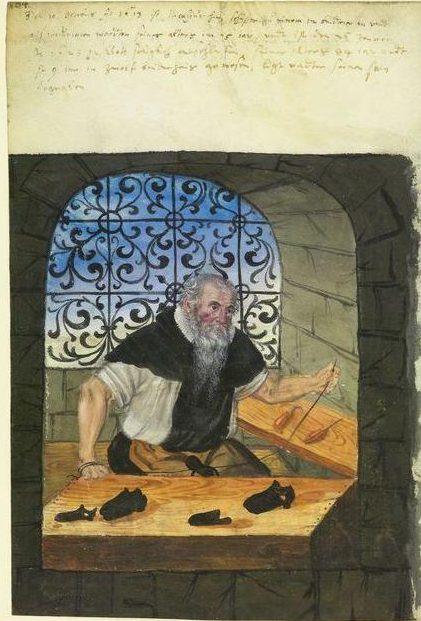
Here we see a cordwainer making shoes. It looks like he in the midst of attaching a sole while sitting at his workbench. The simple tools of the trade are laid in front of him and some finished shoes are displayed behind. Patterns or forms hang on the wall and his pail, probably for water, sits at his feet.
Our workman above is showing leather hose, a popular bit of clothing in its day.
The purse maker is doing a bit of fancy work while his scraps lie beneath his feet; a nice detail.
I’m not sure what this guy is actually doing. If anyone knows for certain, please let me know!
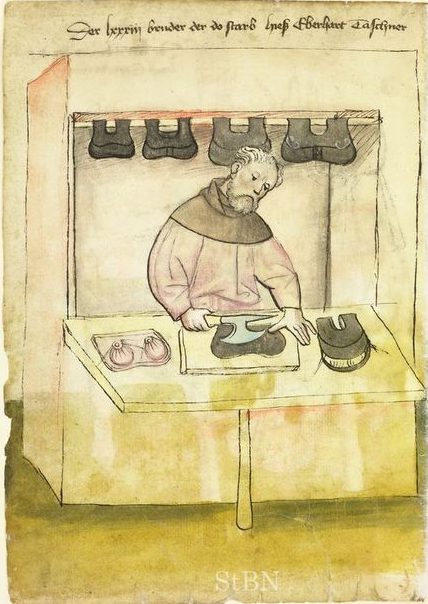
Here we have another shoemaker (cordwainer) hard at work at his bench. Shoes have always been in demand. That is a classic shoemaker’s knife on the bench,
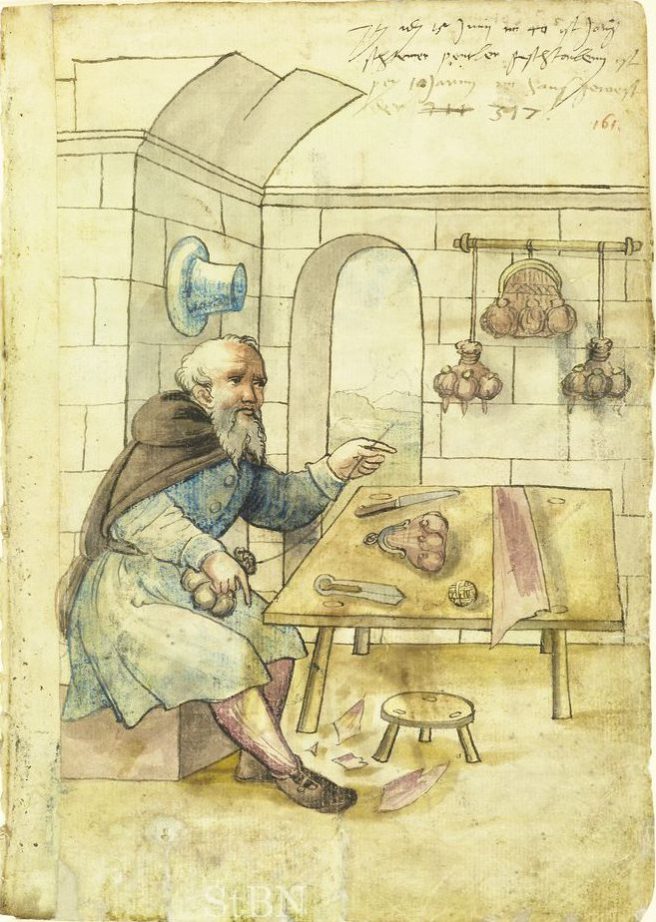
The belt maker had an assortment of belts and is in the midst of punching a hole. Good timing for capturing this image.
Another bag maker creating a classic belt pouch and displaying his wares.
Another take on the cordwainer from the same period by a different artist with a couple of other tools in the background (from the Landauer manuscript).
Why are these guys all old?
A little background – an interesting story of the Zwölfbrüderhausstiftungen (the Twelve Brother’s House).
From BiblioOdyssey, a fine, but sadly dormant weblog: “In 14th century Germany, a wealthy trader by the name of Mendel established a charitable endowment in the city of Nuremberg, known as the Twelve Brothers House Foundation (Zwölfbrüderhausstiftungen). A dozen elderly and unwell (but capable) citizens were (I assume) given a place to live in exchange for their performing work duties.
Although the house life and routine was said to have been inspired by the example of the apostles, there was a fairly anti-clerical or anti-religious tone to the rules and priests were formally excluded from being taken in as one of the ‘brothers’. The house served as a model for the commencement of similar charity foundations in other German cities.
Mendel’s grandson began the practice in the 15th century of having sketches made of each of the brothers engaged in their chosen employment together with detailed notes about the tools and practices relating to their work. The manuscripts were updated until (I think) the beginning of the 19th century, although portraits of craftsmen engaged in their work were only produced in the 15th and 16th centuries.”
I hope you enjoy learning from these images as much as I do.
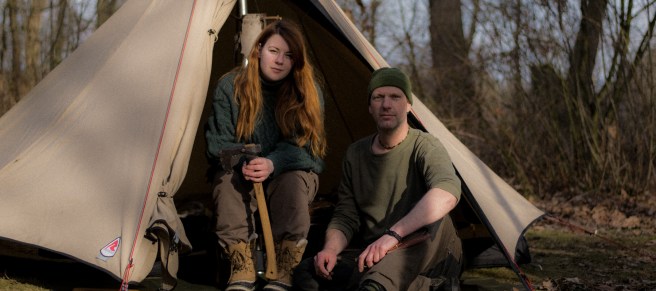
From one of my new favorite blogs Running With Sheep. Johan and Sanne are a couple of remarkable outdoors – bushcraft – survival enthusiasts with more than a touch of philosophy thrown in.
Their most recent project shows how to convert a run-of-the-mill thrift store find into a functional pack basket. From what I can tell, they are adept leather workers so their skill shows in this project. Re-using found objects is an excellent way to economize both money and time, especially if it is something outside your skill set or craft specialty.
Pack baskets are light and strong and a perfect choice for hauling anything from food to dirt. Prehistoric people used them for everything, and the solid structure makes them useful even when not carried on the back (most of the time).
If you can cut a few straight lines, do some minimal sewing, and hammer a rivet, this project is for you. For the complete post, head over to Running With Sheep to learn more. I suspect you’ll want to stay a while and catch up on their other posts as well.

 Here’s a new minimalist traveler’s wallet. I’m still working through the design and construction process but like it so far.
  Simple three-pocket design; a vertical a horizontal card pocket as well as a large one for bills.
 A bucket purse made from an oil-tanned leather. Welted and bound with thin harness-grade bark tanned leather with a heavier leather shoulder strap.
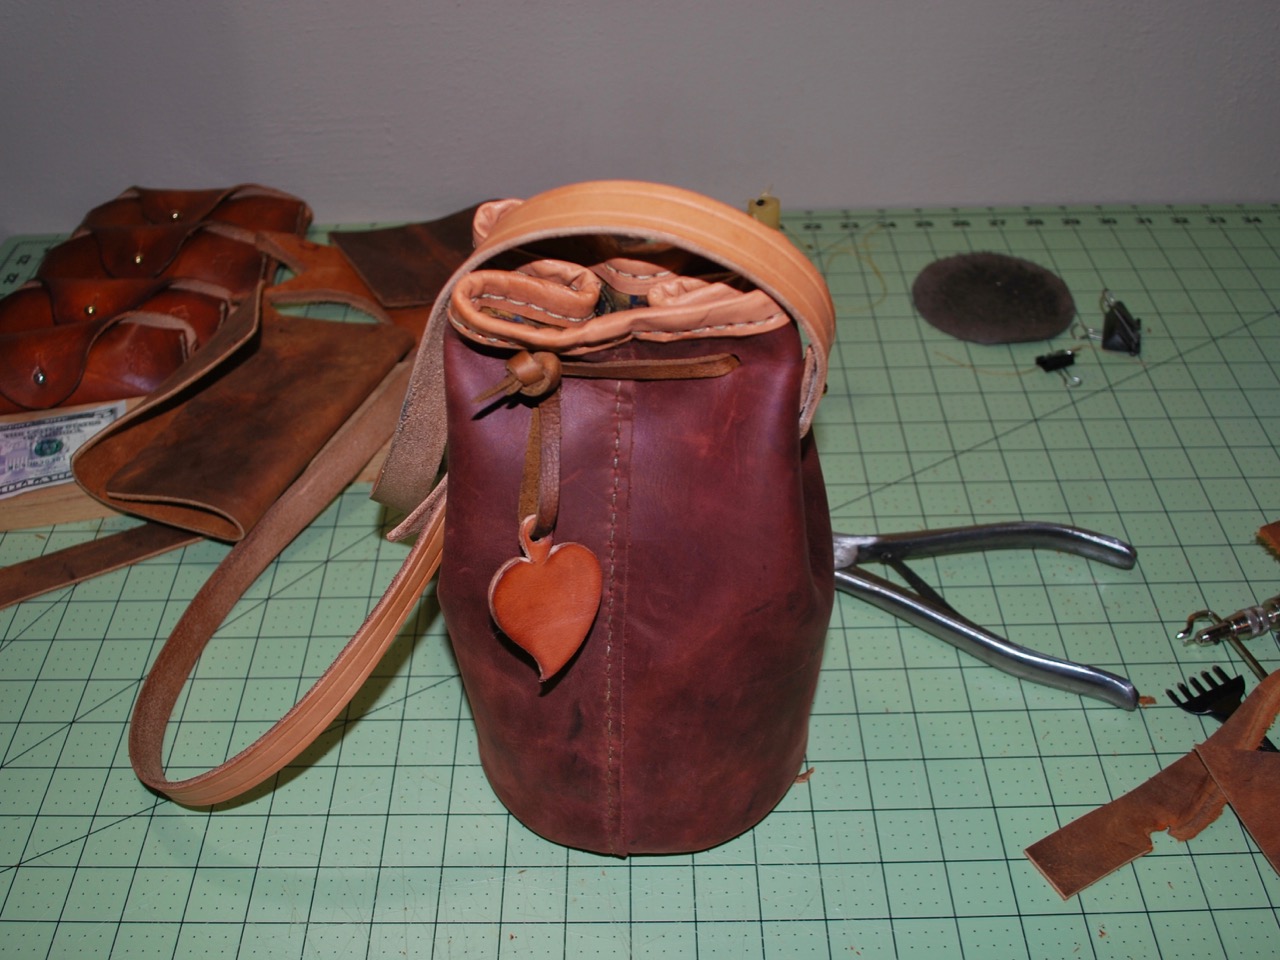 I try to put some sort of bling into projects. This is a historic heart design was cut freehand and balances the antler toggle on the other side.
 Fully lined with a batik print my daughter bought for a skirt.
 Welted bottom.


")


")