Pump Drills

In preparation for summer teaching I recently spent some time making a couple new pump drills for demonstrations and hands-on activities.  While some modern tools were used in the production, these are entirely hand-made with no purchased parts or plans.  As I have only made two of these previously I spent a little time perusing images of old pump drills to find good examples to use as models.

Beginning at the end. The first pump drill of the weekend.

The pump-drill is an ancient technology that was used world-wide for at least the last 5,000 years.  As most (sometimes all) of the parts are perishable, archaeologists are often limited to conjecture on the finer points based on a few surviving parts or images available.  Despite its immense antiquity, pump drills (and their cousins the bow-drills) maintained their currency in the maker’s tool kit well into the Industrial Revolution and, in some places, into the 21st century.

The components of the basic pump drill: shaft, drill bit, flywheel, cross-arm, cord, and flywheel key.

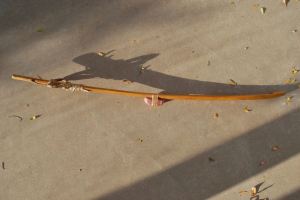
The components can be easily gathered around the house or the wood pile.  The flywheel, in this case, is steatite, a soft soapstone that is easily carved but has a high mass.  Wood or other materials can be substituted if they are more readily available.  My first drill, many years ago had a flywheel from a mesquite wood log. I chose it for its relatively high mass and availability.

The “chuck” shown here was created by drilling a small hole lengthwise down the shaft and cross-cutting with a small back saw. This allows a square shaft drill bit to lock in place as the shaft is lashed tight.

The shaft for this project was split out from some aged oak and worked into a cylinder with a diameter of just over 1/2″ (13 mm). The shaft needs to taper slightly, widest part at the bottom, to keep the flywheel from sliding off.  I drill the flywheel hole 1/2″ wide and slowly reduce the shaft size until it finds a snug fit.

The central hole is “keyed” to keep the weight from sliding around the shaft as it reverses direction.

I learned long ago that through hard use, the stone will sometimes slip around the wood shaft.  Cutting a key slot on the shaft with a corresponding one on the stone will solve this problem with the insertion of a sliver of hard wood or “key.”

My fancy oak key is just a sliver wood. You can literally use a toothpick if you have one in the pantry. Imagine the labor it will save.

Someone could create a nifty GIF animation of this but I think the photos below will assist in understanding how the key works.

A small groove on the shaft holds the key in place while the flywheel is slid over the shaft.

A bit of glue would probably help but I don’t think it necessary if the pieces all fit securely together.

The wheel (or whorl) is slid down the shaft holding the key in place will securely lock both pieces together.

Soapstone is easily worked and can be slabbed, by hand with a hacksaw.  A rasp or an assortment of sandpapers are all that are needed to shape the stone.


A simple metal bit can be easily shaped from a square masonry nail.

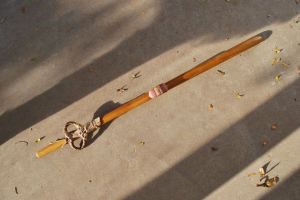
To make a bit from a masonry nail, simply heat it until it is cherry red and let it cool naturally in order to anneal it. This makes the metal soft and easily worked with a file, stone, or grinder.  After it is shaped the point can be re-hardened by heating the point to a dark cherry red again then plunging it in water to cool.

What I didn’t document here is the lashing method.  After fitting the bit in the shaft, the chuck was secured using heavy cotton thread coated in pine tar.  I think that a long-term solution would benefit from using wire but I wanted to keep these simple.  We’ll see if they last.  If you aren’t concerned with “primitiveness” then a strong and permanent connection could be made with JB Weld or two part epoxy.

Anything fun worth doing is worth doing twice. Here are the sibling projects from the weekend.

The second drill, on the left is rigged in a different fashion.  All the connections are made with clove hitches.  We’ll see which we like better.

The rain drove me indoors but it seemed like a good time to take one for a test run. Drilling a block of steatite.
The drill, which hasn’t had it’s final sharpening yet, made it through about 3/8″ of the stone in about 15 seconds.

Spade bits like this one tend to bind as they come through the opposite side so the hole will be finished by flipping the stone over.  Still, the hole is peeking through and ready to finish.

Broken down for storage or easy packing.

Pump drills are an awkward shape to pack when assembled but I discovered early on that they easily disassemble to fit into a very small space.

If you are considering a primitive project as part of your summer “to do” list, give a pump drill a try.  Lots of fun, can be made in a day, and it will impress your not-so-primitive friends.  As a final note, I put an Instructable up based on this post as well.  Have a look if you don’t mind and give comments if you see fit: https://www.instructables.com/id/Primitive-Pump-Drill/

20180529_211322_resized
Follow-up. Drilling slate pendants.

While preparing materials for a primitive tools class I decided to test the new drill on a piece of slate. This is a little harder than soapstone and more abrasive. I didn’t have any lubricant handy (e.g., water) but decided to try it out anyway. It cut like a charm! Just a note to those not familiar with these low-tech drills; the hole is generally cut until is just barely pokes through the other side then the object is flipped over and drill from the rear. This keeps the bit from binding as is comes through.

Enjoy…

Making a bow-drill fire

I was lucky to learn this method as a young Scout and have stayed proficient over the many years since.  To become truly skilled at this, I went through a period of making a coal every day with either this method or by hand drill.  I spent a couple days and nights out in the snow and drizzle and decided to share a bit of my experiences for anyone patient enough to watch.  I hope you enjoy.

Thoughts About Minimalism and Survival

Learning a thing or two from the past…Part 1, 21st century Westerners are not the first to minimalize.

kylixdonkey
How much stuff do we really need to lug through life?

“The things you own end up owning you.” Chuck Palahniuk, Fight Club

There’s a lot of recent talk about Minimalism as a social movement and this fits well with my personal philosophy and my interests in preindustrial technology and survival.  Not long ago, minimalism was mostly associated with artists, aesthetes, wanderers, mystics, and philosophers.  That is to say, the fringe element, outsiders, and weirdos.  These things come in cycles and I think, as a backlash against generations of sell-out philosophy and the creation of a professional consumer class, many people are reaching for something new.

We come to learn that everything old is new again.

I’ve been pondering history and prehistory on a full-time professional basis for several decades now.  As hard to believe as it may be, I even get paid a salary to do it.  One of my professional interests involves the tools, tool-kits, and strategies for surviving that various people have come up with for dealing with the world.  As a sometimes primitive skills-survival instructor and full-time frugalist I think it important to not reinvent a lifeway when we have millennia of ancestors who dealt with most of the same issues we do today.

San
A San bushman demonstrating fire-making.  Ostrich egg canteen in the foreground. These people probably resemble our ancestral way of life and have very few possessions, even in their harsh environment.

For most humans, for most of our history, owning too much stuff has never really been an issue.  We had what we needed and either made what we needed or did without the things we didn’t have.  It brings a smile to my face to know that more than 2,500 years ago, various thinkers people in China, India, Greece, and the Middle East were contemplating the nature and evils of acquiring stuff; some were even writing about it.  That’s not to say that I have immediate plans to become a wandering mendicant like a medieval friar (as appealing as that might sound to some) but I do have an interest in lightening my material load and some very specific goals for the coming year.

mendicant
Medieval European mendicants represented by a pilgrim and a friar.

My foundation as a minimalist (and I may not be very good at it)-

I have been thinking about what stuff a person needs to survive since I was a teenager who enjoyed backpacking and travel.  Like virtually every young boy, I had grand ideas of escaping the family and traveling unhindered across the world.  My family weren’t exactly readers but I devoured Jack London and Mark Twain stories as a kid.  I loved the extensive and well-thought out gear lists provided in the Boy Scout Handbook, the Explorer’s Handbook, and the Philmont Guides.  I read Larry Dean Olsen’s great book of Outdoor Survival Skills and Colin Fletcher’s The Complete Walker again and again.  I read about the mountain men of the fur trade, and always, took note of what they carried or didn’t seem to need.  I would copy lists into a notebook and revise them while sitting in some boring high school class, making my own lists of what I have, what I need, and what I want.  This thinking encouraged me to work and save money to buy a better knife, backpack, or camping stove.  I was probably the only kid I knew who wanted, and got, a file and whetstone for Christmas one year (my grandpa was good that way).  My friends and I spent our teens and early twenties hiking and camping year round, mostly in the woods of the Ozarks in southern Missouri testing our mettle at that time in life time when all teenagers know they are invincible.  Some of us even made it to Europe, Asia, Africa, and beyond.

Books
A few of the many books I ended up possessing on a quest toward fewer possessions.

In a modern sense of survivalist, many people look to the military or the loonies of the social media.  Often, military service is the time when young men and women are introduced to such things for the first and only time in their lives.  Realistically however, the military itself acknowledges it’s shortcomings on a personal basis as (with the exception of a few special operations units) its entire system is dependent on lengthy and complex supply lines, support chains, and de-emphasis of the individual and personal decision making.  Military survival is generally approached as a means of keeping alive until help arrives.  Great for fighting a war, but not always so good when you are turned loose into the world.  This sort of survival strays from our point here anyway.

More (and less) to come soon.


* here are a few links to modern Minimalists of various ilks and philosophical merit.  A journey through these links will hint at the breadth and depth of people on different paths but moving in the same direction.

Read, research, think, and enjoy!

Primitive Fishing

My fishing kit is coming together and I added another hook and leader last night.

DSC_0124 (6)

The left hook and gorge are made from deer cannon bone (metacarpal) and the right is whitetail deer antler.  The antler hooks are proving to be tougher and less likely to snap under tension.  The leaders here are yucca and stronger than I would have thought.  Hopefully, we can test them out sometime very soon.

Learning by Replication

I study the technology of prehistory.  Because of this, I believe strongly in the benefits of experiential archaeology.  It gives perspective on a very deep level.  We can walk in the shoes of our ancestors, so to speak.  I say experiential here not experimental and I’m glad to hear this word coming into the dialog of other primitive technology people.  While not trying to dwell on the words themselves, it is an important distinction.  Experimental generally implies the ability to replicate an actual experiment (i.e., testing a hypothesis to see what you find).

https://paleotool.com/wp-content/uploads/2011/06/dsc_0227.jpg
Experimental pottery; gathering materials, construction, paint, and firing.  Click the image to see more about this project.

True experiments are things like:

  • Can a tree be cut down using an exact replica of a prehistoric axe?
  • Is it possible to move a ten ton stone over long distances using only the technology and manpower available in the Neolithic? 
  • Can fire be made by rubbing sticks together? 
  • Will a Medieval arrow penetrate 14 gauge armor plate?

You certainly gain the experience through these experiments but you are also testing something specific with something like a yes or no answer.  Experimental archaeology can create some popular misconceptions as well.  Just because something could be done, doesn’t mean that prehistoric people must have done it that way.

Replicated woven sandals from the Southern High Plains and the greater Southwest.  Produced from narrow-leaf yucca.
Replicated woven sandals as found on the Southern High Plains and throughout the greater Southwest. Produced from narrow-leaf yucca (by Stacey Bennett).

Experiential archaeology integrates this and everything else learned along the way.  E.g., How comfortable are these shoes, is there more or less back pain using a tump line on a pack, what kind of wear can be expected on arrow fletchings over time?  This allows us to ask even more questions and have a fuller knowledge of ancient peoples.

DSC_0037
Testing silk lashed goose feather fletching. Clicking the image links to bamboo arrow making.

I really enjoy the various directions replication takes the maker.  Learning the finer points of cutting and scraping with stone flakes or abraders, working with antler and wood, creating glues and mastics, and developing an appropriate paint or sealer as on the spear thrower below.

DSC_0001 (9)
Upper Paleolithic-style spear thrower.  Image links to the “how to” for making this thrower.

Whatever you do and whenever you learn, it’s all good.

Raised With Wilderness Skills

Don’t leave the kids out of the things you find important…

Nota bene! The following ramble was written at three in the morning and may contain sentiment, ramblings, and a bit of opinion. I don’t want this to sound preachy.  What was intended as a few childhood pictures from primitive technology events ran away with itself in the dark hours between sleeps.  ~G


Learning to shoot at an early age. Skills like this build coordination, confidence, and an understanding of the greater things in life.

There is a certain amount of balance that can become of the unique skills we gain along the path of our lives.  Some people come to events, take classes, and return to the ‘normal’ life at the end of the week relatively unscathed by the learning they paid for and the time spent.

The first brain-tanned shirt and wearing it with pride. It was a hand-me-down from a friend’s daughter.

To closely paraphrase a linguistic anthropologist I knew long ago,

“Some things we love are embraced the way most people embrace their religion, they take away some message, feel strongly about it, but leave it for Sundays. When we find the thing that is our passion, we embrace it like a lover; it encompasses all our thoughts and becomes our entire life.”  ~L.F.

This is how I feel about primitive skills, wilderness living, and pre-industrial craftsmanship.  Without consciously trying, it just became a part of life growing ever stronger from teenage into full adulthood.  While living in the consumer world, this alternative floated in the background of the mind and continued to influence activities when our child came along.

We were not perfect parents.  Far from it.  But we were consciously better than our own.  We really tried.  We learned.  I sometimes wish I had it to do all over again.  Overall, I think we did pretty well and were lucky in many ways.  We encouraged exploration, learning, and self-reliance.  By not child-proofing everything or creating needless prohibitions, we were forced to be more aware and in the present.  Yes, it is probably more work and yes, it can be exhausting but children should learn their most valuable lessons at home from family, whatever ‘family’ may mean to you and yours.

Every kid and every family is different.  They aren’t robots and it is clear to any observer that they have a mind and ideas of their own from a very early age.  We can only steer them as best we can, present them with our ideas and beliefs, and provide the types of opportunities we think will give them a good grounding for their future lives before setting them free to try their skills in the world.

Examining a fish-hook cactus in the Sonoran desert.

It makes me sad hear or to read in social media that parents that I actually know are so down on the next generation.  Complaining that they don’t go outdoors, have useful lifeskills, proudly hitting them, or even ridiculing them for using the technology they themselves provided.  If that is the case, the blame is only ours!  We cannot place the blame on media and movies and video games, schools, government or a general millennial malaise.  It is not anyone else’s job to raise our children well.  We are, to a large degree, culpable.  When I hear a parent complain that their kid watches too much TV, or plays too many video games, I am baffled.

None of us are perfect, but we can give the following generations the values and ideals we may only cherish in the abstract.

DSCN2530
Modelling the yucca fiber skirt with her buckskin shirt.  A monumental amount of yucca processing.

The intended descriptions have strayed into a hopelessly sentimental post, but anyway, enjoy some of my favorite photos I dug out recently.

Winter Count 2009 - 67
Making fire in the Arizona desert 2009.

I leave you with this broad paraphrasing of Edward Abbey:

Give them the skills and encouragement to get out there and hunt and fish and mess around with friends.  Let them ramble out yonder and explore the forests, climb the mountains, bag the peaks, run the rivers, breathe deep of that yet sweet and lucid air.   And at the end of the day, sit quietly for a while with them and contemplate the precious stillness, the lovely, mysterious, and awesome space we call earth.

We are fed by those that surround us. Choose wisely.
Blacksmithing her first knife.

I hope to see a few of you in the great outdoors very soon.  And don’t forget to bring the family if you can.

Save

Save

Ghillies (simple shoes) again

Here’s a simple shoe design that was made by our ancestors before there were shoe shops or Zappos.  Much of the Europe population, both male and female wore a variation of this for many millenia, right up into the early 20th century.  They are commonly associated with their Celtic cousins in Scotland, Wales, and Ireland but they are essentially the same as the simplest Roman carbatina.  Essentially, it’s a basic European shoe.

I made a set of these around 1986 with a little instruction from an Eighteenth Century reenactor and loved how simple they were to make.  My experience up that point was with Native American style moccasins the difficulty I had with sewing in those days.  This was a perfect option for me and I find that it is a popular class when I offer it as an introduction to leather working and moccasin making.

While this isn’t exactly a tutorial, it does provide the basic information necessary to get started on a pair for yourself.  I would suggest a pattern to be cut from heavy cloth before diving into cutting valuable leather just to get the fit right.  It’s a forgiving design so,

Don’t Panic.

pattern and finished
rear view
rear view
sewn heel
sewn heel
lacing the toe
lacing the toe
after wetting and shaping
drying before oiling

And finally, six years later, they still function well.  The soles are getting thin so it’s almost time to renew them.  Fortunately, a pattern can easily be made and adjusted from the old pair by wetting them, letting them dry flat, and using that as a starting point.

dsc_0130-3 dsc_0127-5Dive on in.

Save

Save

Making Modern Spearthrower Darts (Atlatl)

Power Tools and Preindustrial Technology

Recently, I realized I needed to make a new batch of darts (spears) for an annual atlatl event at Blackwater Draw.  This is a recurring problem when teaching large groups, so several years ago I came up with a system that works well for mass producing these Ice-Age weapons with just a few common power tools.  Nothing about this project is particularly difficult but if you need to produce darts by the dozen, it can get pretty tedious and take many hours. Power tools, in this case, decrease the necessary time and energy allowing free time to pursue more satisfying occupations.

After several decades teaching and demonstrating primitive technology I have learned that people are not careful with other people’s hand-made items (kids doubly so) so making robust and easily replaced models is a real time-saver.  Also, having tried many designs with kids and adults, I have found a size, weight, and flexibility that I think covers a wide range of body types and skill sets so that most people, most of the time, can have some success in just a few throws (except Jim Gnapp, he’ll just never get it).  After promising to do this for several years now, I put together a recipe for mass producing atlatl darts.

GEORGE’S RECIPE FOR LARGE BATCH ATLATL DARTS –

INGREDIENTS:

  • Straight-grained kiln dried hardwood, 3/4″ oak or hickory; three side planed or better
  • Super glue, gel type or favorite fletching glue
  • Strong, thin thread (I use silk for my personal arrows and darts but any standard sewing thread is fine)
  • Glue-on archery field points, 190 gr. or better
  • Two part epoxy
  • Feathers, TruFlight full length arrow feathers or other feather splits; three dozen or package of 50

TOOLS:

  • Table saw
  • Bench sander
  • Sandpaper, 100 and 150 grit; finer paper optional
  • Optional: arrow taper tool for centering and precise fitting of points
  • Small hand saw, band saw, or similar to cut shafts to length
  • Tapered countersink drill bit
dsc_0117-1
Ripping the board into 1/2″ strips.

Preparing the Shafts: Rip board into 1/2″ strips, then re-saw to create 1/2″ square cross-section.

dsc_0118-6
Second rip to square off the shaft.

Set table saw to 45° to further re-saw shaft into octagon section.  This can then be smoothed by hand with sandpaper or on the belt sander.

dsc_0120-2
After the shafts have been ripped into octagons (six passes total for each), the bundle is cut to length. I generally make these 84″ (213 cm).

Cut shafts to length. I generally cut them to 7′ (84″).

dsc_0122-1
Tapering the final 6″ to fit the points.

At this point you will notice that the shaft is far to wide for standard arrow field points so some free-hand shaping on the sander will be required.  Taper the final 3-6″gently down to a scant 3/8″ diameter, rounding the shaft as you go.

dsc_0126-1
Using a tapering jig for a tight fit to the head.

Taper the shaft to fit the field point and test fit a point.

dsc_0127-1
The gang ready to be inserted into their heads.

Repeat until board is consumed and all shafts are all prepared.  At this point, further shaping of the shaft can be accomplished on the bench sander to round out the octagon shape.

dsc_0124-1
190 grain (ca 0.5 oz.) field point test fitted and ready to glue.

Mix a small batch of epoxy and attach the heads to the dart.  I give them a final tap after insertion by holding the dart point down over a hardwood scrap and dropping it a couple feet, sealing the point.  Wipe off any excess epoxy and wait the recommended cure time.

dsc_0117-2
Tying down (whipping) the quill.  This one is not pretty but will work.

Fletching: Tear off about 1/2 inch of the vane or barbs from the quill (the barb is the hairy or fuzzy part).  Place a dab of super-glue on the forward end of the quill and hold down about 7-8″ forward of hind part of the shaft. Once this sets, repeat two more times placing the feathers evenly around the shaft (one-third way around). Trim the rear of the feather to make all three match in length.

dsc_0119-2
Trimming to length.

Using a scant quantity of glue, attach each feather to the shaft.  You can skip this and just tie them down but the glue makes for a robust and neat-looking fletching.  Whip down the front and rear of the feather with thread and coat lightly with super glue to prevent unraveling.

dsc_0122-3
Using a countersink to create the dimple.

Using the tapered countersink bit, create a notch in the base of the dart. For security and strength, I recommend whipping the final 3/8″ of the shaft with thread and coating with super glue to strengthen to wood.

Take a break, drink a beverage, and congratulate yourself on a job adequately done.  You now have a set of tough darts for play and learning that should, with some care, last for several years of hard use.

THROWERS:

dsc_0766
Whittled hook on hickory thrower.
dsc_0681
A smattering of throwers made in about 30 minutes for a class instruction. Ripped out on a band saw, roughly sanded to create smooth round edges, and steamed for 30 minutes prior to free-hand bending.

Now for the thrower… “It is to be created in the usual fashion, neither too long or too short, too heavy or too long.” ~pt

Seriously though, there are myriad ways to create a stick with a hooked end and I won’t go into the finer points here.  I will say that this is really the simple part and can be achieved with either hand or power tools in a short time.  There is much about spear thrower design (atlatls) on the web and it is important to remember that most cultures world-wide used these efficient tools.  As their prey and use varied, the styles varied as well.  They broadly fall into a few categories but the most common in the U.S. are variations on the “Basketmaker” or “Great Basin” styles and what I like to think of as the hammer-handle styles (above).  The latter are more akin to the early designs from the Ice Age and are found throughout Europe, often make from reindeer antler, over many millennia.

My second favorite; Osage orange wood, buckskin, sinew, pitch glue and red argylite.

As for style, I personally recommend finding a cultural group you are interested in or just a design that strikes your fancy and dive in.  Wood is cheap, easily worked and plentiful.  Worry about the details later.

Click the image to learn more about this thrower.

FINALLY, FIELD TESTING:

They work! and all survived a day of heavy use.


Oh but wait! There’s more! Here are a couple other respectable links to get you started:

OCCOQUAN PALEOTECHNICS LLC.®

0_seitenkopf


Save

Save

Save

Save

Save

Save

Save

Save

Save

Save

Save

Save

Save

Save

Save

Save

Save

How to Build an Earthen Oven — Savoring the Past

https://youtube.com/watch?v=i0foHjPVbP4%3Fversion%3D3%26rel%3D1%26fs%3D1%26autohide%3D2%26showsearch%3D0%26showinfo%3D1%26iv_load_policy%3D1%26wmode%3Dtransparent

The existence of ovens like this is easily documented for the 18th century. In fact, just about every ancient culture had a very similar oven. There’s one particular wood cut illustration from medieval times depicting an earthen oven built on a wagon. There are references in 18th century literature and also archaeological evidence that you […]

via How to Build an Earthen Oven — Savoring the Past