
Power Tools and Preindustrial Technology
Recently, I realized I needed to make a new batch of darts (spears) for an annual atlatl event at Blackwater Draw. This is a recurring problem when teaching large groups, so several years ago I came up with a system that works well for mass producing these Ice-Age weapons with just a few common power tools. Nothing about this project is particularly difficult but if you need to produce darts by the dozen, it can get pretty tedious and take many hours. Power tools, in this case, decrease the necessary time and energy allowing free time to pursue more satisfying occupations.
After several decades teaching and demonstrating primitive technology I have learned that people are not careful with other people’s hand-made items (kids doubly so) so making robust and easily replaced models is a real time-saver. Also, having tried many designs with kids and adults, I have found a size, weight, and flexibility that I think covers a wide range of body types and skill sets so that most people, most of the time, can have some success in just a few throws (except Jim Gnapp, he’ll just never get it). After promising to do this for several years now, I put together a recipe for mass producing atlatl darts.
GEORGE’S RECIPE FOR LARGE BATCH ATLATL DARTS –
INGREDIENTS:
- Straight-grained kiln dried hardwood, 3/4″ oak or hickory; three side planed or better
- Super glue, gel type or favorite fletching glue
- Strong, thin thread (I use silk for my personal arrows and darts but any standard sewing thread is fine)
- Glue-on archery field points, 190 gr. or better
- Two part epoxy
- Feathers, TruFlight full length arrow feathers or other feather splits; three dozen or package of 50
TOOLS:
- Table saw
- Bench sander
- Sandpaper, 100 and 150 grit; finer paper optional
- Optional: arrow taper tool for centering and precise fitting of points
- Small hand saw, band saw, or similar to cut shafts to length
- Tapered countersink drill bit

Preparing the Shafts: Rip board into 1/2″ strips, then re-saw to create 1/2″ square cross-section.

Set table saw to 45° to further re-saw shaft into octagon section. This can then be smoothed by hand with sandpaper or on the belt sander.

Cut shafts to length. I generally cut them to 7′ (84″).

At this point you will notice that the shaft is far to wide for standard arrow field points so some free-hand shaping on the sander will be required. Taper the final 3-6″gently down to a scant 3/8″ diameter, rounding the shaft as you go.

Taper the shaft to fit the field point and test fit a point.

Repeat until board is consumed and all shafts are all prepared. At this point, further shaping of the shaft can be accomplished on the bench sander to round out the octagon shape.

Mix a small batch of epoxy and attach the heads to the dart. I give them a final tap after insertion by holding the dart point down over a hardwood scrap and dropping it a couple feet, sealing the point. Wipe off any excess epoxy and wait the recommended cure time.

Fletching: Tear off about 1/2 inch of the vane or barbs from the quill (the barb is the hairy or fuzzy part). Place a dab of super-glue on the forward end of the quill and hold down about 7-8″ forward of hind part of the shaft. Once this sets, repeat two more times placing the feathers evenly around the shaft (one-third way around). Trim the rear of the feather to make all three match in length.

Using a scant quantity of glue, attach each feather to the shaft. You can skip this and just tie them down but the glue makes for a robust and neat-looking fletching. Whip down the front and rear of the feather with thread and coat lightly with super glue to prevent unraveling.

Using the tapered countersink bit, create a notch in the base of the dart. For security and strength, I recommend whipping the final 3/8″ of the shaft with thread and coating with super glue to strengthen to wood.
Take a break, drink a beverage, and congratulate yourself on a job adequately done. You now have a set of tough darts for play and learning that should, with some care, last for several years of hard use.
THROWERS:


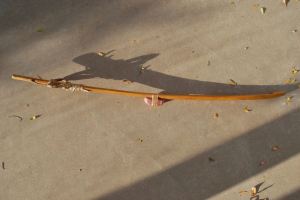
Now for the thrower… “It is to be created in the usual fashion, neither too long or too short, too heavy or too long.” ~pt
")
")
")
")
Seriously though, there are myriad ways to create a stick with a hooked end and I won’t go into the finer points here. I will say that this is really the simple part and can be achieved with either hand or power tools in a short time. There is much about spear thrower design (atlatls) on the web and it is important to remember that most cultures world-wide used these efficient tools. As their prey and use varied, the styles varied as well. They broadly fall into a few categories but the most common in the U.S. are variations on the “Basketmaker” or “Great Basin” styles and what I like to think of as the hammer-handle styles (above). The latter are more akin to the early designs from the Ice Age and are found throughout Europe, often make from reindeer antler, over many millennia.
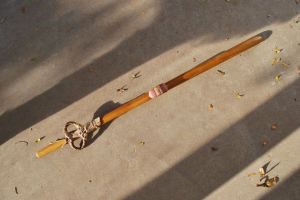
My second favorite; Osage orange wood, buckskin, sinew, pitch glue and red argylite.
As for style, I personally recommend finding a cultural group you are interested in or just a design that strikes your fancy and dive in. Wood is cheap, easily worked and plentiful. Worry about the details later.

FINALLY, FIELD TESTING:


They work! and all survived a day of heavy use.
Oh but wait! There’s more! Here are a couple other respectable links to get you started:
OCCOQUAN PALEOTECHNICS LLC.®


It is true, brow ridges negatively effect throwing……