Eight Foot Terrapin

CTLogo
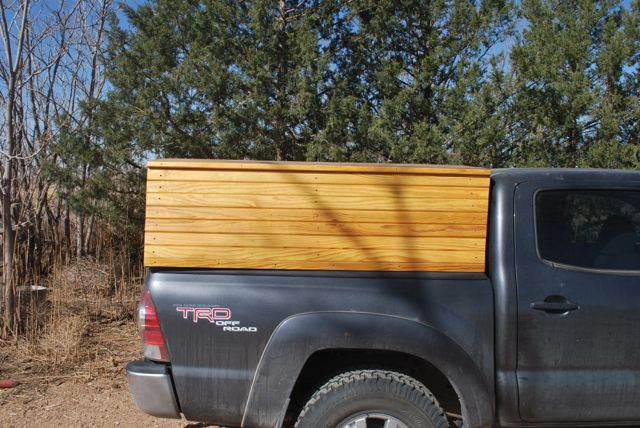
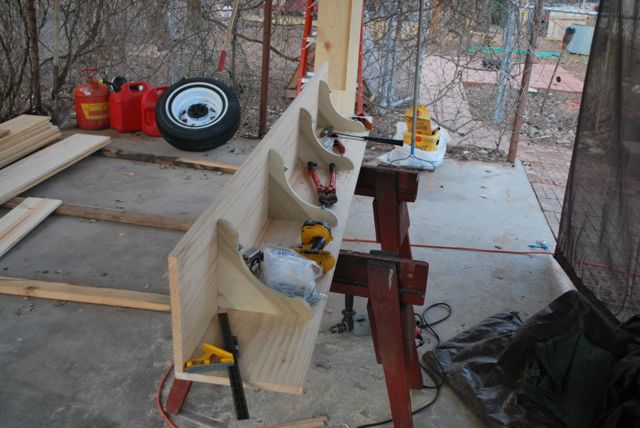
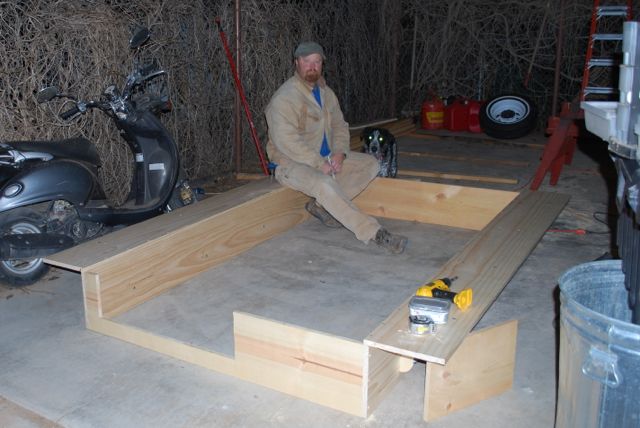
Not terribly far from the Paleotool secret lair there toils a designer and builder of unique, hand-built, small campers.  Inspired by the lack of uniqueness and beauty in mass-produced campers, Peter Pavlowich put his Wood Construction and Design degree to work to create beautiful, minimalist campers for small pick-up trucks under the name Casual Turtle.  These are real works of craftsmanship and simplicity and are reasonably priced for those who cannot or do not want to build their own.  I particularly like the compound curves of his roof designs.

OLYMPUS DIGITAL CAMERA“Casual Turtle Campers was founded on the belief that wood is good, small can be comfortable, and that there is still room for simplicity in this increasingly complex world.”  Peter Pavlowich, owner-designer-builder, Casual Turtle Campers.

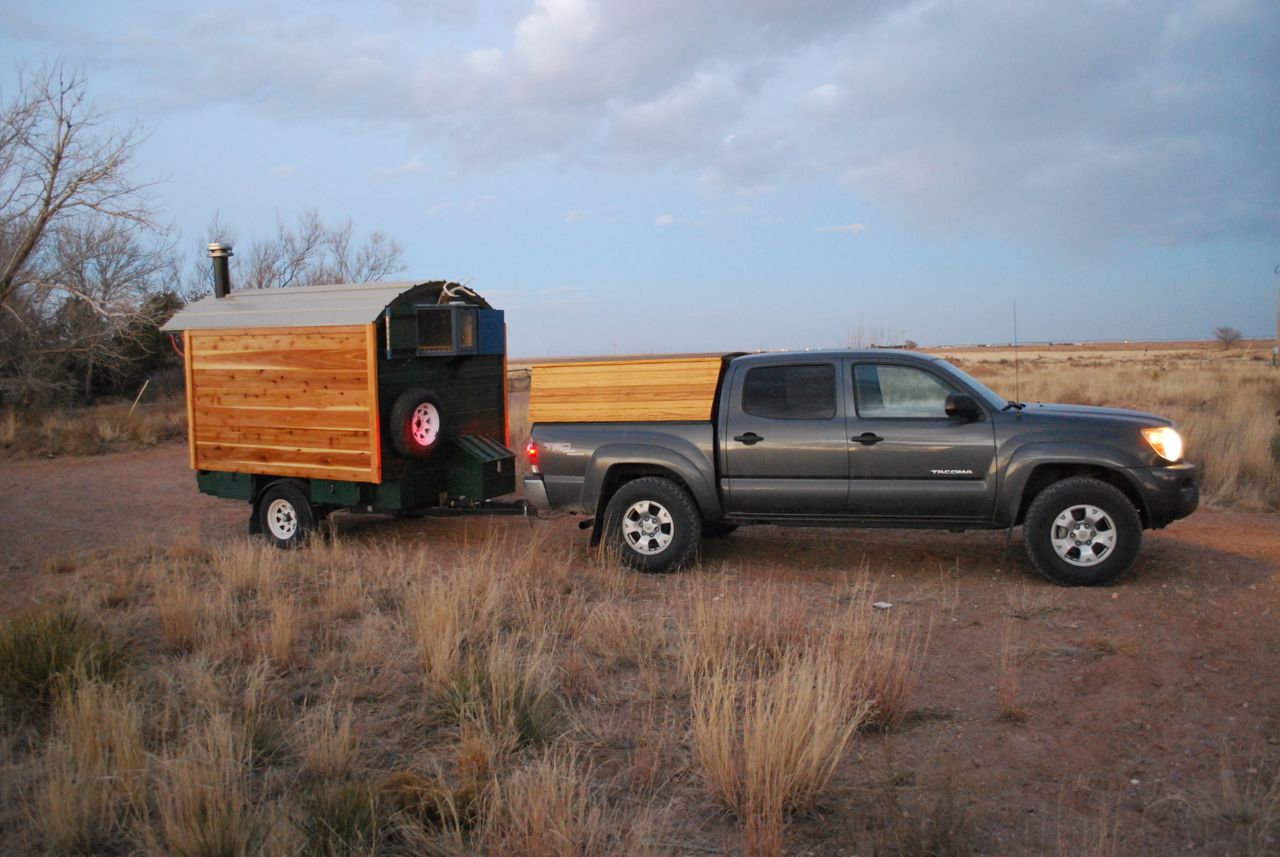
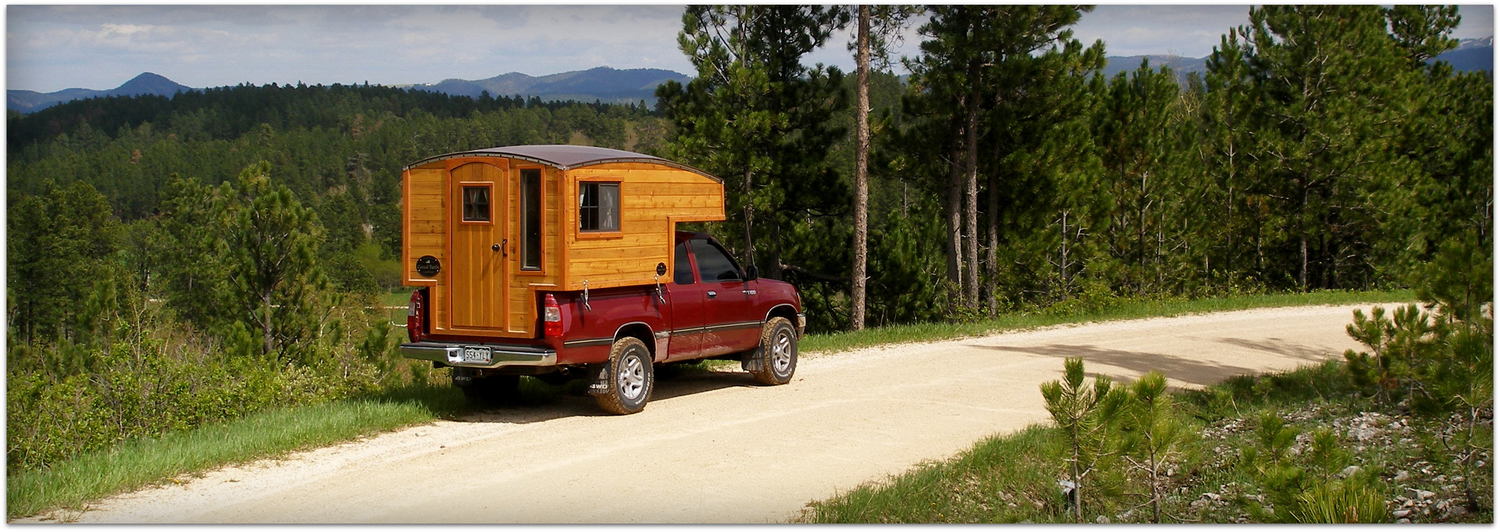
Building on his past successes, Peter has now branched out into trailer-caravan design using the same principles as his truck mounted campers.

OLYMPUS DIGITAL CAMERA
Meet the new Terrapin from Casual Turtle.

The new design packs a lot thought and detail into a small package.  The new Terrapin is about 8’2″ long by 6’9″ wide (nearly identical in dimensions to the vardo known as the Snail).  First of all, I love the roof design and have decided that if and when I build my next vardo, it will have compound curved roof like this.

OLYMPUS DIGITAL CAMERA
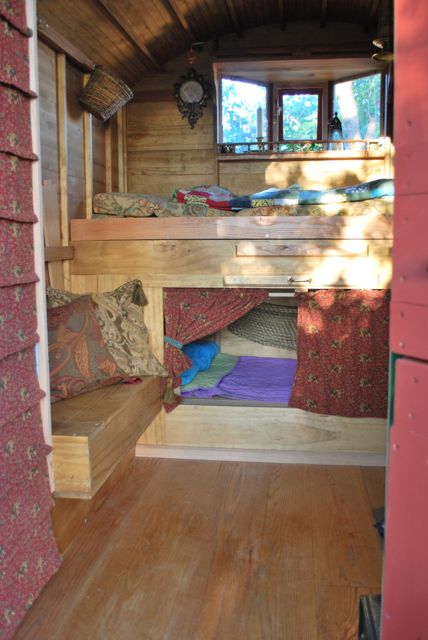
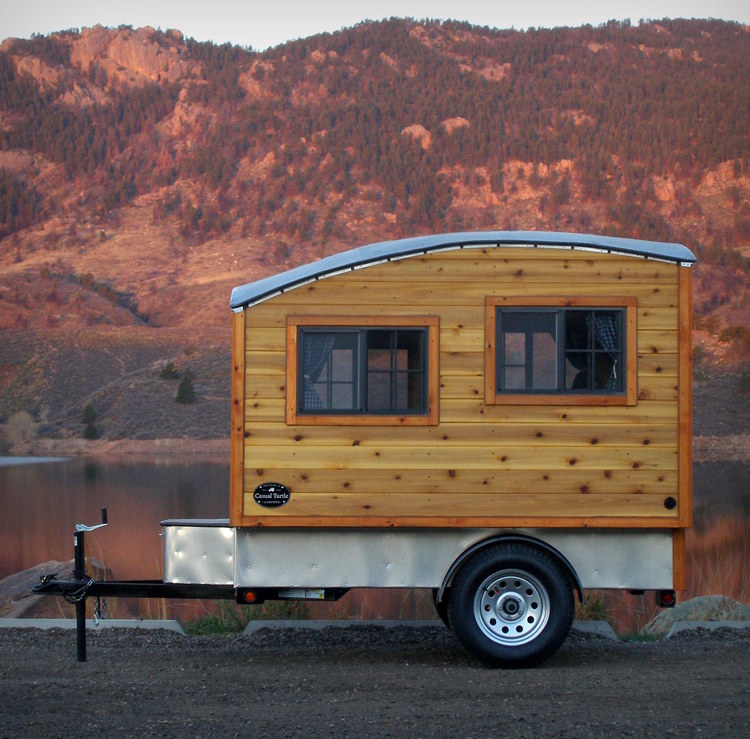
“Tiny and simple” is the mot juste of this design, containing all the space you absolutely need and not a scrap more.  Like the Snail, this beauty could easily accommodate two adults on an extended journey.

T9
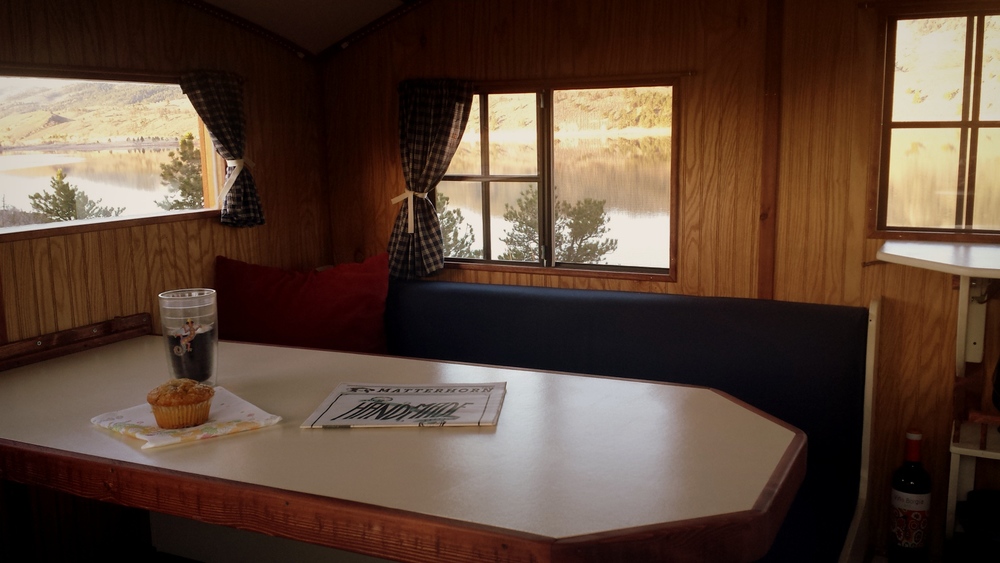
Taking inspiration from early twentieth-century design, the interior is a simple kitchenette that converts to a bed.  A rich, wood interior keeps it classy and abundant windows provide light and views.

T16
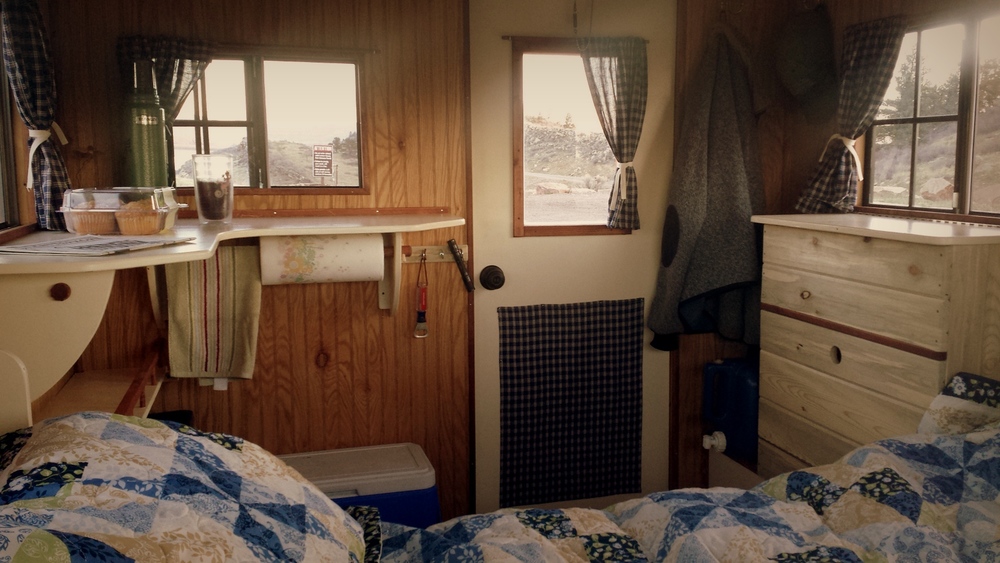
There is plenty of room for customization and in my opinion, maybe even a heat source.

Here are the spec’s from Casual Turtle’s website:

  • 1,360 lbs
  • 5’x8′ custom trailer frame from Sport Trail (Loveland, CO)Professionally-sprayed Reflex truck bedliner undercoating
    • Rockwell American 3,500lb axle
    • 15″ wheels and trailer rated tires
    • A-Frame tongue with jack and custom storage box
  • Fully insulated floor, walls, and roof
  • 15 amp shore power inlet – two interior outlets
  • LED crown moulding lighting
  • Full size memory foam bed (75.5″x54″)

Dimensions:

  • Width: 6’9″
  • Height: 8′ (at peak)
  • Length: 8’2″ (cabin), 12′ overall
  • Interior Height: 5’11” (at peak)

All coming in at $11,800.  Not too shabby.

Head on over to Casual Turtle to see more today!

CTLogo

Campaign Desk

CampaignDesk

Here’s an interesting piece of “gone native” campaign furniture.  There was much bad about empire building (and still is) but the bringing together of foreign cultures often created new and interesting art and craft styles.

While on the topic, if campaign furniture is of an interest, or if you want to even know what it is, head over to Lost Arts Press and check out Chris Schwartz’s new book on the topic.

Here are just a few designs from the genre known as Campaign Furniture taken from Schwartz’s webpage.  Click the link below to go right to his book store.

cfbook

Leather Dopp Kit

DSC_0040A small toiletries bag made from a wax-impregnated leather.  The design is essentially that of a very small 18th century portmanteau.  Included here are some of the basic tools-of-the-trade for scale and perspective.  I think leather work is appealing to me, in part, due to the honest simplicity and lack of power tools.  Most projects can be accomplished with a sharp knife, straight-edge, awl and some stitching needles.

DSC_0039This certainly is not anything fancy but it will do the trick.

Leather Laptop Case

DSC_0044I needed a new laptop case and had some nice shoulder leather left over from other projects.  It’s a fairly minimalist design but serves to protect the little Mac.  A small brass button closure is the only hardware.

DSC_0042After giving this some thought, I realize that a leather case like this should last at least 50 years, possibly more.  The lifespan of a computer is about five years so this might end it’s service life as a document holder of some sort.  It will make a great music case or something to hold a sketchbook somewhere down the road.

Wooden Truck Topper

A couple recent inquiries prompt this quick post about a wooden truck topper.  The question that came up a few weeks ago was “why would you make a topper instead of just buying one?”  Well, I’m not wealthy and making something costs a lot less than buying it.  Also, if you are a woodworker, it’s easy to end up with surplus wood from projects.  Often, the next project is virtually free.  That’s what happened here.

DSC_0028Sorry for the grime in this photo but I live on the southern Plains.  What can you do?  I tried to streamline it and match the curves of the pick-up but honestly, I didn’t put too much effort into any aspect of the topper.  I just needed something to get me through last summer but I’ve liked it enough that it is now a fairly permanent fixture.  The arc of the roof approximates the arc of the truck, created by eyeball and a pen on a board.  There is no better tool than the human eye in the creative process.

DSC_0027While making the shell, it became apparent that the Toyota bed tapers to the back.  I decided, upon reflection, to be lazy and just ignore this inconvenient truth and keep the shell square.  I did, however, match the front of the shell to the slope of the cab and allowed the back of the roof to overhang slightly.

DSC_0026This interior shot shows the three frames and sill that are essentially, the skeleton of the whole thing.  Also, highlighted is the eternal mess in the back of a working truck.

DSC_0025Here’s the basic part list that I used: 2x4s for side and front sills, 2×4 frames, tongue and groove yellow pine for sides, front, and hatch, western red cedar roof.  Lexan front and rear windows, hinges, closures, and various fasteners to hold it all together.  For the roof exterior, 30# tar paper and a canvas truck tarp.  The whole thing is varnished with exterior spar varnish. I think the whole thing can be made for  a couple hundred dollars as opposed to a couple thousand from the store.

DSC_0519And besides, it matches the house…

Good luck!  Hope this helps somebody out there.

A Vardo Build Recap

DSC_0253 copy
Conception. After years of doodles and illustration, mock-up a few models and decide what works best.

This post is a re-cap of the Vardo build.  I get questions about this project at least three times per week and I think it has inspired a few other people to make the leap.  I still consider it a work in progress even though it is four years old and has 18,000 miles under it.  New and improved ideas are being added right now but maybe this will help somebody get started.

DSC_0046After the sketch-up, start making parts.  This was a momentous occasion for me.

DSC_0083 Assembly begins.  Mild panic sets in; “will this work?” and “am I crazy to dive into this?”

DSC_0086At this point, I took some time to ponder.  “Is the size and layout really going to work?”

DSC_0089 copyAttaching the ledge to the prepared frame.

DSC_0102 copyBuild, build, build.  Using a window of good weather in January.

DSC_0093Even relatively easy details, like door placement and size, were still up for change.

DSC_0109Finally, I can get a real sense of scale.

DSC_0121I fell in love with the design once the box was built.

DSC_0161Working alone means lots of clamps.

DSC_0155Gawkers were willing to take pictures.

DSC_0122The bed framing becomes integral to the structure.

DSC_0125Seats were designed and tested for size and functionality.

DSC_0126The first storage is done.

DSC_0182Wood is good!

DSC_0169The shell becomes complete.

DSC_0189 copyNow for the details.

DSC_0289Temporary window inserted for a quick trip to the desert.

DSC_0108-2Quick coat of paint and off we went.

DSCN2446A little living helped bring together the details.

DSC_0404Spending time in the space gives an idea of where things are needed.

DSC_0399Finish work is a process, not an event.

SternThe Vardo becomes a home.

DSC_0814A safe and cozy nest on the road.

DSC_0743Still far from done, I took her cross-country anyway.

DSC_0700Things began to come together after a few thousand miles travel.

DSC_0198Finishing touches are added constantly.

closedAs are safety details.

DSC_0066DSC_0064Still making changes and additions four years down the road.

More big changes are happening and I hope to get up some new information very soon.  I think an important fact that this project showed was that, for a relatively low-budget, and a little patience, a little home can be built over time but still be usable along the way.  I didn’t wait for every last detail to be completed before putting this house to good use or I’d still be waiting today.

21st Century Sea Chest

This is not furniture worthy of the great builders like Peter Follansbee, Chris Schwartz, or Chris Hall.  However, it is a piece of functional furniture created from nearly all recycled materials and will hopefully be with me for the rest of my life.  I’ve wanted a sea chest for about as long as I’ve known they exist.  These are the unit of personal possessions of the old mariners during the heyday of wooden ships and work well as a low table.  I’ve put off building one for many years now as I’m fairly lazy at heart (and intimidated by the huge number of dovetails and other joinery involved).  But I’m also a schemer and a planner…

DSC_0001When I took up my current post it had a fairly rocky start and I prepared for the worst.  Instead of filling my small house with bulky furniture, I built nearly everything from dimensional lumber, primarily 1 x 12″ pine as it is ultimately recyclable.  While rearranging the house over the winter I decided to remove a large set of shelves that were not being used very well.  This left me with a hefty pile of very dry, aged pine that now needed a purpose.  I decided these would just about serve to make a trunk of some sort and convinced myself to knock up a sea chest.

DSC_0002Being a 21st century guy without huge swaths of time for fine woodworking, I built this fancy box without any complex joinery, just stainless steel fasteners and wood glue.  The only purchased materials were the hinges, hasp, and Cabot’s Wood Finish (color: Midnight).  So, for a few bucks, a few weekends and evenings, and a little labor, I now have a sea chest to hold my coveted earthly possessions.

DSC_0004The chest is based on several 18th and 19th century sea chests I have seen with a lift out tray and a solid box for small objects.  The outer dimensions of the chest are 34 1/2″ x 19″ deep x 18″ high giving an internal volume of nearly 8700 cubic inches or a little over 5 cubic feet.  That is about two large backpacks worth of space for possessions.  Not too bad.

DSC_0005I should note that some scraps from the barn were added to complete the project.  The strakes that hold the handles are oak and the floor of the chest is made from tongue-and-groove yellow pine, left over from previous projects.  At the time of this post, I consider the chest about 90% complete.  The 5/8″ manilla handles will soon be covered with leather, and the lid support will be replaced with something a little nicer (it is just black para-cord at the moment).  Also, the interior needs a finish, probably shellac, to avoid the off-gassing of regular varnish.

I hope this motivates someone else to forgo garbage, mass-produce, pressboard furniture.  It is more than possible to make something worthwhile and lasting from the poor end of the lumber yard.