So, a vardo is a small space, especially when living with a dog.
Stationed for maximum observation.
The old dog loved sleeping under the rig as she took her guard duties seriously but unfortunately, she is no longer with us. The youngster, on the other hand, has no interest in that sort of nonsense and only wants to be by my side as much as possible. She loves enclosed spaces so the vardo is a big attraction for her. She spends much of her time under the main bed, hidden away, and often forgotten about until she decides to get under foot. I even lost her for the better part of a day when she snuck in while I wasn’t looking, slipped into her bed, and was locked in for several hours. When I found her, she looked content enough and came out stretching like a sleepy child.
Making it fit.
Much of 2016-2017 I was lucky enough to spend many nights camped in the gypsy wagon with just my dog for company. She doesn’t get on furniture inside the house but the dog has decided the floor or her bed are not good enough when she’s in the vardo. Since she knows she not really supposed to sneak into the bed, the (too small) bench seat is often her compromise in the wagon. She doesn’t really fit but I guess it makes her feel like one of the family.
A bed’s eye view in the morning.
A couple years ago I learned to be extra careful when sliding out of bed, especially in the dark, as she often plants herself on her favorite felted rug; right under my feet. In this case, it also happens to be in front of the ceramic heater on a chilly morning.
Photo-bomb. She climbed out from her bed in order to not miss the action.
Even while getting ready to go to work, she seems to manage a photo-bomb; always lurking nearby and not wanting to be left behind. Just because it’s a small space, there is still plenty of room for a dog; sort of.
I have needed a stitching pony for a long time now…
The two-hour stitching pony.
Like so many other undone projects, this one has been stirring around in my head for several years. Since my efforts have been so focused on sewing leather lately, the time had come for a new and useful tool in the shop. I’ve looked at plenty stitching horses and ponies over the years and even used a few n person so I understood the basics of what I needed and began eyeing up the scrap pile for obvious parts.
Not absolutely necessary, but it’s nice to be able to open the jaws fully.
I decided to keep the project simple, small, and portable while making as few purchases as possible. I was able to gather up the lumber, leather, hinge, screws, glue, and tacks in just a few minutes and get to work. Power tools make jobs like this easy so the boards were quickly ripped, cut, and clamped up to dry overnight. A little cleanup in the morning yielded a working model suggesting a few minor changes. The opening of the throat was widened by 1/2″and I decided a longer bolt would be useful for fat projects.
This meant a trip to the actual hardware store setting the project bill up to $1.07 with a total work time of about two hours. We’re good to go…
I rarely (I mean almost never) go out of my way to endorse a product of any kind but while considering the upcoming holidays I came across this link I saved a while back. I think it would be perfect for the workshop and is a work of art in its own right.
I can imagine it over my new workspace or even hanging on the wall in the den to be pondered while dreaming of building something worthwhile. It’s called the Chart of Hand Tools from the Pop Chart Lab, “printed using 100 lb archival recycled stock certified by The Forest Stewardship Council, this poster is pressed on an offset lithographic press in Flatlands, Brooklyn.” Sounds good so far and I love how they are actually grouped in logical sets by basic function. That satisfies the analyst in me.
Click the image for a larger version or the link to get yours today (or to send me one!).
“With over 300 meticulously illustrated tools this chart celebrates the tinkerers and the doers: those who build, repair, and create. Breaking down all manner of hand tools by their basic function, this sprawling print covers the most basic, such as the humble yet mighty hammer, to the most highly specialized, such as the 24 types of files depicted here. A hand-crafted compendium of ingenious and essential devices, this chart is a complete cut-list of the tools that empower makers and artisans. —And the chart is printed with brass and aluminum metallic inks to give it a shop-ready sheen.
Size 24″ x 36″
Each print is signed and numbered by the artists, and comes packaged in a Pop Chart Lab Test Tube.
At $37 U.S. it seems like a great addition to any Maker’s house. I hope my own Santa Claus or Krampus drops one off at the shop this winter. I better start being good for the Yule-tide season.
Bamboo container with walnut reel. The background cloth is from some test cloth my wife wove and turned into small lunch napkins.
Here’s a bamboo container I may integrate into the new fishing kit. It’s made from a big stalk we got from a friend in Georgia (USA). I plugged the bottom with a poplar stopper and made the lid from a sotol stalk. I’ve found that the sotal is denser than most yucca but is still relatively soft and easy to work.
The box can fit a lot of gear (lures, hooks, line, sinkers, floats) or could work as a bait box equally well. The top is tightly wrapped with hemp cordage to prevent splitting and will be treated with pine tar.
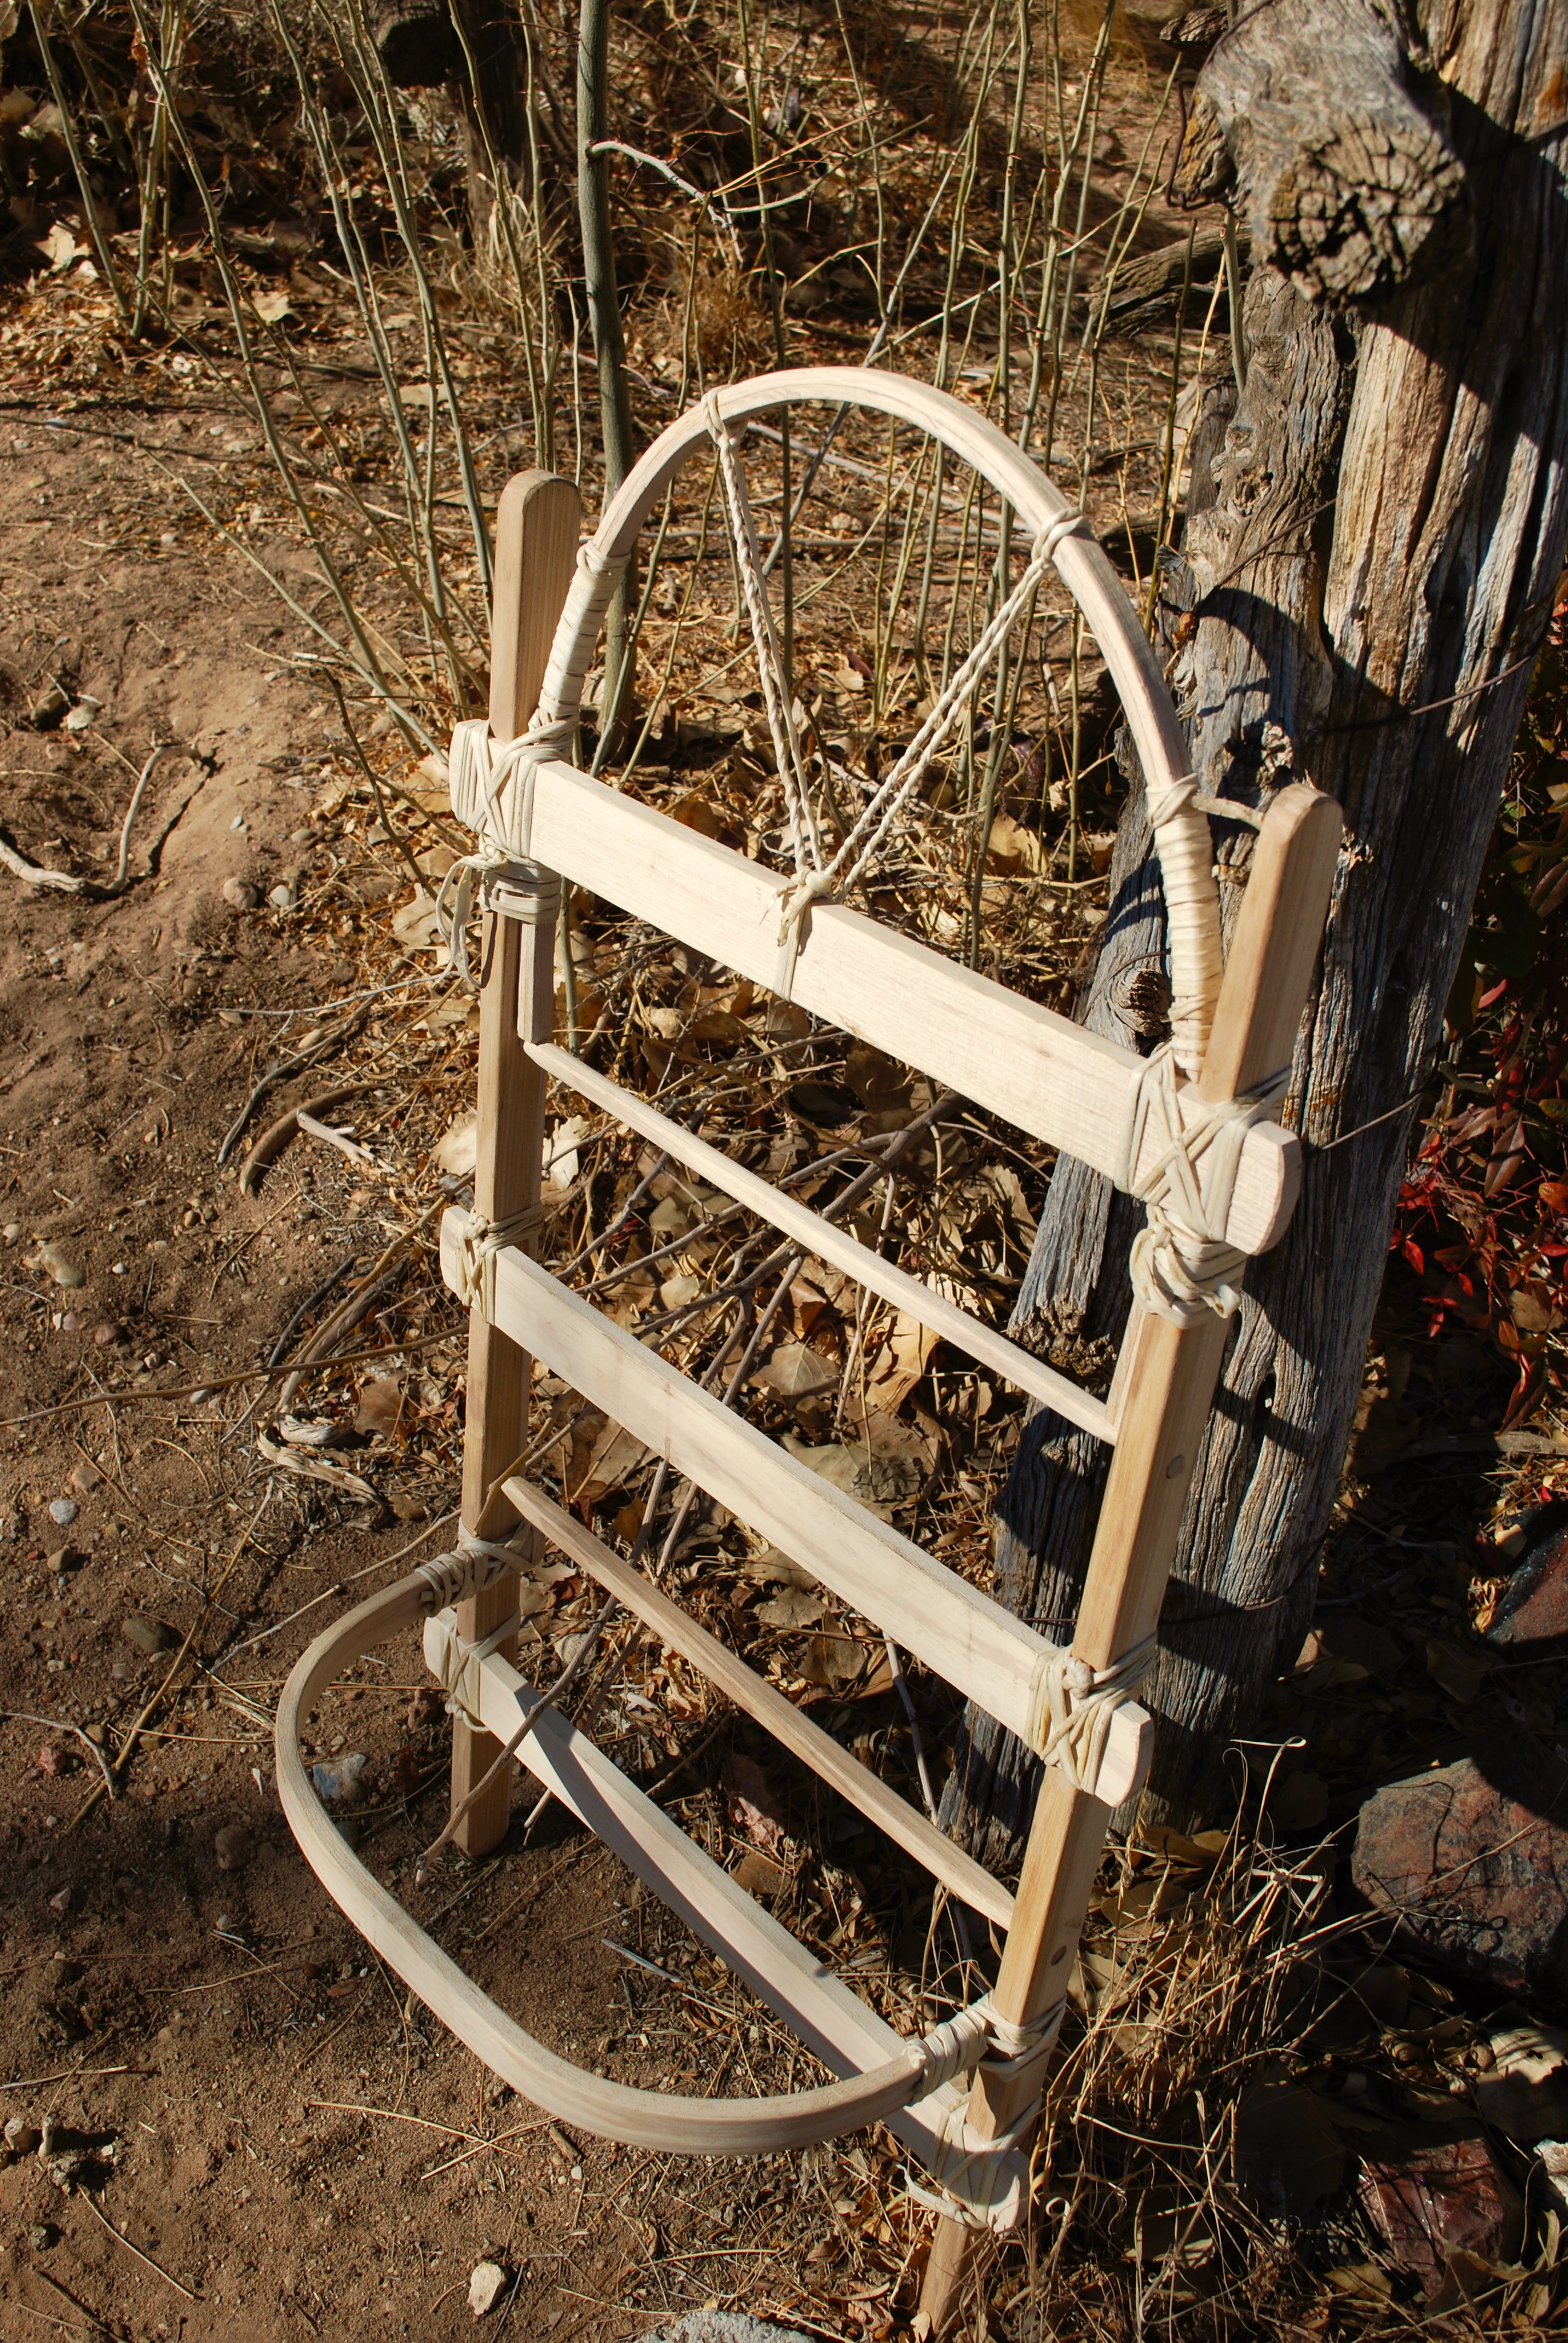
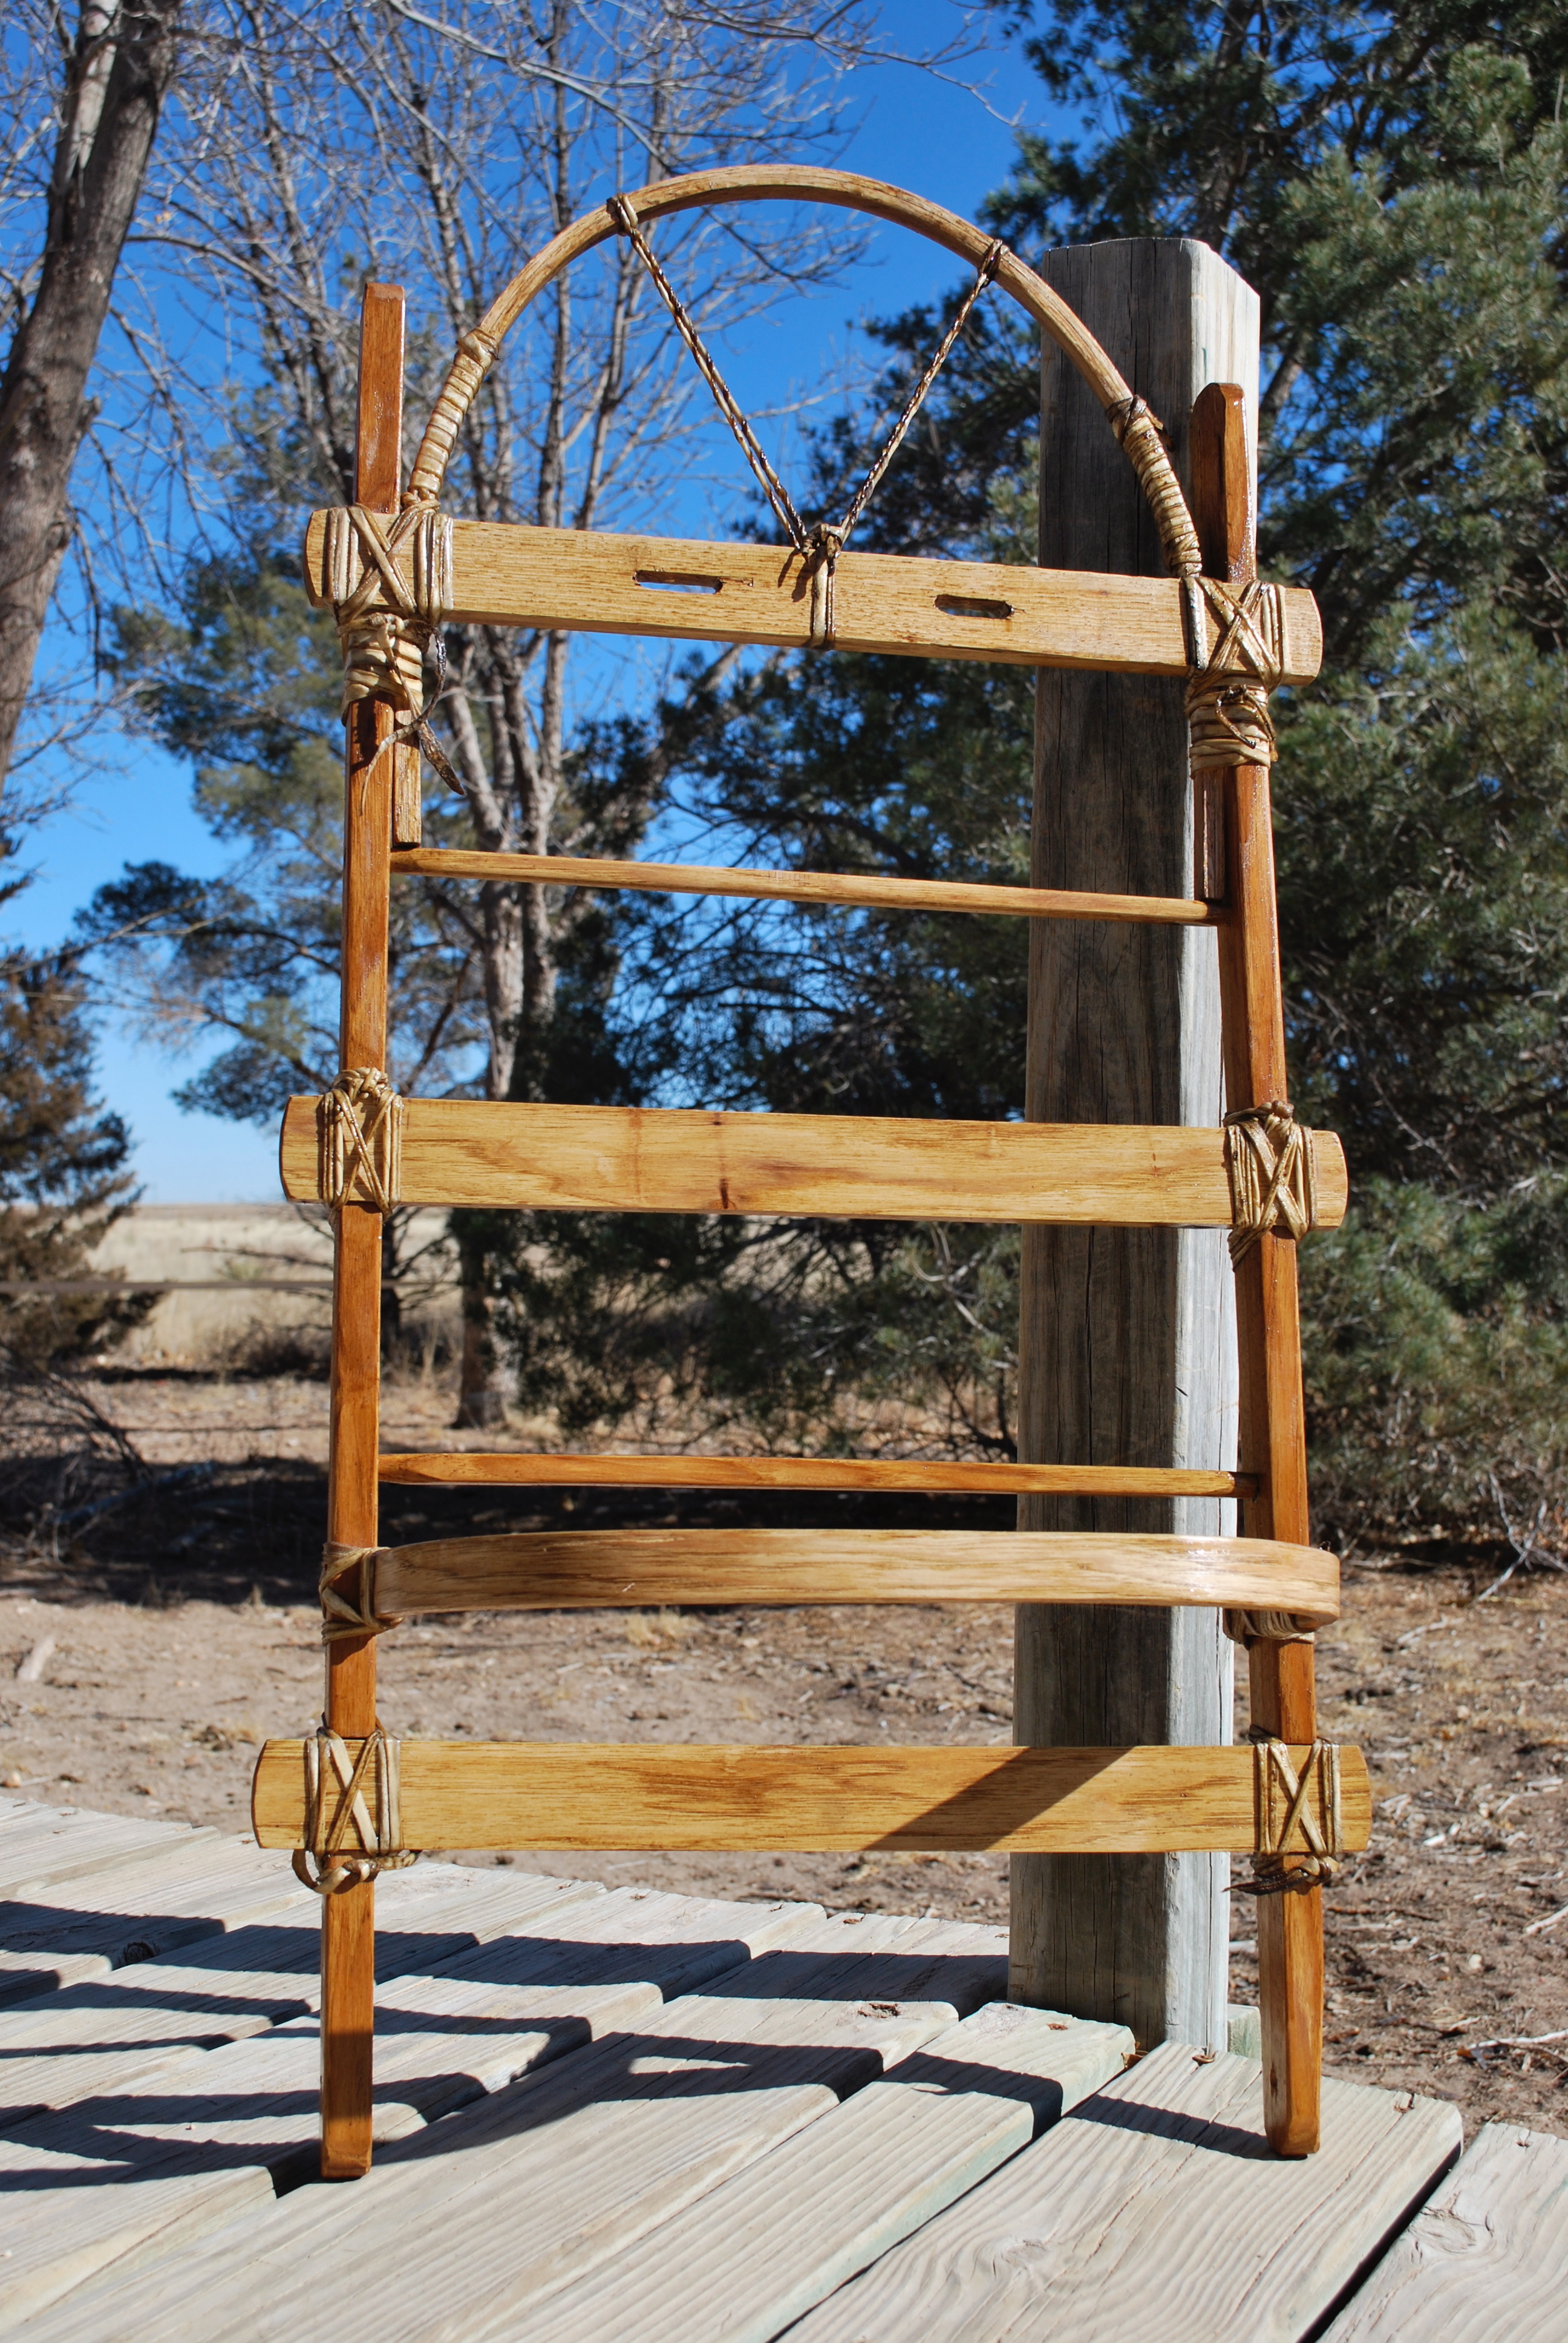
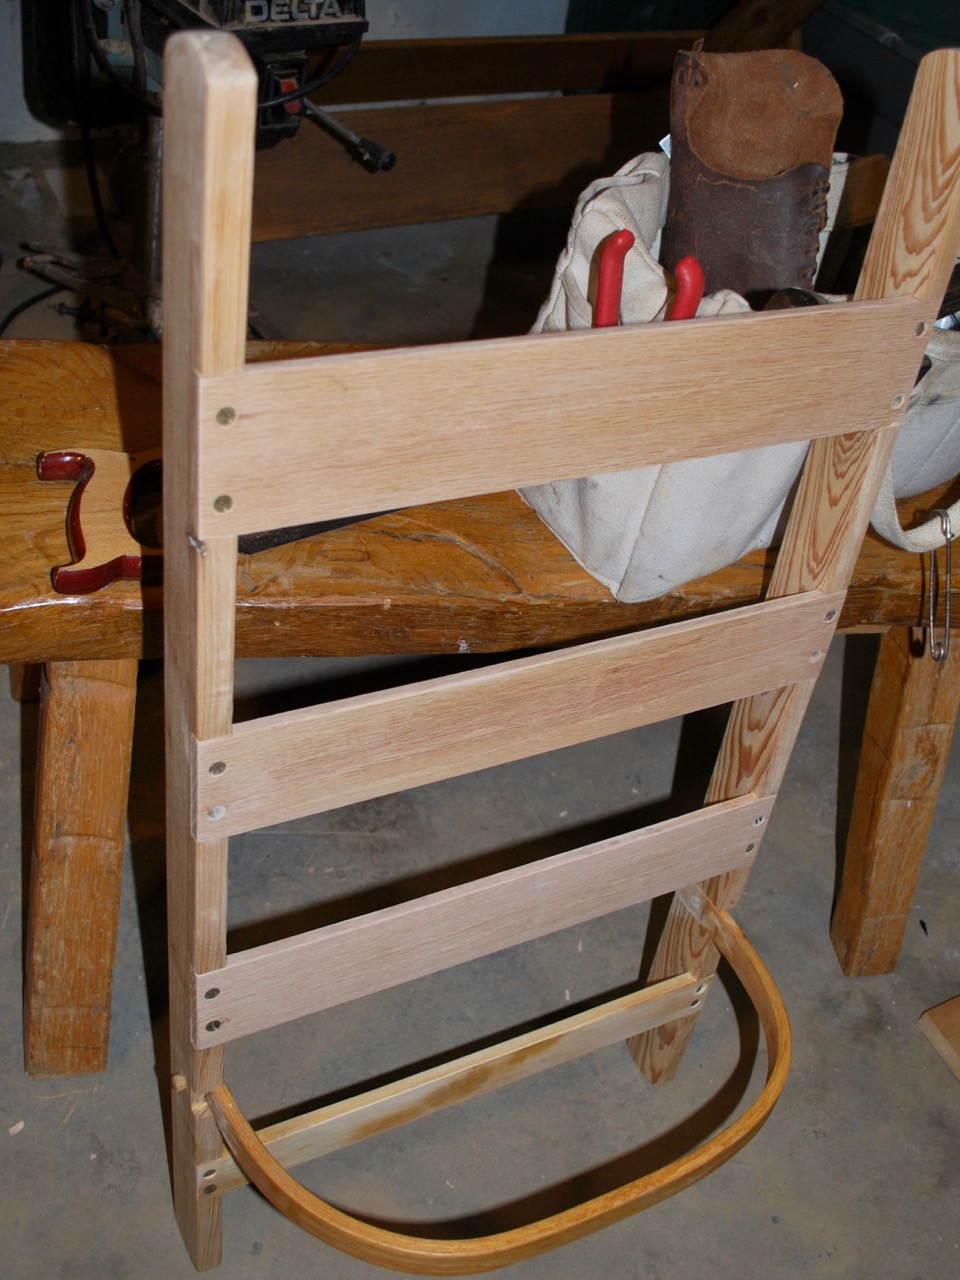
I collect old plans for projects I never seem to get around to making. With winter here, maybe someone would want to build this fine sled. This comes from an old Delta Tool company publication and the procedure is about as simple as can be.
I lived on the flat Plains for quite some time and I’m rediscovering the joys of hill country.
From the book Toys, A Deltacraft Publication, DELTA MFG. DIVISION
There’s not much to it really. An couple large project scraps and two long boards for the runners will just about do it.
The recipe is simple:
The frame is 1/4″ birch and the top boards are 3/8″ birch. Fasten together with countersunk, flat-head wood screws.
The runners are made from ash. Make a simple form with an 8″ radius from scrap wood. Soak the ends Of the runners in hot or boiling water for about an hour, then clamp onto the form and allow to dry for 24 hours. Ash takes to bending very well in my experience.
Finish body of sled with varnish or paint. Apply several coats of shellac to the runners and wax.
Maybe one less plastic tub sled will end up in the landfill.
Here’s the link to the website where I found the plans. There are some fun and simple projects to you busy in the coming fall. I recommend the “retro” section for some good stuff.
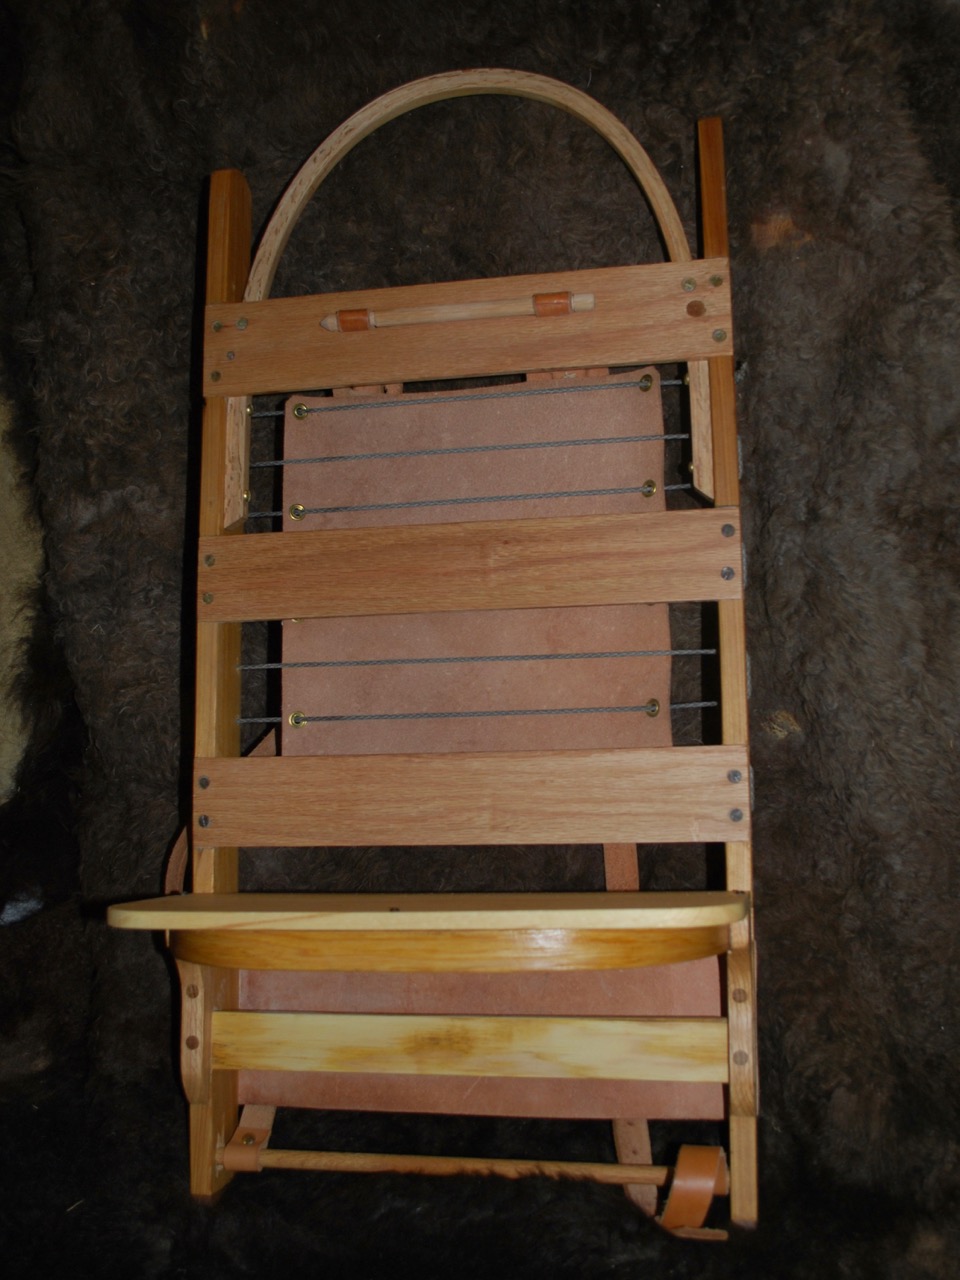
In 2012 I decided to build a wooden packframe. What started out as a Sunday afternoon project led me down many paths, from Iron-Age Europe to 21st Century military designs and it took about a year of stewing around before I actually got around to building something. It was fortuitous for me that Markus at 74 FOOTWEAR DESIGN CONSULTING wrote and excellent little history of frame packs at almost exactly the same time I began researching them myself. Shortly thereafter, I discovered Steve Watts and Dave Wescott were delving into the same subject (great minds think alike I guess). After collecting many photos and drawings I dove in, and using human measurements as much as possible, I built the frame below.
A few hickory boards and some simple steam bending created a design I liked.
I decided against metal fasteners for the original project so everything was pegged and tied with rawhide.
It didn’t take long to build and tying it all up with rawhide was a simple evening job. The next step was to create some sort of support to keep the frame from my back and attach shoulder straps. This wasn’t as easy as it sounded since comfort and strength had to be combined while keeping possible chafing to an absolute minimum.
The two horizontal rods keep the uprights from converging under tension and the three cross-strakes are stabilized by being set in grooves on the uprights. The steam bent support and top bar add to the overall sturdiness of the frame.I decided that simple was best so I used heavy leather, stretched tight, across the back kept the straps fairly straight-forward.Several people asked about the need for a curved top bar; well why not? I like curves and I think it reminiscent of the Otzi-style simple frame.
An Otzi reconstruction. Click the image to see the article there.
Was it good enough?
The answer is probably. It was mostly used to pack gear in for demonstrations and spent most of its time as a show-piece. Honestly, over the years I owned it, it only went on one real backpacking trip, and that was even a fairly short one. However, I learned some things along the way. I like the shape, it was fairly comfortable, it was certainly sturdy enough,and it carried a heavy load without much difficulty or discomfort. So the design was more-or-less right for me.
On problem was that I didn’t like the tensioning of the leather back straps as it was difficult to draw them tight enough. That’s how packframe number 2 came to be. I began by deciding to improve the back padding system but with a few other minor changes in mind, this happened.
A bunch of new parts generated themselves on my workbench one lazy afternoon.
Parts –
Recycled fir for the uprights came from a 125 year old door frame, some planks for the cross-bars came from the scrap pile, and a couple pieces were pulled from the first packframe. Before I knew it, I was bending a thicker and better arch for the top piece and construction began. Since I wasn’t working from a plan and there is no real standard for this type frame I pondered the whole thing for a couple days to decide how to fasten the parts (pegs, lashings, screws, or glue) and began assembly a few nights later. I have gathered quite a few old screws of various sizes over the last couple years in my housing restoration so I decided to use those for the basic construction.
After too long a mental debate, construction went pretty quickly.
Construction technique –
As can be seen in the images, the cross-bars are let into the uprights in a simple lap joint for strength and racking stability and fastened with reclaimed brass screws. The platform support is lapped and pegged with wooden dowels.
Side view showing lap joints and side supports.
I added a small oak angle brace to further support the platform support which is also lapped and pegged. The small missing piece visible here is operator error. When I was cutting the laps I was in such a groove that I cut the low one on the wrong plane. I’ll probably fill the gap with a small wood piece, but for now, I live with the hideous disfigurement. Also visible here are the walnut caps I pegged to the bottom of the uprights. Old Douglas fir is a fine wood but can be very brittle and the end grain would probably not fare very well under hard use on rocky terrain.
The frame in all its glory, waiting to be packed and carried off into the sunset.
Straps and Suspension –
I chose 12 oz Hermann Oak leather for the lower pad stretched tight and permanently fastened to the frame with brass screws and finishing washers. The essential suspension depends solely on the cordage being strung tight while the leather pad distributes to stress across a smooth and wide surface. I think it will be quite comfortable.
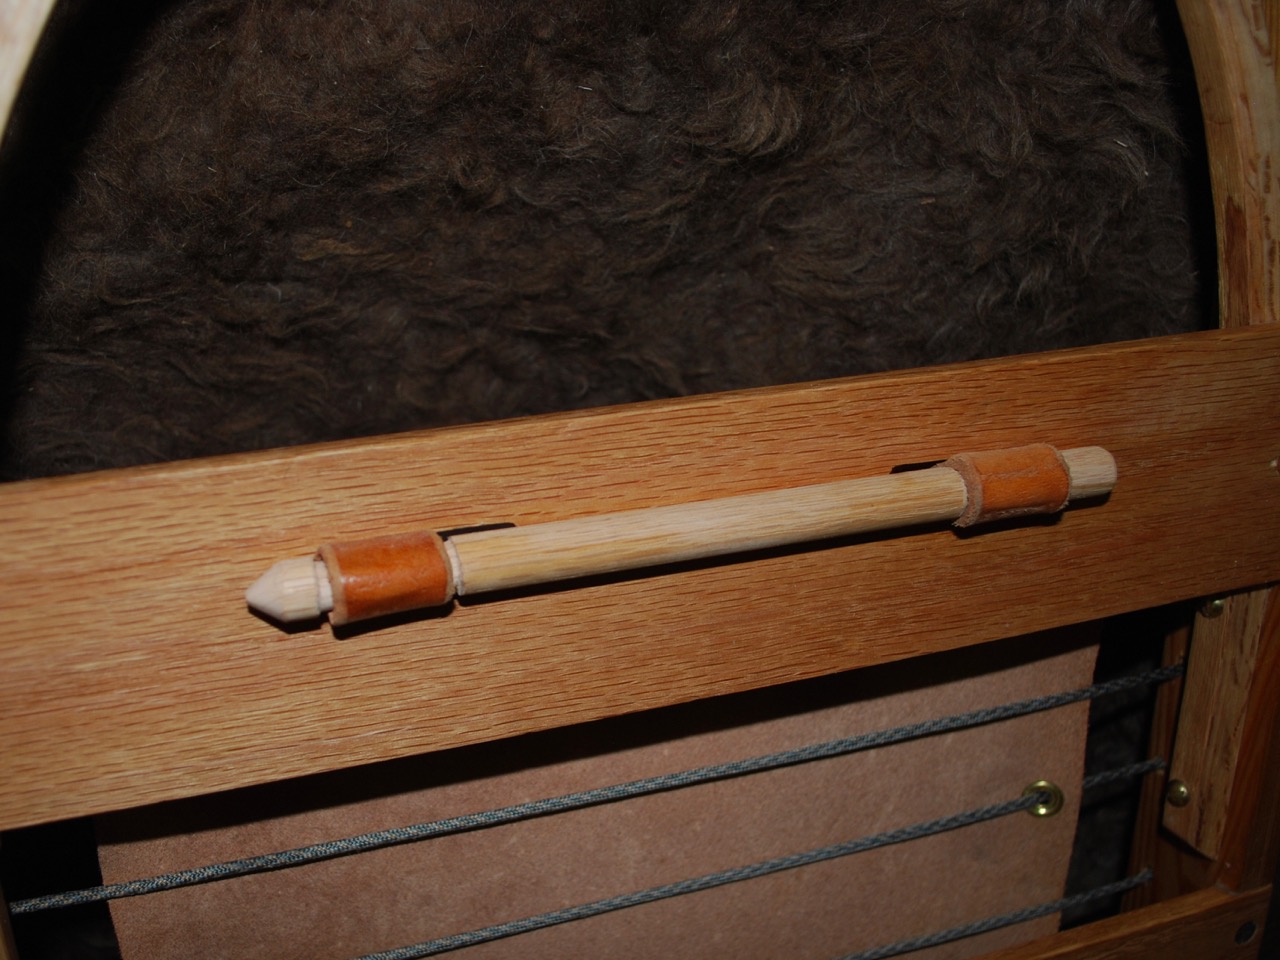
Shoulder strap connection, a whittled oak dowel that is easily removed.
I would like to make a removable rucksack for this frame and would like to be able to utilize the straps either so making them easily removable was a must.
Waist support, 12 oz harness leather. 6-7 oz leather was used for the back pad.
As for hip belts; I’m still undecided at this time but I suspect that sometime soon I will be constructing one.
A better view of the top arc and the overall harness.
I’ll continue to update the progress here and try to remember to take more photos along the way. It really hinders work to have to think about documenting yourself along the way but I know people appreciate seeing the steps.
Just a short show-and-tell today because I needed a new eating spoon. I lost my old favorite a few weeks ago and as near as I can remember, it was about 20 years old. I remember this because it was cut from the end of a bow stave of a bow I love. Here is the new one made from Walnut harvested in southeast Missouri.
The growth rings helped determine the sweep to the handle.
It is satisfying to use something you create yourself, even if it isn’t perfect.
Maybe not as dense as Osage orange (Maclura pomifera) but walnut will hold up well and darken with time.
The board this came from was quite variable in density and color. This spoon comes from the lighter-colored part.
For me, function comes first for a tool like this but grace and beauty should not be left out of the equation.
After it was finished, the whole spoon was rubbed down with walnut oil and it will be treated again in a couple of days to help protect the wood from soaking up flavors.
Dowel Cutter – A useful tool for large-scale production
A version of this post appeared here in 2012 but here is an update as prelude to a coming post.
I’ve been using a Veritas dowel and tenon cutter to rough out arrow shafts from planks. Quite a while ago I posted about the jig I built for cutting the shafts and thought it might need some follow-up. Although I didn’t have much in the way of appropriate wood available for arrows on the day the cutter arrived, I did have one well-aged straight-grained poplar board that had been set aside to age for arrows to experiment with. The cutter, once set up, takes a piece of square stock of 7/16″ – 1/2″ and cuts it down to a 3/8″ dowel.
Looking through the feed end of the dowel cutter.
When the shaft comes out of the cutter it tends to start wobbling and the effect increases quickly. The solution is to create some sort of guide for the shaft so I came up with wooden blocks, as seen below with slightly oversized holes drilled inline with the cutter. There is a second identical block set back a few inches further to increase stability. After the first few experiments I could really tell that the stabilized shafts were much smoother than the unstabilized ones.
Shavings as they exit the cutter.
The wood can be turned by hand or a wrench or, as in this case, it can be driven by a drill motor chucked with a square socket (not pictured). The drill motor is not only faster but seems to cut smoother due to the high rate of rotation.
Before and after a light sanding. Sharpening the blade reduced this spiral of fuzziness.
The above photo is blurry but the right shaft demonstrates the rough “fuzzy” state as they come out of the the jig and the left is after a few minutes with some 100 and 220 grit sandpaper. They are subsequently burnished and await nock reinforcements as the next step. After putting a better edge on the blade, the shafts come out a littler smoother but it really seem to vary with the type of wood being used.
Image from the English War Bow Society. Click the image to link to their site and find out more about English warbows.
I was able to turn out eight experimental shafts in a short time. Two were rejected immediately as they has little kinks in the grain and two were rejected during sanding due to blemishes in the wood. They’ll probably be okay for light weight kid’s bows but are not acceptable for heavy, fast bows. The spine feels a little light to me but I’ll hold out to see what comes of them. The goal is to create some fairly standard issue British war bow arrows and see how they perform. Since I use wooden dowels to peg together many other projects, very few shafts have gone to waste since this purchase.
Note: many great arrows have been cut with the Veritas cutter since the original post in 2012 and I will do my best to continue documenting the work.
Several years ago I starting documenting some of the arrow-making I do. I wrote the original version of this piece in 2012 but as it always draws a lot of interest I have re-edited it and am posting it again.
Arrows have been much on my mind after seeing how ratty some of mine have become. Even though shooting takes its toll on the fletchings, it seems they get at least as much damage in storing and travel.
I was intending to start with a set of British longbow style arrows but having received some beautiful arrow bamboo (Pseudosasajaponica) from a friend who grows the stuff, I changed plans to suit the new material. Prior to this project I had never used real arrow bamboo but have used it’s distant cousin the american bamboo or rivercane (Arundinariagigantea). It could not be much more perfect for the job.
Since I hoped to do this right, I decided to photo document the process as best I could. Good arrow making isn’t easy or fast so unless you are dedicated to perfection, you are probably better off buying them.
Matching shafts.
High-grading the materials
The first thing to do is to select shafts. I didn’t have hundreds to choose from but these were pre-selected for diameter (hence spine), straightness, node alignment, etc. so this made my work easy. I parsed out a half-dozen I liked for starters and cut them to length. Note similarity in diameter and node alignment. The scale above the shafts is in inches. I could hardly ask for better.
A preview of shafts selected, straightened, and cut to length.
Attributes to look for in bamboo or cane shafts
Your arrows should be a consistent diameter, consistent weight, similar spine, long lengths between nodes, similar node placement, with very little taper overall. Most people seem to think that bamboo is straight coming right out of the ground but this is rarely the case. Expect to heat straighten and you shafts. Your best work will be done in groups to get a consistent set, not just a one-off product.
After a lot of reading, I decided to approximate Korean style arrows with inserted wood nocks. These have worked well for me in the past but I have never started with this great of bamboo.
Remove the flares at the node sections.
Cleaning up the shafts
Raw bamboo has a flair at each leaf node that must be removed for a smooth arrow shaft. I do most of this with a knife but a small plane or file will suffice. You don’t want something bumping over the hand or bow as the arrows is loosed.
Smoothed node.
The node above is cut smooth.
Further smoothing.
I have a neat little shaft plane (made by Dick Baugh) that helps at this stage but a rasp or sandpaper will work too. You might have a divot at the joint but this won’t really affect your arrow.
Nodes are smooth.
The nodes of the set are now relatively smooth. Now, any final straightening should be done over gentle heat. This can take several hours so don’t rush it. Keep fixing little bends and make sure to heat the entire shaft to temper it. I stand over the stove for this but have used coals from the fire in a pot to achieve the same purpose. Wear gloves and be patient.
Whittling nock inserts.
I selected Osage orange for the nocks. Horn or other hardwoods can be used here as well. The above photo shows a blank and finished nock preform.
More whittling.
This photo shows the basic method. With a very sharp knife, score a ring around the nock. Whittle away from the score to narrow the piece slowly. Repeat until it fits the shafts. At this point I will say that I omitted a photo of an optional, but I think important, step. That is, to wrap the end of each shaft with sinew and hide glue to prevent the shaft from splitting while pressing in the wood. If, for some reason, sinew isn’t available, silk thread can be used in its place but you should top the silk with a little thinned white glue to help prevent it unraveling through abrasion. As sinew is free and carried around inside all the higher life forms, it should be pretty easy to get some.
Almost a tight fit.
As you get close, keep test fitting the nocks until they are a perfect fit.
A perfect fit.
You can see the sinewed shaft ends being fit with the inserts. Glue the nocks in place with a water-soluble wood glue for easier repair.
Steps in forming the notch.
At this point, several simple steps create a nice notch. First, wrap the joint with more sinew and coat in a thin layer of hide glue. Second, drill a small hole through the nock, preferably at 45 degrees across the grain. Make a small saw incision to start the carving and remove the waste with a small knife. Use a very small file or sandpaper to open the notch and smooth the surfaces.
The finished product.
At this point, you have the essence of an arrow.
Foreshafts, points, and fletchings
The next step to make these fancy sticks into arrows is to fletch them with feathers. To make fletchings, the best feathers must be selected. I am using some goose wing feathers given to me by a friend which have been graded to the last three per wing. Perhaps common knowledge in the fletching world but it worth noting that all three feathers must be from the same side of the bird (i.e., all right wing or all left wing). I cut a template from Bristol board to serve as a guide so that all the fletchings are the same size and shape. After the quills are split and trimmed, the bases (where they will be glued to the shaft) must be trimmed smooth and sanded flat to lie against the arrow. This is a very time-consuming task but critical in proper fletching.
Feathers to fletchings.
Again, there are only about three feathers on each wing suitable for fletchings and all three on an arrow need to come from the same wing to have the same shape and twist. To produce the needed 18 fletchings I cut about 24 as some may go to waste. I always ruin a few in the final trimming or end up weeding them out due to defects. Save them for later repairs if you have any left over.
Serving the feathers with silk.
After gluing them in place by hand, the ends are served with two layers of fine silk. This is a slow and tedious job and neatness really shows but the end product will be sturdy and handle a lot of abuse through shooting.
Silk in the sunlight.
The arrow above is now fletched, reinforced, and has a sturdy wooden nock. Real silk is strong and shimmers beautifully in the light and comes in virtually any color.
Inserted wood nock and goose fletching.
It takes me nearly an hour for each arrow so I took a break after the first four.
Footings
The foot is the front portion of the arrow that reinforces the shaft and connects to the point or head. This was done exactly as the nocks above but instead of drilling and cutting a slit, they are tapered to match the heads they are to be attached to.
Bodkin, foot, and sinew reinforcement.
As for points, I chose some traditional bodkins since they are good looking and very efficient. Many cultures came up with this essential design. These are English copies and are known to punch through heavy armor. They are surprisingly sharp and tear through most targets easily.
Bodkins test fitted. The joint at the wooden “foot” is reinforced with sinew.
For the photo, I dropped these from about six inches above and they all stuck in the oak. I should mention that these points haven’t had the final fitting yet and are just stuck on by friction. If you look closely in this photo, the ferrules don’t quite fit the foreshafts yet.
First four finished.
Arrows are difficult to photograph so I took this high oblique shot to show them as nearly done. I hope these images help a fledgling fletcher somewhere as it isn’t an easy task. Be patient, don’t lose hope, and be consistent. Good things take time and it really shows in their performance and longevity.
A bit of red ochre paint completes the set.
I marked my shafts with a little ochre paint made with a base of boiled linseed oil with a drop of turpentine and ground pigment. I love the natural look of ochre and enjoy knowing I found and ground the pigment myself.
These remarkably fast and true arrows suit my bow very well. A little luck, experience, and patience pay off big rewards in the end.
Some Thoughts on Making Arrows, an Underappreciated Art –
I have been making my own arrows from scratch for a couple decades (since 1987 to be precise) and thought I’d showcase some I have made over the past few years. I don’t generally make them to sell and I rarely hunt these days but there is something very satisfying and meditative in gathering the materials and constructing something so practical, with such fine tuning and narrow parameters in functionality. I learned many tough lessons along the way, having no actual teacher, but I gleaned all I could from the historical resources I could find. Most cultures of the world have a martial tradition of archery and each have their advantages and limitations.
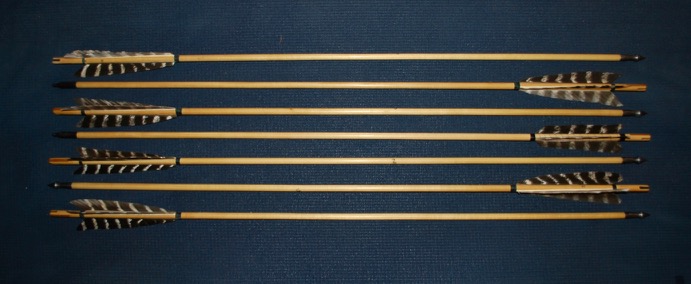
A set of seven hand-turned poplar arrows in the English tradition.
The poplar arrows above were made from aged, straight-grained wood that was split along the grain then turned in a dowel cutter. The nocks are reinforced with Bois d’arc (Osage orange) wood for added strength. The heads are conical bodkins, fletchings are prime turkey wing secured with glue and silk binding.
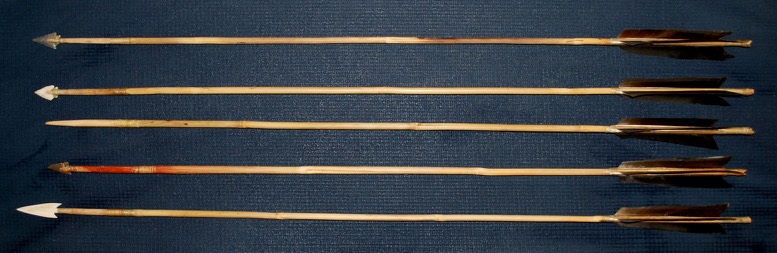
A “primitive” set of cane arrows with hardwood foreshafts tipped with a variety of point types.
Making matched sets –
I sometimes come across beginning arrow-makers (fletchers) who only produce “one-offs” without attempting a matched set. This is fine as an experiment or as a learning tool but does not suffice for someone who plans to actually use them for precise or regular use. The minimum I make is three but I try to produce arrows in sets of six or twelve. Since the plank used for the the arrows above worked out to produce exactly seven shafts, I kept the group together.
I believe it was a writing by Arthur Young where I first learned that to have a truly great set that sometimes you had to sacrifice a few as imperfect. With all the work that goes into an arrow, it is painful to cull one out but sometimes it must be done. The weights may match, the spine may feel the same, but one may just not fly as perfectly from the bow as the rest. In the past, I have marked these and they become stump shooters of ones that you don’t mind risking on a long or difficult shot.
Finding a perfect set of rivercane shafts can involve a lot of looking, sorting, and luck. People who want to purchase these hand-crafted materials and products rarely appreciate how much work goes into just gathering the materials. A dozen matched cane shafts may come from sorting a hundred plants, then aging, curing, and straightening before the arrow can even be started.
Rivercane (Arundinaria) arrows with reinforced self nocks.
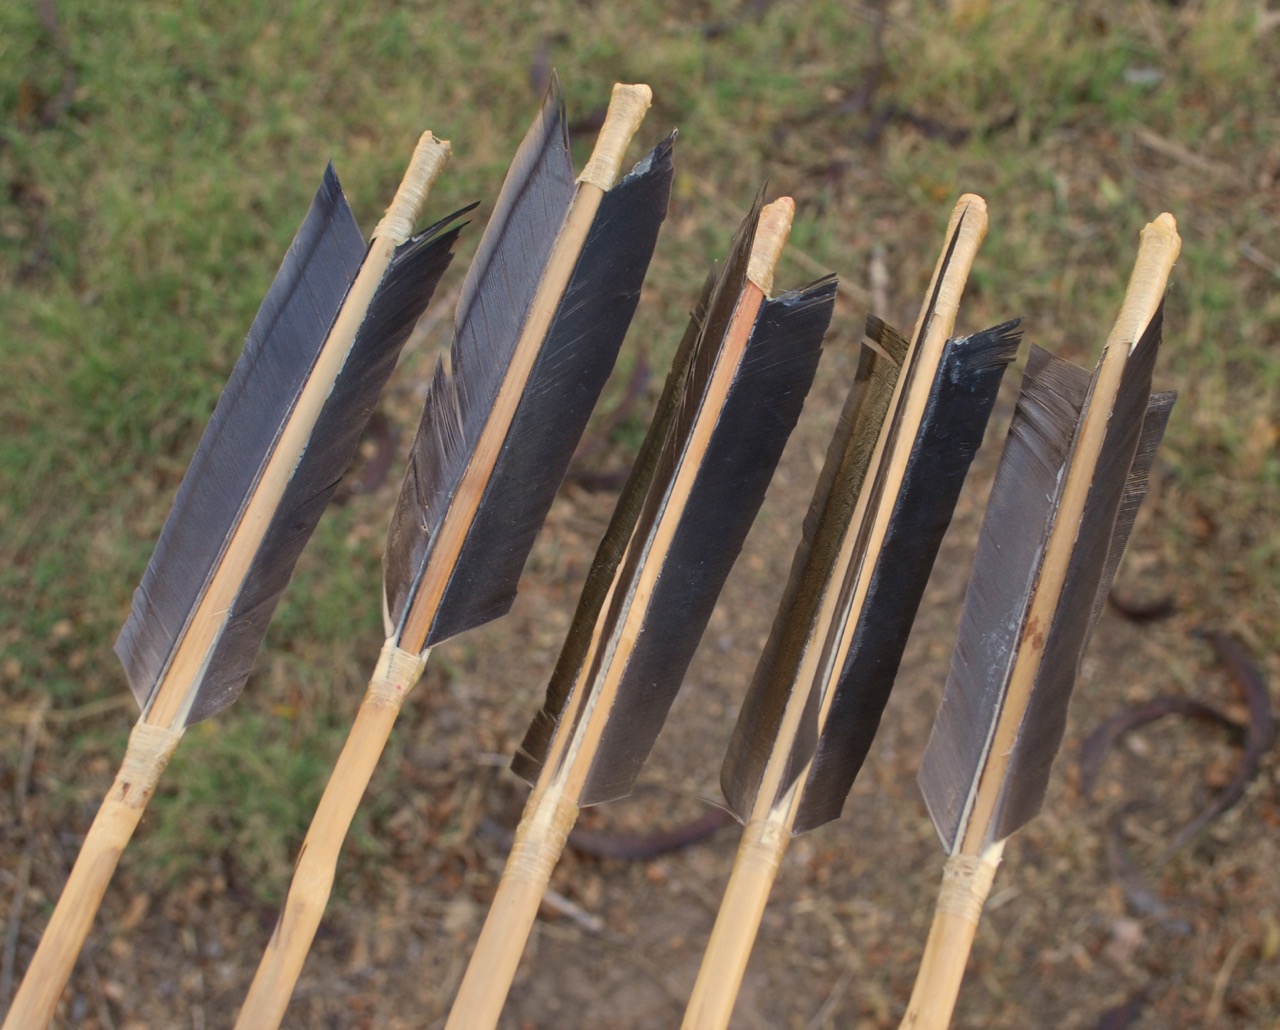
Fletchings –
To produce enough fletchings for the above, one has to acquire three feathers per arrow, matched by side (all rights or lefts) and placement on the wing of the bird (e.g., second or third wing feather). This could mean wings from seven to fifteen animals depending on how picky one is just to produce five sets of fletchings.
Antler point.
Points –
Finally, the points are considered based on the needs of the archer. Will these be for hunting large or small game, target shooting, or just all around fun shooting? I use bone, antler, stone, wood, and steel depending on the intended use of the set. Although I purchase most of the metal points I use, a lot of time can go into making matched heads from natural materials.