A quick follow-up on yesterday’s post in the wee hours of the morning.
Hook engaged.
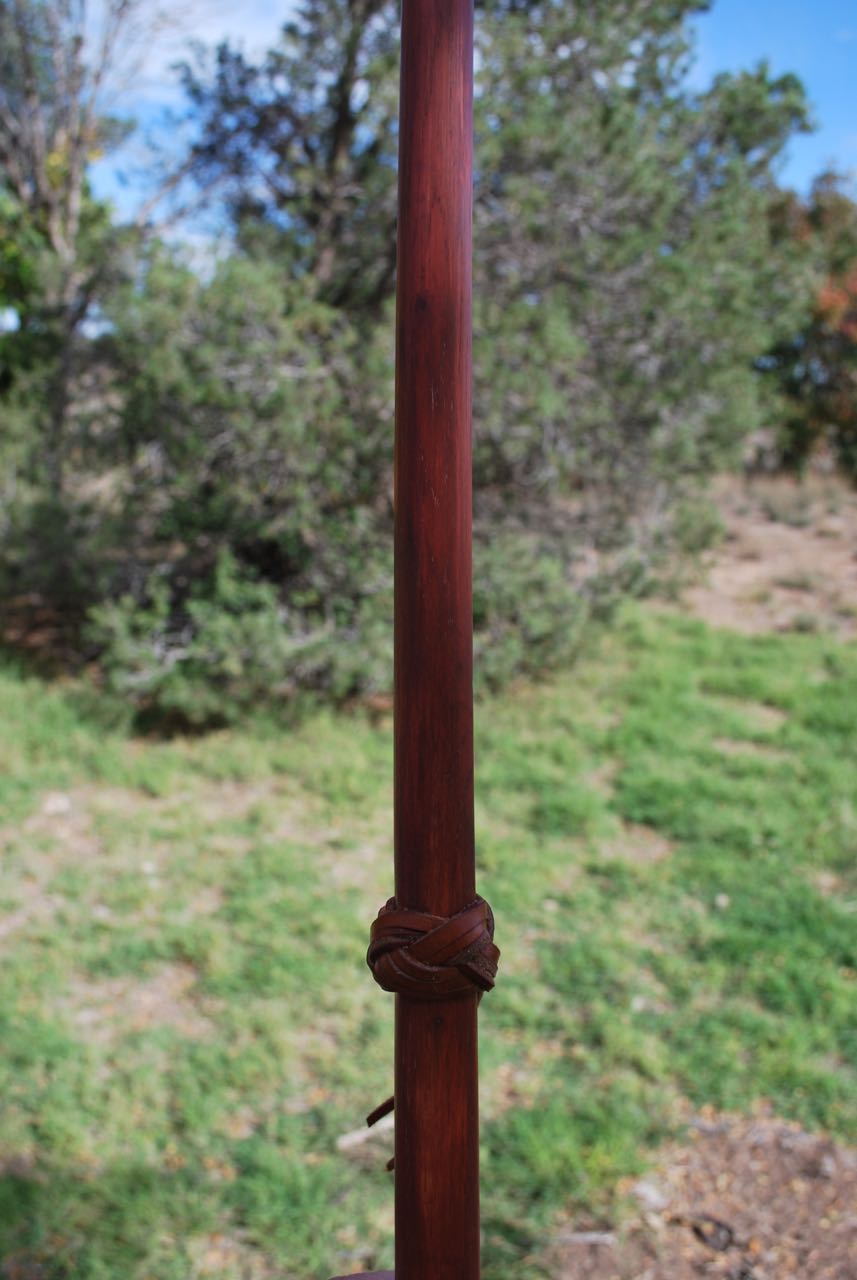
Based on a question that came in yesterday it seems appropriate to show the thrower in use. This is my favorite dart but I’m a little embarrassed by the sloppy fletching. The base (proximal end) of the dart is carved out in a shallow cone and reinforced with some very fine hemp, coated in hide glue. The indent should not be too deep or the hook only catches the rim and will break off bits when thrown. It should “bottom out” for best contact.
Hook detail.
The hook is pulled out here to show length. I find that if the hole and pin are too deep, the release is not smooth as it binds up during the throw.
Hole oblique.
Nothing magic, just a technology we all knew back in our family past. I should say that there are three primary types if connection for spear throwers; this on just seems the most popular. I hope to address the others sometime down the road.
I recently finished another Paleolithic inspired spear thrower (a.k.a. atlatl). This came about due to some throwing over the past year that re-energized my feelings about this technology and it’s sporting aspects. As usual for this type of project, I made several at once since the tools were at hand. Here’s a quick rundown on the process of connecting an antler hook to a wooden handle.
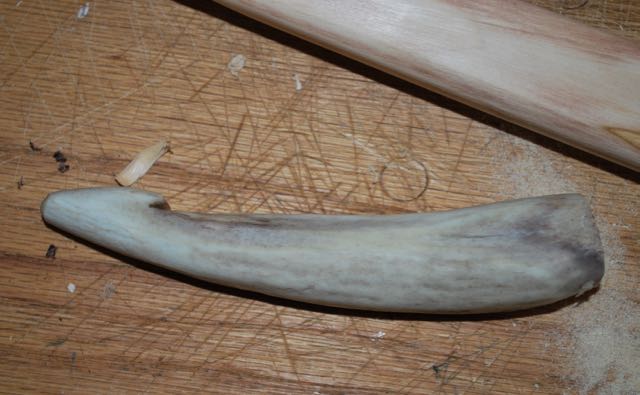
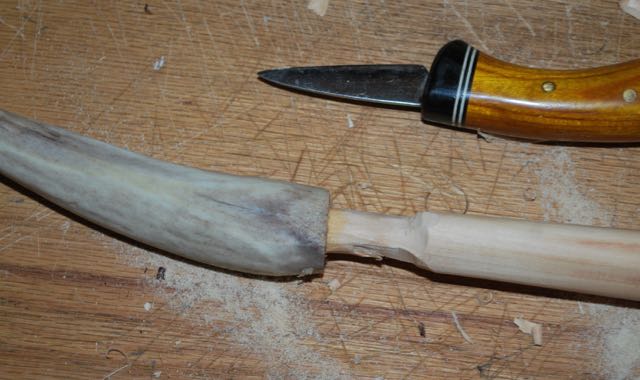
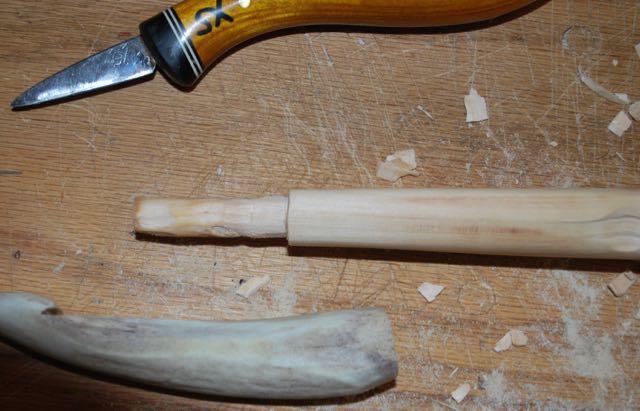
I cut the antler and rough out a notch for the hook. A few hours soaking in water will soften the cancellous core for easy working.Drilling can easily be done on the softened antler with a narrow knife, stone flake, or tapered drill bit.Once the hole is drilled (I take it down to about 3/8 inch or a little thicker) the handle can be roughly whittled, testing periodically for fit.Argh! A moment of distraction means the snap of a stone bit!A process of trial and error will eventually make a tight joint.Nearly there.Cleaning of the shoulders of the joint makes for a much neater look and solid connection.If the fit is tight, the drying cancellous tissue in the horn sticks surprisingly well. However, I want this to be maintenance-free for the owner so a drop of wood glue will insure decades of strength. Now the slow and tedious shaping can commence.Antler hook after shaping.Here is the hickory handle after being painted with red ochre.And, for mine, I added a turk’s head knot in vegetable-tanned leather to keep hand placement consistent.
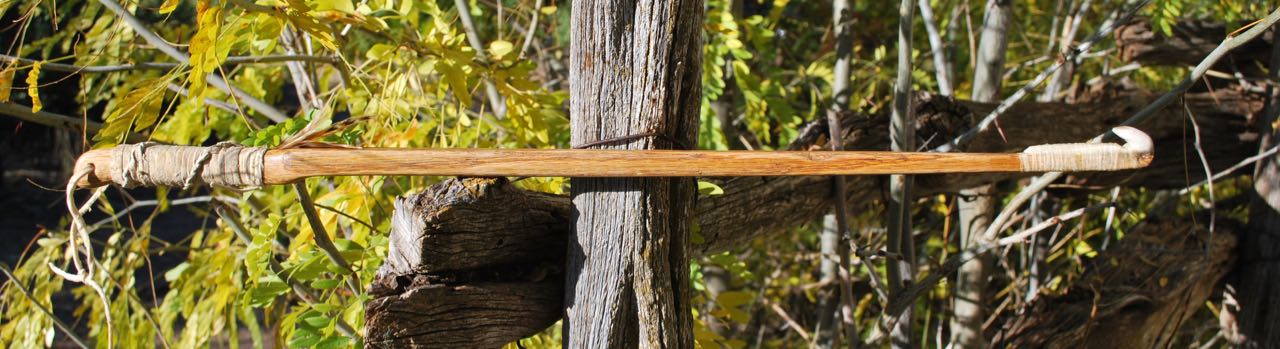
My favorite style is the Western European Upper Paleolithic “hammer-handle” style thrower. It works well with heavier darts and is a solid companion.
I recently got around to repairing my partner’s atlatl for an upcoming throw at the Landmark. It’s been in use for seven years now and suffered some dings as well as losing it’s wooden hook. The handle is oak and the original cocobolo hook has been replaced with antler which will hopefully last a lifetime.
The hook itself can come under a lot of stress, especially if it lodges in a too-deep socket on the spear or dart. I started keeping them fatter and flatter, more like Upper Paleolithic specimens from Europe, making them stronger with a smoother release. This design works well for me.
Side profile of the nearly finished antler hook.
The hook above is held by elk sinew and hide glue. It may need another round to smooth it out.
Sinew coated in hide glue drying on the spear thrower hook.
Sinew is an amazing material to work with. I learned about it when I was a teenager by reading Larry Dean Olsen’s classic book Outdoor Survival Skills and have been a proponent ever since. Real sinew has many advantages over modern materials including the so-called “artificial sinew” in that it adheres to many surfaces, bonds perfectly with hide glue (sharing much of the same chemistry), and shrinks as it dries making for a tighter bond. Another advantage to sinew as a survival tool is that every animal has it, so watch out.
Grip wrapped (half-hitched) with buckskin lace and ornamented with some hackle feathers.
Finally, a lot of folks prefer a leather gripped handle for a better hold when wet or sweaty. This thrower has won quite a few competitions in the past and I hope that tradition continues in it’s newest reincarnation.
An advertising card from when people appreciated hand made archery equipment. No training wheel, gizmos, releases, or sights. There is no date on the image but I suspect that late 18th century or early 19th century would not be too far off. Apparently javelin throwing was in vogue at the time as well. Now we have television, video games, and the internet. I feel fortunate to live at a time when primitive technology is making a resurgence. We felt very alone 20 years ago doing these things but an upside to the world-wide-web is connecting people with so much to teach each other.
Click the image to access the British Museum page for this item.
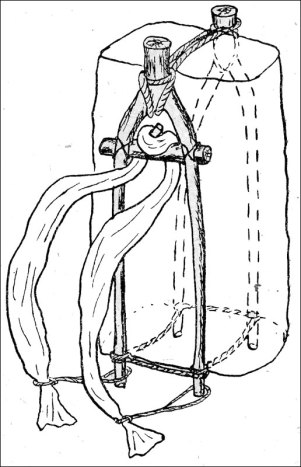
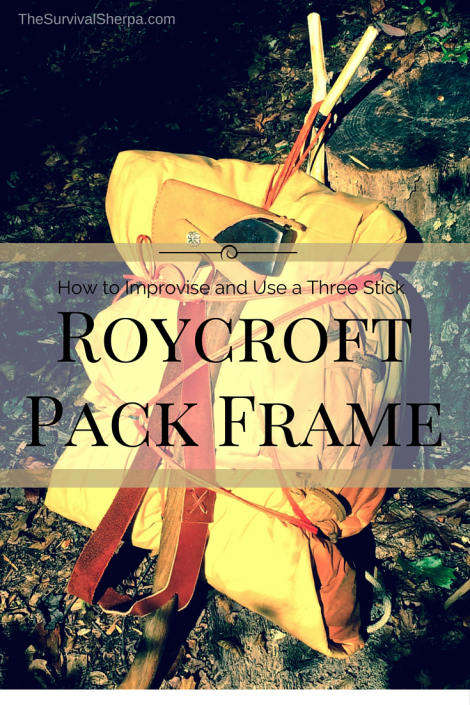
Thanks to Survival Sherpa for posting this look at making a pack frame. Making a quick, three stick pack frame is a valuable bit of knowledge. How serendipitous that this came up (seems to be a lot of convergent thinking around my world lately) as I am beginning to tweak my own wooden pack frame for some experimental travel. And while we’re on the subject here’s a link to a broad look at pack frames from around the world on Markus Kittner’s fine web page.
Have a look at Survival Sherpa by clicking the link below.
These are nearly the same type I make. A frame saw is a useful and simple introduction to woodworking and tool-making. If you are interested in woodworking, Paul Seller’s blog has a lot to offer.
From Paul Seller’s:
If you have not yet made one of these you should. They are quick and simple to make and give you the European push and pull stroke saw in a single saw which is useful depending on where you want to…
Before looking at the ethnographic literature I experimented with tying up some simple sandals with mixed success. It turns out that it’s not as simple as one might think. Now I’m a connoisseur and am always making mental notes when I see old depictions, or in the old world, images on statues. For simple, soft lace sandals, the Tarahuamara style works perfectly. A single lace does everything you need.
Learning from the past may save us from losing our future.
There are still Huaraches north of old Mexico. As I prepare to resole my huaraches I thought it might be good to look back on them as a very viable hand-made shoe.
For a long time while searching for huarache construction techniques, I could only find the simplest tire sandals and many links to “barefoot” style running sandals. However, a few years ago, I found Markus Kittner’s Huarache Blog and scoured it for inspiration and design secrets from real huaracheros in old Mexico. He has done excellent work in documenting the process.
My first beautiful huaraches drying after being soaked to shape to my foot. They were subsequently oiled and slicked down. I owe much to the Huarache blog for so many great images and descriptions of traditional huaraches.
As a craftsman of sorts, I understand that making a “one-off” of something does not imply expertise. Only replication builds a real understanding and mastery of the object being produced. However, this is not my first leather working or shoemaking project but a major improvement on a theme. This style shoe is made on a last. The shoe lasts I purchased on Ebay have finally been used to actually make a shoe. I documented the process as it came together as best I could; my mistakes and changes included in the process. This is not really a “how to” recipe for making a huarache but shows the process I used.
The lasts I found on Ebay. The sole cut out, punched for strapping and nailed to the last.
The last shown here fits me well but are an Oxford dress shoe style, meaning they run a little long in the toe. As I am making an open-toe design, I let the last hang over slightly in the front, squaring the sole to the shape of my actual foot. New lasts are pricey (ca. 50 euros/$70 US), but I think it will pay in the long run to invest in a better design for myself and those people I might make shoes for.
Wetting out the first strap.
I didn’t show the strap cutting process as there is little to be learned about that. It is a skill in itself, even if you have a strap cutter. My Osbourne strap cutter can be seen in the upper right of this photo
Since this project was experimental, I used scrap leather, meaning I could only get about three foot (one meter) straps. In future, I’ll probably use 6 foot or longer pieces (2+ meters).
Nailing the strap to the last.
I pre-punched holes in the mid-sole and away we go. A little tallow on the straps helps cut the friction of the leather but ended up being not worth the trouble. They were kept damp throughout the process.
Placing the twining thong.
This is a signature of the style I chose. The vamp or tongue-like piece was later removed as I didn’t like the way it looked. I’ll experiment more with that later.
Lacing and twining.
Unlike normal, I completely finished the first shoe and removed it from the last to check size and shape to determine any major changes that would need to be made.
A heel piece was added and laced up the back. I think this step shows the evolution of the strap sandal to the modern huarache.
The straps running under the mid-sole look like a problem here but are ultimately skived down, dampened, and hammered flat.
Straps ends as added in. Longer straps would lessen the ends here.
I used simple wire nails (as is traditional) to attach the soles but sewing would work too.
Ends to be trimmed and skived, and a finished sole.
Pulled from the last, they actually matched. I don’t know why I was surprised but that made me really happy.
Preparing to nail the sole.
The method I chose to attach the rubber is fast and efficient, and I suspect rather tough. The nails are pressed through the leather and rubber into a thick leather scrap below. Otherwise, you would need to pry it up from the work board. One surprise I learned over time was that the nails actually wore off on the underside before the rubber.
Nailing the sole.Bending the nails in preparation for clinching.
The nails are bent over (inward) to prepare to “clinch” them. There are no photos of this part of the process but this was done by setting the shoe back upright on a small anvil and hammering the nails down tight with a punch. The pre-bending causes the nail to curl inward and back up into the sole. Voila! The Huaraches below have about five miles of hiking on them now and they’re beginning to have some character.
Huaraches you say? Do tough guys wear such things? In an era of cheap, slave-made garments, its easy to forget how self-reliant our ancestors were for such things as raiment. I include this photo of Capitan Alcantar I found on the Huarache Blog as a great historical image of a man of action wearing his huaraches and ready for war.
Click the image for more historic photos like this.
I hope this prompts someone out there in the world to take on the project of making their own shoes, whether for survival, uniqueness, or just as a challenge. Making for yourself is a small act of revolution against a bad system.
A fun and relatively tame primitive technology event for a good price located in southwest Missouri put on by good friends of mine. Here’s some information from their website:
This unique event has two parts – a free knap-in/native arts-crafts show starting Thursday, with top-notch knappers, artists, and crafters from a 20-state area making and selling their work. In the Workshop Area starting Friday, a pool of some of the area’s finest instructors offer workshops on various wilderness skills and crafts. You can learn the survival skills of our ancestors, and in many classes, take home a completed project.
Overnight camping and vendor-knapper setup – $5/night, a limited number of electric sites available on a first-come basis – $15/night. If you arrive before Wednesday, leave camping fee in the deposit box, Wednesday and after, please pay at the Registration Booth. Food Concession provided by the Dade County Historical Society.
Admission to the Workshop Area – $60/day or $150/3 days:
Get your hands on it, and learn with some of the finest primitive skills instructors in the midwest!
Below is a partial list of workshops available – the list may change to to instructor availability, check registration for an updated schedule.
Friction Fire
Flintknapping
Flute-making
Basketry and Pottery
Deadfall Traps
Pine Pitch and Hide Glue
Pump Drills
Bow and Arrow Construction
Atlatl Construction
Bone Tools
Tracking and Trailing
Primitive First Aid
Bowls & Containers
Knife Sharpening
Primitive Cooking
Braintan Buckskin Hide Tanning
Buckskin and/or Cattail Moccasins
Cordage & Netting
Shelter
Rivercane Blowguns
Edible, Medical Useful Plant Identification
Edible Insects and much more!
HEAD OVER TO THEIR WEBSITE FOR MORE INFORMATION, MAPS, ETC.
For the past twenty or more years the technology of the spear-thrower has become more and more well-known as a sport. Popularly called an atlatl in the Americas as that was the name the Nahuatl-speaking Aztecs gave it. This is a world-wide technology and arguably one of the greatest technological leaps for early modern humans. I feel fortunate to have lived through this increasing popularity and to see the growth of the sport.
Have a look at some remarkable throwers recreating an ancient training game reported to be from South America.
For a more European take on the subject, check out speerschleuders at this fine German website. Finally, possibly the oldest image of a spear thrower in action from Lascaux Cave.
The bird on a stick in the lower left is believed to be an animal effigy spear thrower widely known in the region from the later Pleistocene.