Once again, I am producing some large, traveler’s wallets. While some are waiting their finishing touches, here’s the first of six. They are all of the same general size and design but each has some variation in shape and closure type.
A simple wrap closure. This can accommodate a bulging wallet.
I think my dying is improving. Having read more on the subject, I’ve been able to create a nice overall finish. The dye is applied in many diluted layers and hand rubbed to force it into the leather.
The right size for many applications.
The leather is from a 6 – 7 ounce vegetable tanned cowhide that was a real beauty. The side was just shy of 30 square feet. To start working the nine foot long hide, I had to move my operation into the kitchen and onto the floor for initial cuts. Maybe someday I’ll have a shop table big enough to accommodate something this size again.
The interior divider provides four pockets. Big enough to hold a load of cash, passport, and the separated slots are sized for standard identification or credit cards.
This wallet is perfect for keeping everything in one place for log term travel or to be used as a small clutch purse.
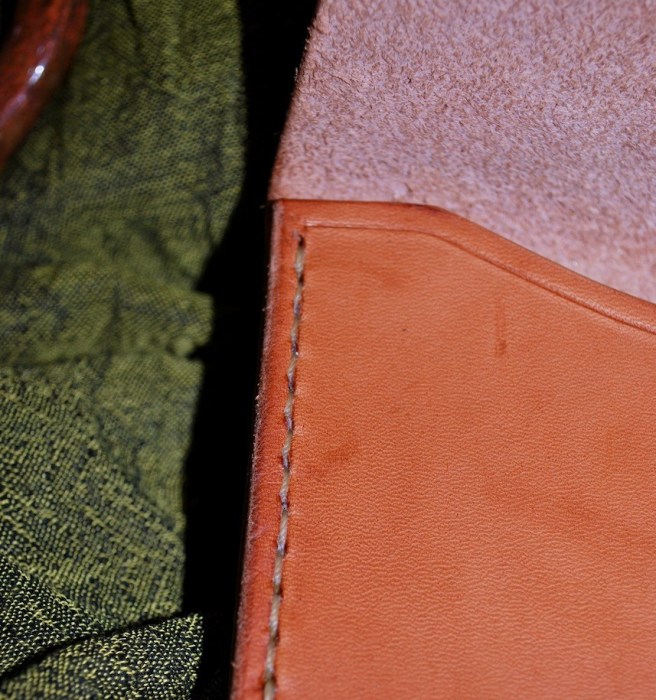
Edges are burnished to give a finished look and the body has been waxed with all-natural dubbin.
The thread is heavyweight bookbinder’s linen in dark gray (nearly black) so is absolutely period correct for the reenactors out there.
If you are interested in this or some of our other work, check out our Etsy shop, look at the previous sales, and read the reviews.
In my life-long quest for better designs and finer gear, I am constantly on some sort of hare-brained mission to make something new. Some readers may remember the earlier backpack I made and eventually traded off to a new owner. My friend Jacob, even made a fine copy for himself and it now lives happily in Botswana, hopefully seeing many great adventures.
Snapshot of the pack, ready for waxing.
Leather and Brass? (or, what the hell were you thinking?)
One thing that can be said about real leather is that it will, barring some mishap, last a lifetime but eventually fade back into to earth, leaving little trace. Leather is strong, wears well, is abrasion and heat-resistant, feels good to the touch, and cannot be beat for beauty. While I considered antler for buckles, I decided to go with a slightly more modern closures and fasteners made from solid brass. As I use antler in most of my creations, I chose to make a few well-shaped toggles as practical accents.
The downside? These materials are heavier than modern, lightweight materials but, for me, the trade-off is completely worth it.
It begins with the little things. There are many repetitive steps in large projects such as this.
This backpack started off as some daydreaming and sketches on graph paper sometime last November but other projects and commitments made me set it aside again and again. This was good though; it allowed me to rethink the plans and make modifications as they occurred to me in the quiet hours of the night.
The harness system took some time, thought, and modelling before work could commence.
What were the design parameters?
Design is always the toughest part when creating something new. I’ve been looking at handcrafted bags and packs for years so I’m sure there are a thousand images bouncing around inside my skull influencing the composition of this piece. Honestly, choosing a size was the most puzzling part of all for me. I’m a biggish guy and have a tendency to go big when I make gear so I was determined to keep this one reigned in.
Once the more difficult decisions were made, cutting and sewing could begin.
I already had a “look” in mind and already decided on the construction technique. Should it be a six panel body for easier layout or single panel around the body for a more seamless build? Should it be sewn, laced, or riveted and what pockets does it need? Will it be “turned” (seams hidden inside) or will the closings be visible? Finally, where to begin construction? We can’t close the body until the external sewing is done so pockets and straps were a good place to start.
Not long after getting most of the parts gathered and cut, I found myself wounded, with only one arm for practical use. This slowed down sewing to a crawl. What should take fifteen minutes took over two hours so this bag became an exercise in patience.
Still, I managed to make headway and the pack came together over several weeks.
A “turned” pocket freshly attached to the body.
Maybe not my prettiest stitching ever, but as it will be mine, and not for sale, I will still cherish every flaw.
Large pocket accessible with the main flap closed.
As a prototype, there were changes that must be made on the fly but overall I was happy with the design.
The shoulder straps were made to be replaceable without too much hassle and are long enough to accommodate a heavy coat in winter.
A carry handle was a heavy debate in my mind but makes a lot of sense for modern travel.Each side has a slip pocket, tie down D rings and a compression strap at the top of the pack.Bottoms up! I was able to place a scar in the hide on the bottom of the bag. The two rectangular patches are for blanket straps.Details – brass rivets, antler toggles, and beautiful leather called for a heavy pillow ticking to serve as the liner.Waiting to be packed for an adventure. I hope to get it waxed and outside later this week. Hopefully, I’ll get some photos of the new pack in use.
I’m currently working on a custom order. Projects are coming to an end for a few weeks with the impending surgery. The dimensions of this bag are suited to fit a specific waterproof map case already owned by the customer.
The components clicked and punched the old-fashioned way but with the aid of some modern measuring tools.Double-needle stitching. It may not look perfect yet, but a little trimming and burnishing will clean the edge up beautifully on this bag edge.The double-needle work creates a tight, strong seam.A sewing awl and needle are used to hold aligned pieces for stitching.
Here is a little Boho Chic bag made from a beautifully bark-tanned hide by Joe Brandl (#absarokajoe). It’s a bit outside my normal style but people have loved these bags over the years. Heading to the Oregon Country Fair, Burning Man, or just the beach? This is an accessory for you. Oh yeah, it makes a a great possibles bag too!
Here’s my unapologetic SALES PITCH…
This hand-made bag was created by me and is adorned with a lunar crescent and four sea-shells collected on the Oregon coast. The leather is extremely soft to the touch and was tanned with an all natural process using the natural tannins from tree bark. It is double needle stitched with heavyweight hemp thread waxed with pure beeswax from another friend, Benjamin Pixie. The strap is a three-strand braid from the same hide and is very soft and supple.
The crescent and shells are stitched with real buckskin (not commercially made) in keeping with the authenticity of this bag. It is the perfect size for a day in the wilderness, beach, or at a festival. It is beautiful enough to work as an everyday Bohemian purse in town. I have made several of these over the years and they have always been the envy in any crowd. Wanna look like the coolest Shaman on the block? This bag will get you there.
The edge is bound for stiffness to hold its shape.
Specifications:
Length – 7″ (17.75cm) long
Width – 5″ (12.75) wide
4″ (10 cm) fringe
Strap length – 58″ (147 cm) to hang low on the hip
If you are looking for the perfect gift for the outdoorsy Lady or Gent, we are here to help you out. Our new webstore will be filling up as we learn our way through the Matrix. In the mean time, check us out at: https://www.etsy.com/shop/LostWorldCrafts
This is a recipe for high productivity in the workshop.
Hot off the workbench.
Fortunately, I have a fairly large stockpile of leather and supplies to see me through my projects as I find inspiration in different projects. I am leaning toward things that have been popular in the past years but if anyone has ideas or suggestions, I will gladly consider them.
Sam Browne button in solid brass.
This is my travel wallet design. It’s a simple clutch-style document case to keep things safely stowed when you want more than a card wallet.
Simple, rugged design.
No frills but elegant in its own way, this one was left natural color and rubbed with dubbin (a mix of neatsfoot oil and beeswax). Full-grain veg-tanned leather like this ages beautifully and takes on a golden brown patina. This wallet should outlive its owner.
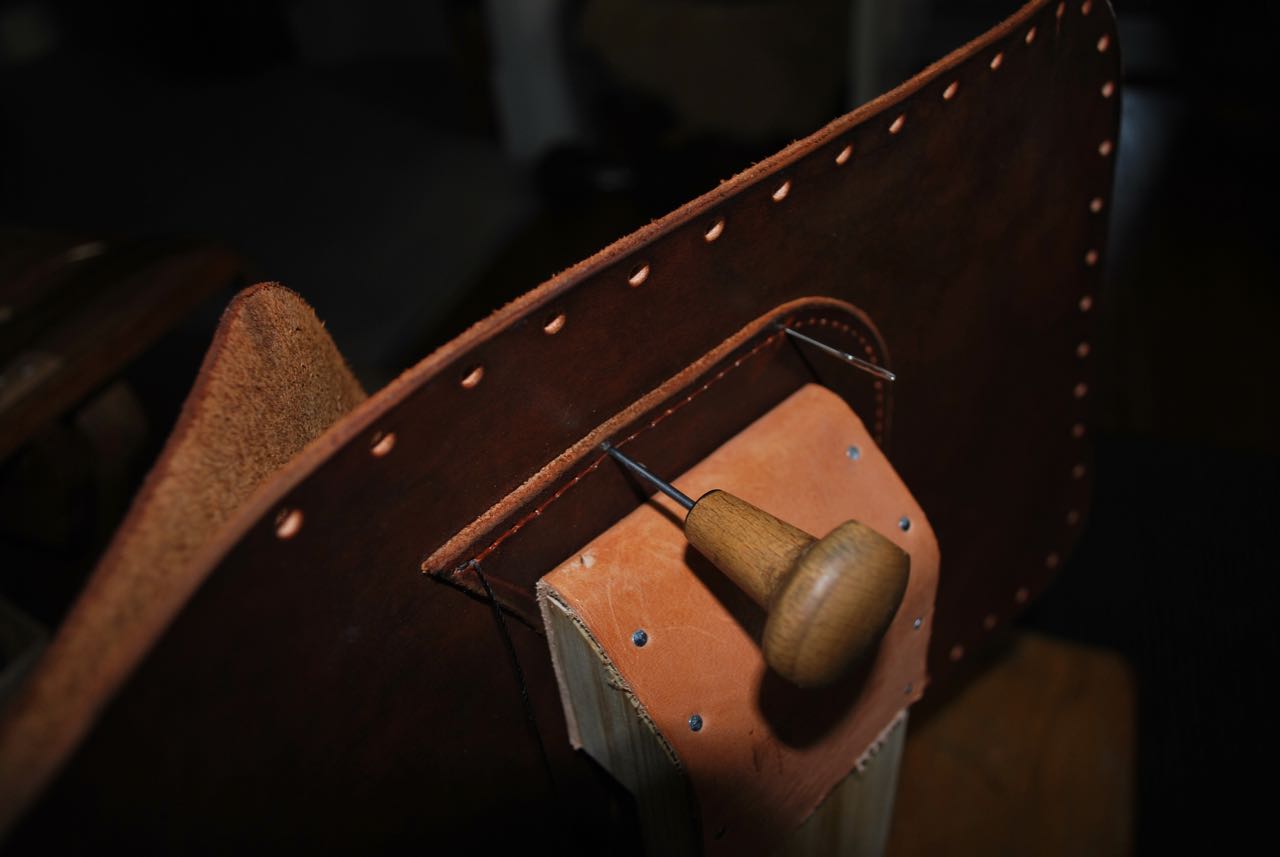
Hand stitching.
As always, the stitching is double-needle saddle-stitch for strength and hard-wearing. If you are interested in this or similar goods, please check out our new Etsy shop at https://www.etsy.com/shop/LostWorldCrafts or just click the banner below. We hope to have the site fully running and stocked with new goodies in the coming weeks.
The sporran is complete and ready to go so, of course, I had to model it to show the size and wearability.
Here is the Maker in his workshop sporting the new bag. I didn’t bother to “kilt up” but that is the belt I frequently wear when kilted. Overall, this design is great and I’ll probably start making a few more right away. I like this one better than my own day sporran so I guess I’ll need to make one for myself as well. I should note that a truly traditional sporran would be ornamented with leather or hair tassels. I pondered this addition, but it isn’t really my style. Maybe on the next one.
I have been wanting to make a few sporrans based on the classic 18th century style. This type, often referred to as a Rob Roy style, is a fairly simple, single pocket design that can have a number of variations. The one I’m making here is from 6 oz full-grain hide and should outlive it’s owner, even under hard use. A versatile belt pouch like this was originally intended to be worn with kilt or trousers as built-in tailored pockets are a rarity in history.
At 6.5 inches wide by 6 inches tall it can hold a fairly complete fire and survival kit in a handy position on almost any belt.
As with most of my leatherwork, this bag is hand sewn using a double-needle saddle stitch for strength and longevity.
The dye is wet in these photos, looking a bit uneven, so I’ll try to shoot a few more in better light when the weather improves.
The bellows design I chose stays flat but will expand to fit more gear as needed. Look for a follow-up soon. It is listed on my Etsy page so it will, hopefully, be finding a new owner in the near future.
I never touched a tool in high school. When I was there, kids were openly placed in two “tracks;” either Academic or General education. I know I wasn’t the sharpest student and I generally disliked almost everything about being in school but I was placed among the Academics. In lieu of shop classes (woodworking, metal shop, electricity, etc.) I learned a lot from a former engineer-cum-teacher who taught Drafting and Engineering Drawing. This was the closest thing to shop class a kid on the Academic track could do. Why? I have no idea. We learned about house design, making scale plans, estimating materials, and other useful things.
Engineer drawing.
Fortunately, my grandfather was a handy guy who grew up on a farm and spent his early years in the building trade so I learned the basics of using a square, compass, saws, planes, and the like from him. Also, being left as a somewhat feral child, I was able to use and abuse the family tools and learned many valuable lessons the slow and often frustrating way. When I was sixteen, I began working part-time for a construction company as a laborer with the thought I might make that my profession. I learned a lot, both good and bad, by observation and exposure, and continued to work as a carpenter in various capacities through graduate school a decade later.
Elementary school Sloyd.
Where am I going with this ramble?
It was a long and meandering road for me with many side excursions and dead-ends, and although I feel grateful for all the lessons and training I received along the way, I sometimes lament the loss of craftsmanship and the values of creativity in schools. In short, education isn’t an either/or proposition; that you are either on track for academic pursuits or you will be in the labor force. I have met many geniuses with little formal education and many fine academics who excel in the manual arts.
Teach your children well. Real life skills are too important to be left to others.
I’m just going to stretch the imagination and say this is Clark Gable and Joan Crawford just prior to christening this little home (or maybe just after, he does look a little sweaty).
Here is a wonderful tiny home with Clark Gable and Joan Crawford eyeing each other up on the front porch. It appears to be strapped to a regular flatbed trailer, presumably for delivery to its final destination. There is nothing new under the sun.
Anthelme Trimolet (Anthelme Claude Honoré Trimolet, born 8 May 1798, Lyon – died 17 December 1866, Lyon) from the Musée des Beaux-Arts de Lyon.
I have stared at this painting for quite some time. There is a lot to unpack from this one if you have any interest in hand tools. This image is of a very organized workshop of a master craftsman plying his trade in the early 19th century. I feel he is consulting with a client about a commission they are undertaking and discussing the finer details. Click the image for a larger version and enjoy.