This advice will go a long way towards happiness. It isn’t an excuse to be selfish or uncaring of others but to find who you are and what you want to be. A path we’re all on.
“Be yourself- not your idea of what you think somebody else’s idea of yourself should be.”
This is what you shall do; Love the earth and sun and the animals, despise riches, give alms to every one that asks, stand up for the stupid and crazy, devote your income and labor to others, hate tyrants, argue not concerning God, have patience and indulgence toward the people, take off your hat to nothing known or unknown or to any man or number of men, go freely with powerful uneducated persons and with the young and with the mothers of families, read these leaves in the open air every season of every year of your life, re-examine all you have been told at school or church or in any book, dismiss whatever insults your own soul, and your very flesh shall be a great poem and have the richest fluency not only in its words but in the silent lines of its lips and face and between the lashes of your eyes and in every motion and joint of your body.
Walt Whitman 1819 – 1892, “This is what you shall do” – from preface of Leaves of Grass (1855).
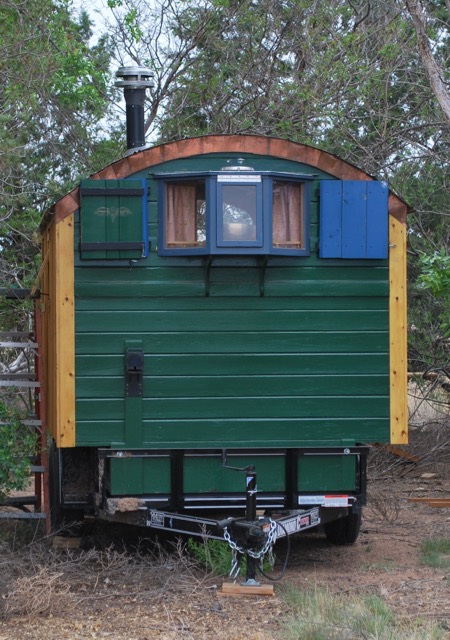
I have not been entirely idle on the vardo project but have not had time to post here. Work life has been eating up my spare time with travel, and fun though that may be, it means nothing else gets done outside the work day. Cutting a hole in my nice, dry roof haunted me for several months but with the aid of a high-temperature silicone stove-pipe flange, I was ready to dive in. I didn’t want to remove the roofing panels so the cutting was difficult. I did what I could with the circular saw and gnawed the rest out by hand with a chisel. Not pretty, but it worked in the end. Then it was just a matter or cutting a hole through the steel and cleaning it up with a file.
The ugly hole. Fortunately it will be hidden.
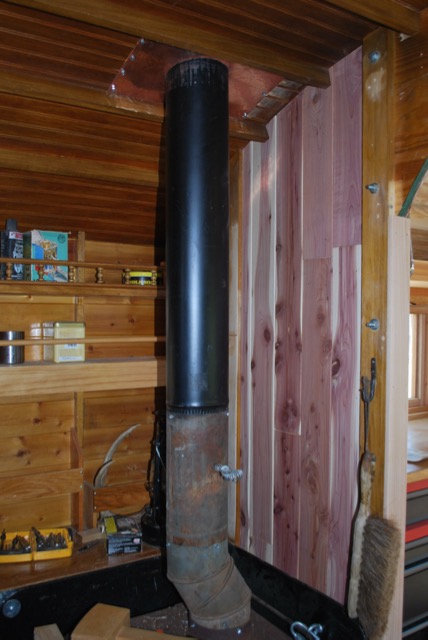
I created a cover for the hole from an old, solid copper serving platter (see photo below) that looks nice, and will cover the ugly. The gap between the layers was filled with stove gasket insulation.
Matching up old, very old, and new pieces to make the connection. The offset was used so that the pipe lands between the purlins.
The upper pipe will get a coat of high heat paint while the lower portion will get stove polish along with the stove itself. In the background, the new juniper paneling is visible. Otherwise, the place looks like a wreck. The mallet is handy to solve all measurement problems.
The silicone flashing isn’t as ugly as I feared but still hope to pretty it up with copper sometime.
Learning from experience, I created this new chimney setup so that the outside pipe could be easily removed, if necessary, for off-road travel. I will probably shorten the pipe by a few inches as it sticks up fairly high. Once this was completed, I could get back to the good stuff.
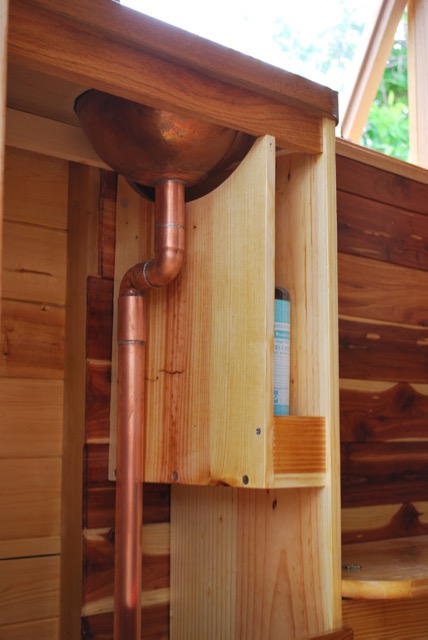
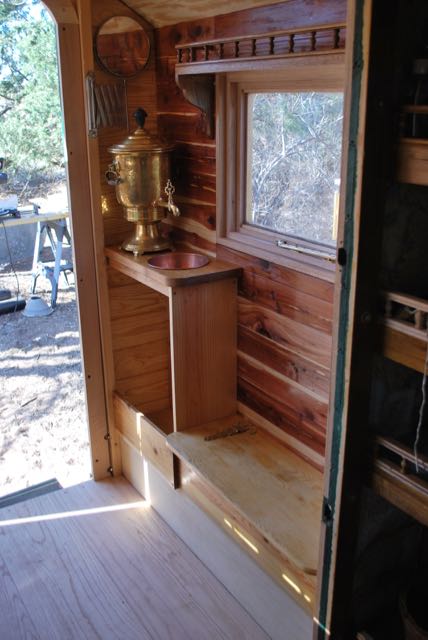
Sink area with a new-purpose-built soap holder.
In order to maximize storage space a small shelf was created to hold soap. The size was determined by a standard Bronner’s soap bottle and it holds two comfortably.
A little carpenter’s geometry.
Some scraps from the wood pile were recovered and planed down to rejuvenate them for use. Nothing fancy here, just utility.
The large under storage area is designed to hold the beautiful copper cistern from the tinker Robins.
Everything in the area has another coat of varnish so as soon as create a method of securing the Samovar, the washing-up area will be complete.
First coats of varnish on the oak.
Finally, I have begun varnishing the floor. The new oak contrasts with the old but will darken soon enough.
The existence of ovens like this is easily documented for the 18th century. In fact, just about every ancient culture had a very similar oven. There’s one particular wood cut illustration from medieval times depicting an earthen oven built on a wagon. There are references in 18th century literature and also archaeological evidence that you […]
“The first supermarket appeared on the American landscape in 1946. Until then, where was all the food?… It was in homes, gardens, local fields, and forests. It was in the pantry, the cellar, the backyard.” – Joel Salatin
Like many Americans, you have come to homesteading to be able to provide for your family, friends and community in the way that you see fit. The last time so many Americans felt the way you feel now was during World War II. During the Second World War, many of us had a victory garden and raised poultry because foods were either being rationed or were not available. The systems which are now the backbone of the United States’ economy seem to be growing quite weary and failing in some respects. So much instability creates a great unease. Homesteading, on the other hand, creates security for you, your family, friends…
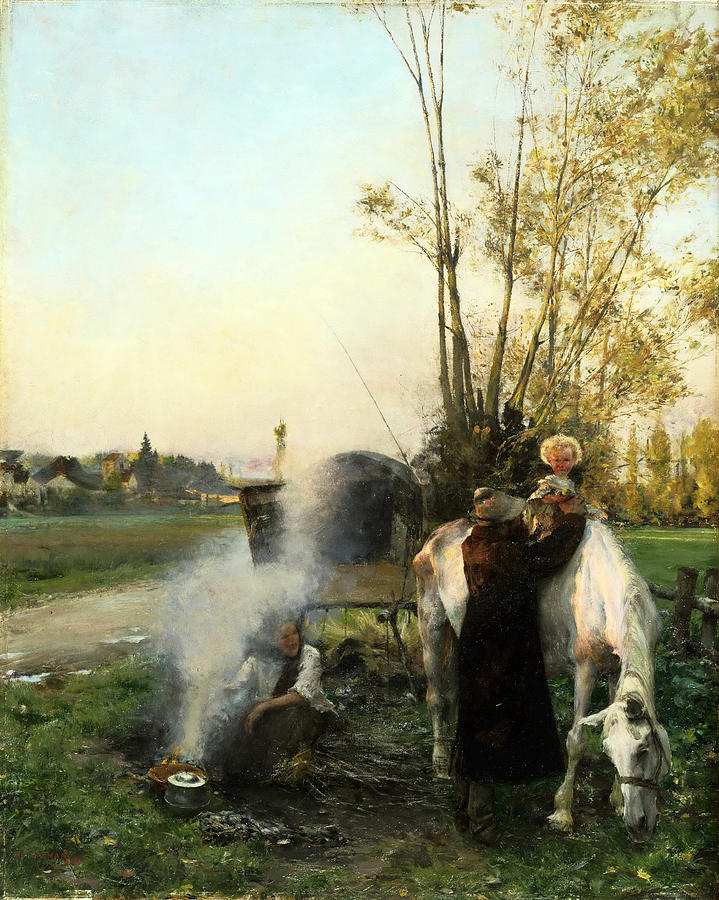
Getting back to our theme of traveler’s, caravans, and other wanderers of the world… a few images from Pascal Dagnan-Bouveret a French Naturalist Painter of the late 19th and early 20th centuries.
“Dans la forêt-Musée des beaux-arts de Nancy.”
I believe I would enjoy siting around this campfire.
“Chevaux à l’abreuvoir.”
Once a common scene, now virtually lost in an era of loud, fume-belching machinery.
“Gypsy Scene.”
A peaceful morning cooking breakfast in the morning dew. The caravan is obscured by the smoke of the campfire.
Músicos de todo el mundo se unen para tocar “La Bamba”, canción que llena de alegría los corazones y que es símbolo de nuestra cultura.
Hoy más que nunca, ¡qué orgullo ser mexicano!
In case you need to sing along, here are the Richie Valens lyrics from the original.
“Have nothing in your house that you do not know to be useful, or believe to be beautiful.”
Wise words from William Morris.
William Morris
This is the mantra that drives the entire vardo project. I try to keep this in mind for every thing I add and every part I build. Otherwise, isn’t it just junk?
Sink, seating, and storage galore – I’m finally moving onto the luxuries that make this addition what it is meant to be; essentially moving some outdoor activities and living indoors with more amenities and easier foul-weather living.
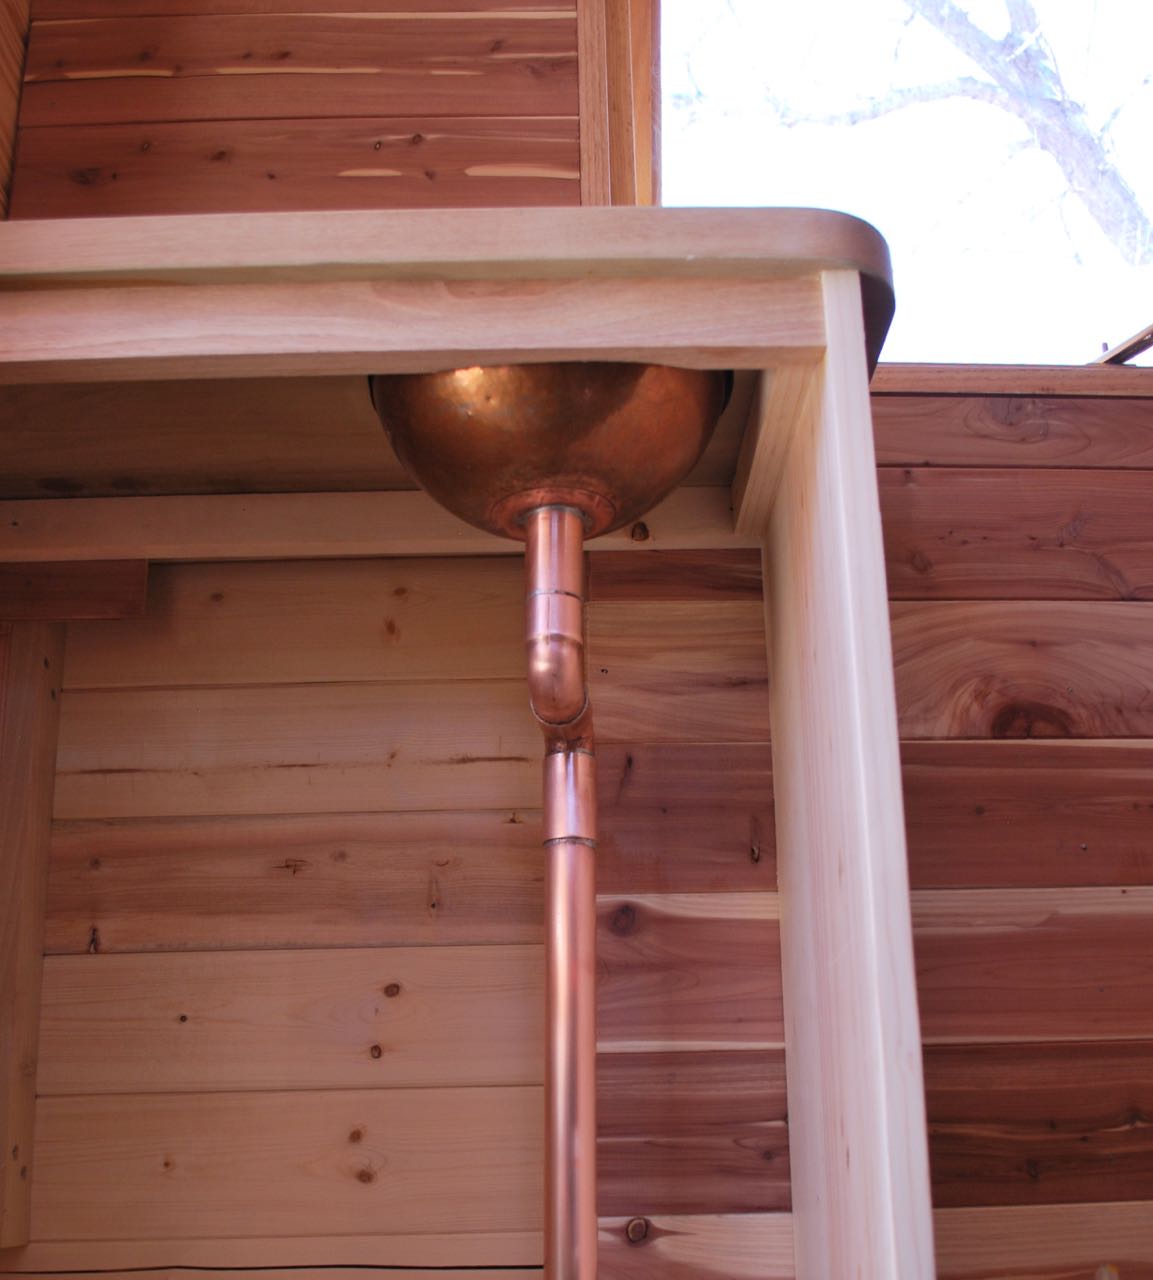
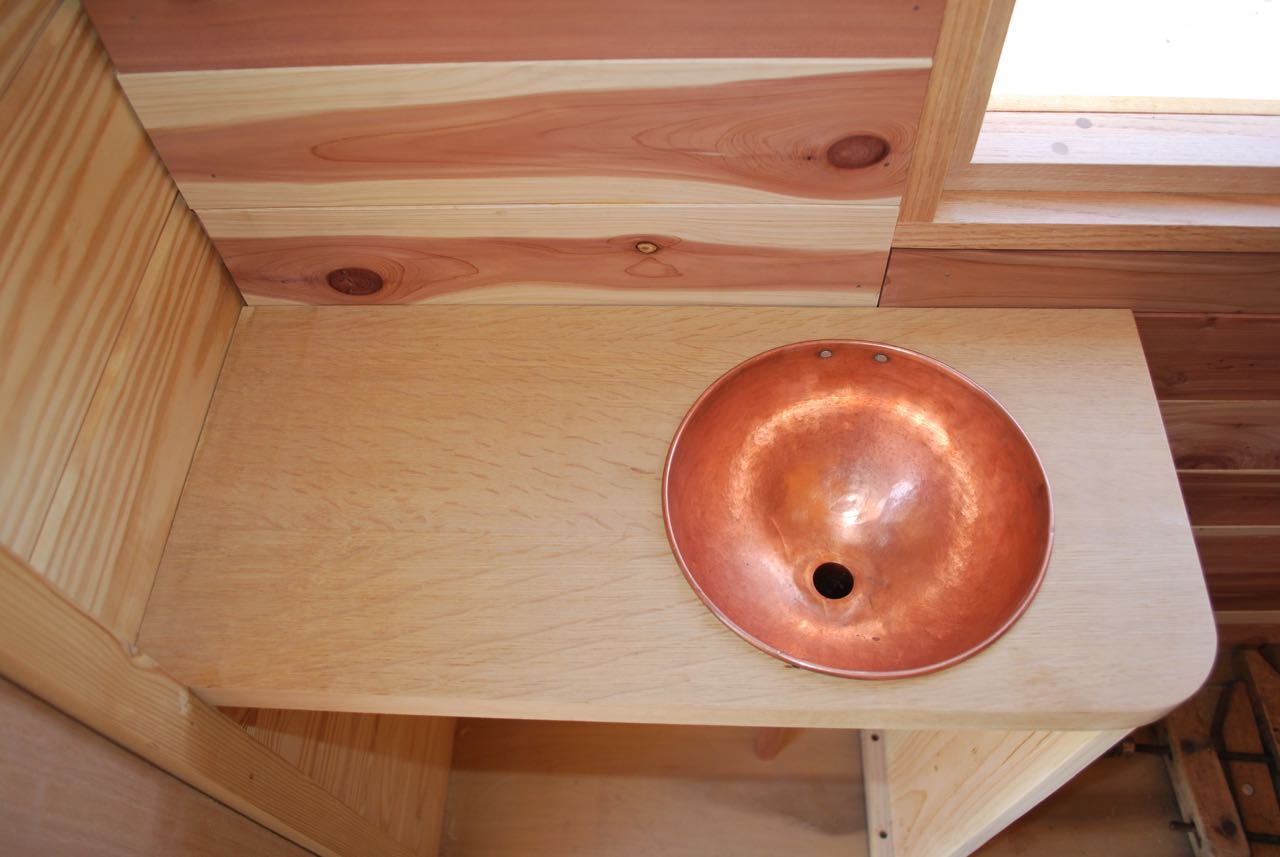
Copper mixing bowl drilled for a drain.
Beginning with a little sink re-purposed from an old copper mixing bowl set – This one was the middle size and fit the area perfectly. I’m certainly not taking credit for the idea as I took this freely from Mick’s vardo. The bowl is a perfect size for some personal hygiene, tooth-brushing, etc. while on the road while the bigger cleaning can still be done outside with the old washtubs and in the future, with an outside shower.
Drilling the hole – I was concerned about this step as there were several things that could go wrong; hole placement, dented bottom, rough fit, and so on. In the end I did my best to find the exact center with a tailor’s tape, from the outside, and marking the location with an awl. I then flipped the bowl over, set it up in a scrap board, and while holding it with my feet used a hand brace with a Forestner bit to slowly cut the hole. This worked surprisingly well and required only a little sanding and smoothing before moving on.
The bowl is not very heavy copper so I was concerned about the solder strength at the joint. There should not be much real strain on it but to ensure a larger surface area to sweat the solder, I sleeved the short pipe with a heavy coupling. I flowed the solder deep into the sleeve before attaching to the so they should be united forever now.
Pipe and coupling soldered in place.
Some serious tugging and testing leads me to believe this is a solid joint.
View of the plumbing from below.
A couple elbows and a short run of pipe completed the plumbing “system” and installation was a breeze. A small shelf to hold a couple Dr. Bronner’s bottles and a towel bar will be added soon to complete the set-up. The storage area to the left was sized to hold the beautiful new copper cistern during travel. The cistern will live outside in the kitchen area when encamped.
A note of caution – Although not really discussed here, the oak-framed windows are visible in some of the images. These were recently added and are glazed with Lexan for its light weight and excellent strength. Keeping the weight low is still a major priority, even in the addition and, if you are building something like this, remember: EVERY SINGLE POUND COUNTS! Fasteners, glass, hardware, accoutrements; they all add up and will be paid for in the final weight. If I could build everything with oak and walnut and hickory for durability, I would. However, the weight will add danger in towing, lower the fuel efficiency and have a cumulative effect on the overall structure.
Looking down the drain.
The sink was fitted into place and a outflow pipe seated in the hole drilled by the same Forestner bit used in the bowl. This counter is a re-purposed old office desk top from the 1930s or 40s that I’ve had for many years. It is a white oak laminate over a red-oak core (when things were built to last). A couple passes through the planer yielded a beautiful and sturdy surface to work with. The rest of the desk top was turned into the large counter on the starboard side that will be included in the next post.
The Samovar in position for washing and the shaving mirror in it’s new place.
This old Samovar was a lucky find for us and fits the location perfectly. It’s high pedestal provides clearance that would otherwise need to be created with some sort of shelf. Otherwise, it’s simply a beautiful and functional piece.
The new bench and a smattering of varnish.
The next step was to create a small bench with the idea that this would give room when two or more people were inside as the floor space is limited in the main cabin. This area will serve as something of a mud room for the rest of wagon. The hinges were an Ebay find of solid brass under a hundred or more years of varnish and tarnish. I think Stacey really enjoyed making these shine again. This wood is some very solid pine reclaimed from an antique child’s desk and again, a planer made short work of cleaning it up for use.
Side bench.
I would have preferred the seat to be a little deeper for comfort but didn’t want to interfere with the traffic-way through the door. Nobody wants a shin-buster in such a small space.
There cannot be enough storage space in such a small accommodation.
The bench provides another small storage compartment for items that may need to be readily accessible; it’s not large but every bit counts.
An overview of the new area.
It’s always difficult to get a clear picture of arrangements in such a small space but this shot from the main cabin gives a general impression of the area and the relative size the new window.
For Part 1 of the rebuild/addition then CLICK HERE.

 “Be yourself- not your idea of what you think somebody else’s idea of yourself should be.”