I had to wait a while to publish this one but maybe I just need to get it out…
I like to think I’m a safe person. At least to the point of looking out for others if not always myself. I don’t drive aggressively, I maintain my vehicles, and don’t take big chances on the road. That said, I probably stress my truck and the vardo more than most people would. The truck has spent sixteen years as an archaeologist’s field vehicle and has gone into places I would have never thought I would take it. I have crept into BLM campsites with the vardo that required it to be tipped up to 45 degrees and I was certain it was going to go over. I’ve intentionally jack-knifed the whole thing just to push it into place between boulders.
These things are just the nature of travel in the…
So, a vardo is a small space, especially when living with a dog.
Stationed for maximum observation.
The old dog loved sleeping under the rig as she took her guard duties seriously but unfortunately, she is no longer with us. The youngster, on the other hand, has no interest in that sort of nonsense and only wants to be by my side as much as possible. She loves enclosed spaces so the vardo is a big attraction for her. She spends much of her time under the main bed, hidden away, and often forgotten about until she decides to get under foot. I even lost her for the better part of a day when she snuck in while I wasn’t looking, slipped into her bed, and was locked in for several hours. When I found her, she looked content enough and came out stretching like a sleepy child.
Making it fit.
Much of 2016-2017 I was lucky enough to spend many nights camped in the gypsy wagon with just my dog for company. She doesn’t get on furniture inside the house but the dog has decided the floor or her bed are not good enough when she’s in the vardo. Since she knows she not really supposed to sneak into the bed, the (too small) bench seat is often her compromise in the wagon. She doesn’t really fit but I guess it makes her feel like one of the family.
A bed’s eye view in the morning.
A couple years ago I learned to be extra careful when sliding out of bed, especially in the dark, as she often plants herself on her favorite felted rug; right under my feet. In this case, it also happens to be in front of the ceramic heater on a chilly morning.
Photo-bomb. She climbed out from her bed in order to not miss the action.
Even while getting ready to go to work, she seems to manage a photo-bomb; always lurking nearby and not wanting to be left behind. Just because it’s a small space, there is still plenty of room for a dog; sort of.
I have needed a stitching pony for a long time now…
The two-hour stitching pony.
Like so many other undone projects, this one has been stirring around in my head for several years. Since my efforts have been so focused on sewing leather lately, the time had come for a new and useful tool in the shop. I’ve looked at plenty stitching horses and ponies over the years and even used a few n person so I understood the basics of what I needed and began eyeing up the scrap pile for obvious parts.
Not absolutely necessary, but it’s nice to be able to open the jaws fully.
I decided to keep the project simple, small, and portable while making as few purchases as possible. I was able to gather up the lumber, leather, hinge, screws, glue, and tacks in just a few minutes and get to work. Power tools make jobs like this easy so the boards were quickly ripped, cut, and clamped up to dry overnight. A little cleanup in the morning yielded a working model suggesting a few minor changes. The opening of the throat was widened by 1/2″and I decided a longer bolt would be useful for fat projects.
This meant a trip to the actual hardware store setting the project bill up to $1.07 with a total work time of about two hours. We’re good to go…
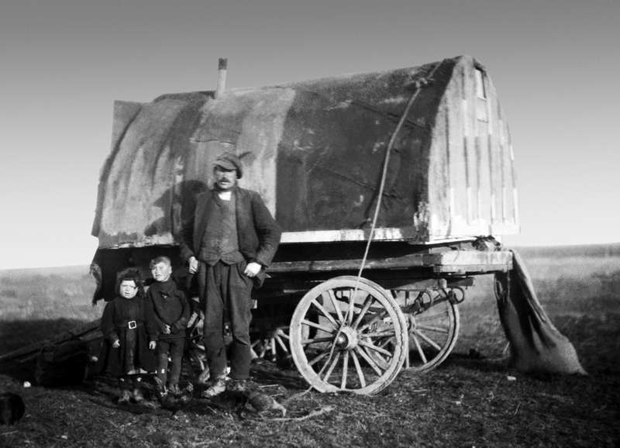
Here’s a wonderful old photograph of a “Tinker Family in Scotland.” It is believed to be taken sometime in the 1920s but the location was not identified. The wagon could just about pass for a western American sheep camp. Even thought they had the wealth to own a wagon it was still a pretty tough life, often unwanted in non-traveller (sic) communities, these people have been marginalized for centuries.
I found this one while perusing the Johnston Collection on the Document Scotland webpage. Have a look if you are interested in great images of a beautiful country.
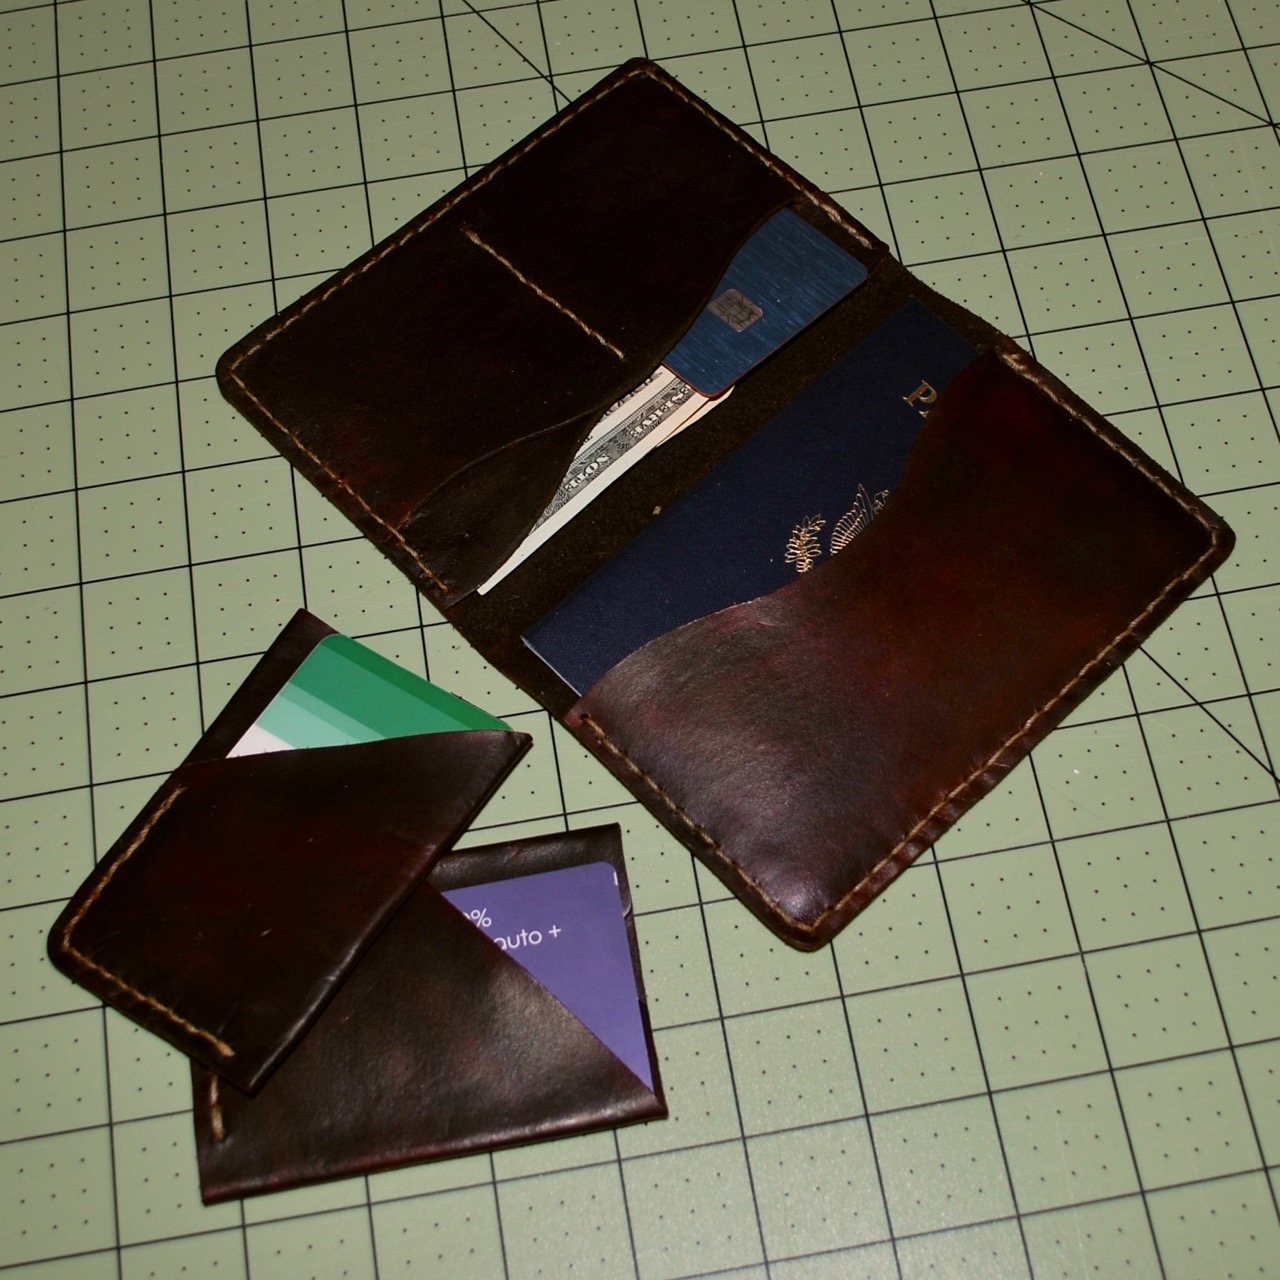
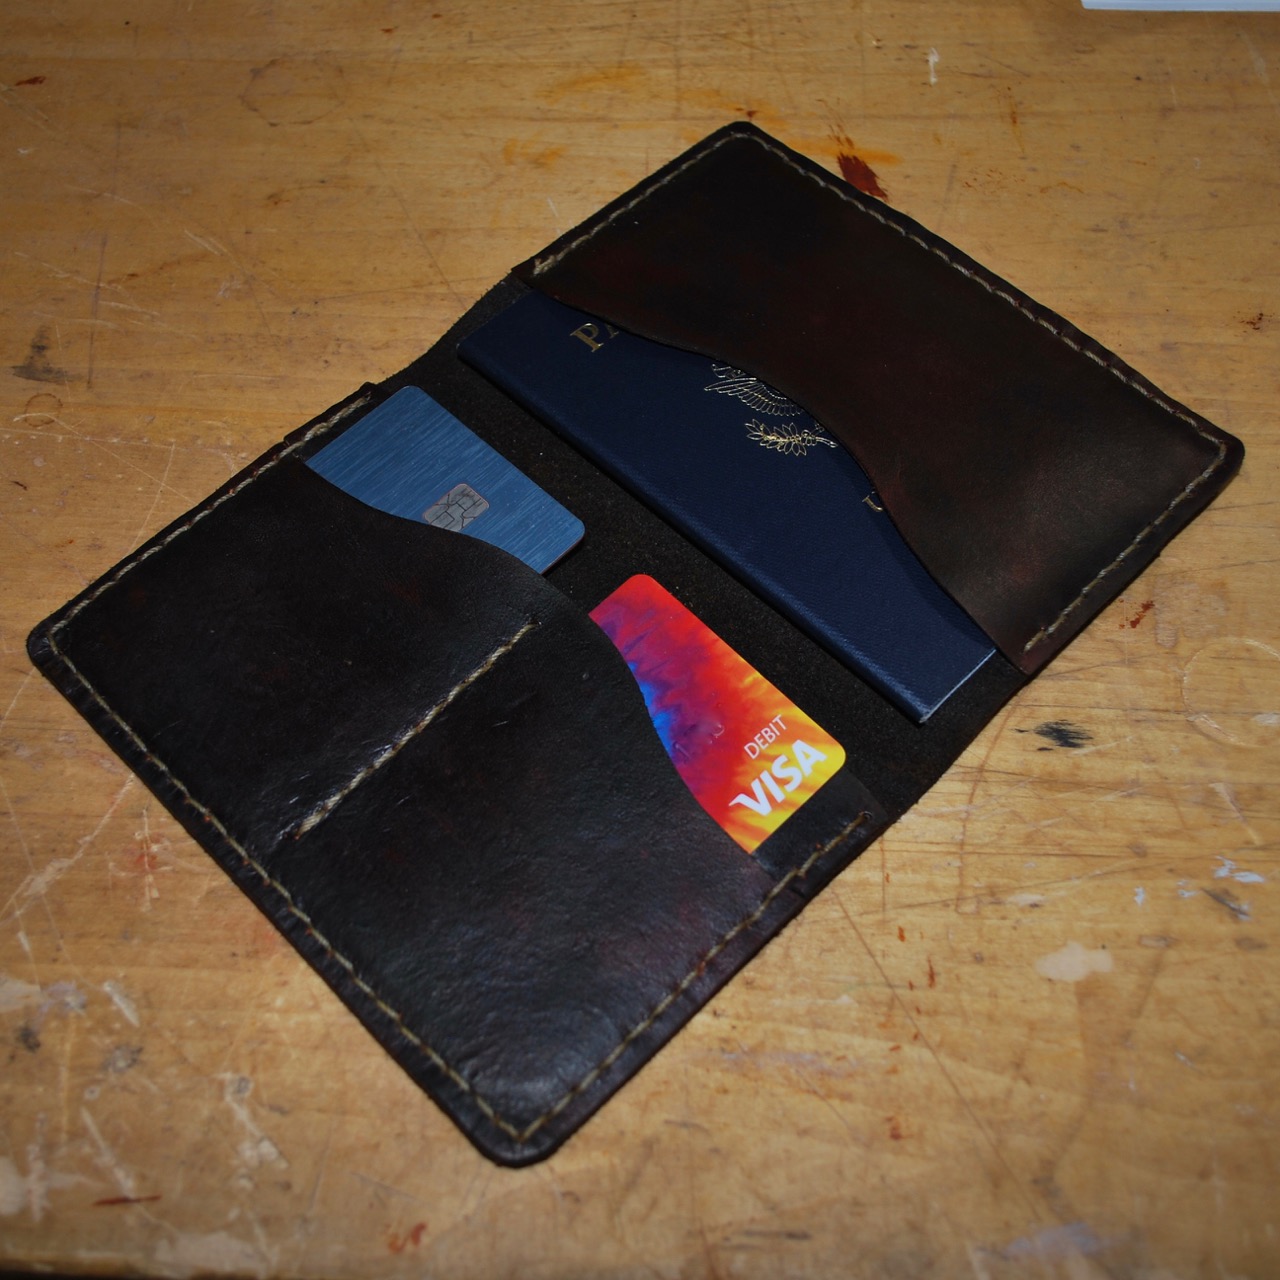
Maybe this is a little mundane but I’ve been using the cold and snowy weather as an excuse to do some cutting and sewing of leather. I completed a passport wallet and finished up another minimalist wallet design. I got the pattern for the larger travel wallet from Tony, the owner/designer at DieselpunkRo. He sells finished goods, patterns, and gives a lot of good advice for makers working from his patterns on his Facebook group page.
My three newest creations.
If you follow his Facebook group, he will occasionally share free, downloadable patterns. I have two patterns from him so far and they are both great.
The large wallet is a handy, four pocket affair that snugly holds a standard passport, cards, and cash.
This is another good starter project that easily yields a great product.
We were acting like shut-ins today because of a surprise snow storm so I’ve been able to jump to another leather-related project. I’ll share some photos soon.
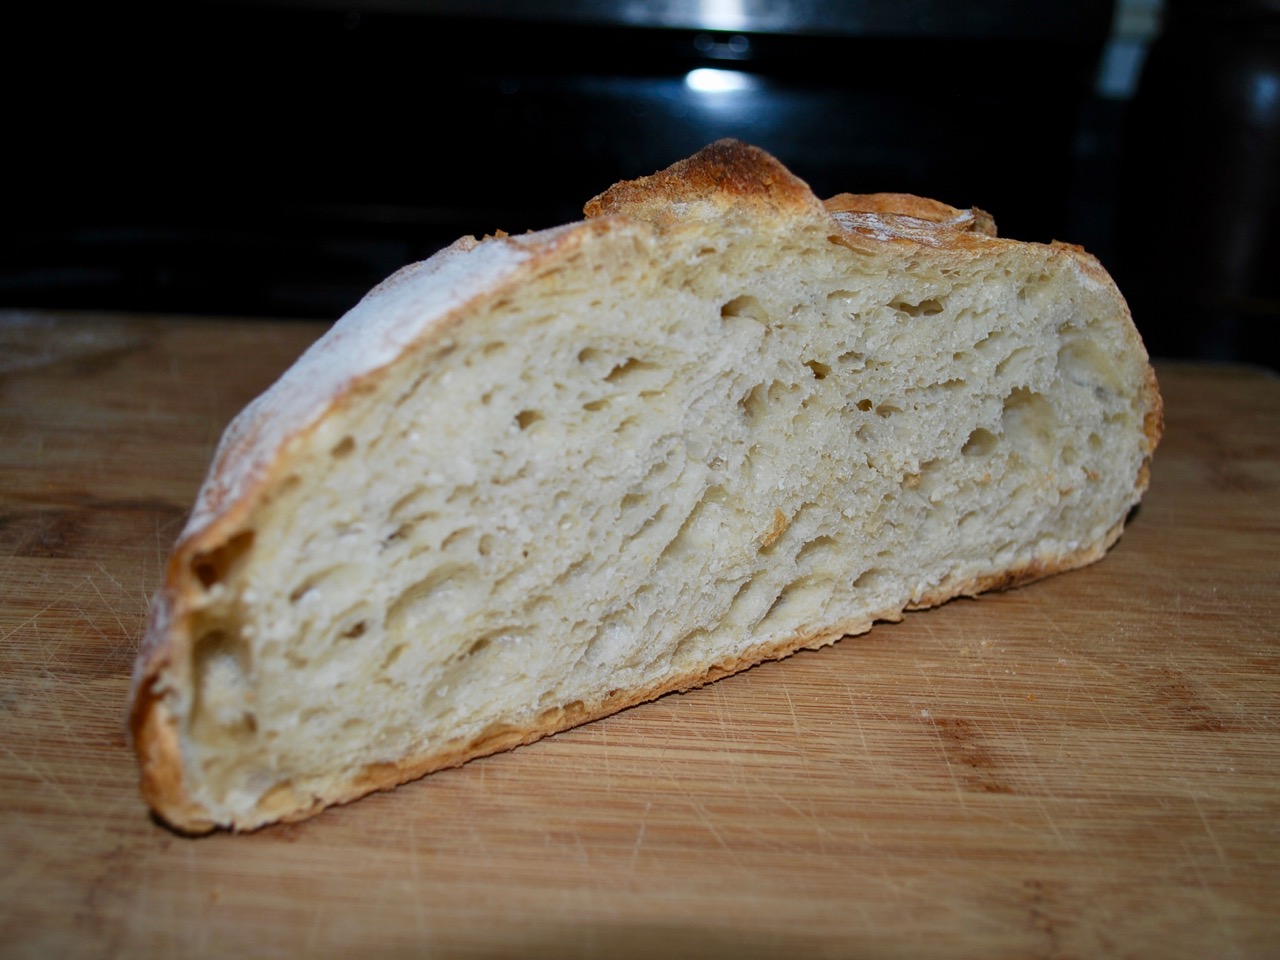
Someone asked for the recipe I used to make the artisan-style Dutch oven bread I posted a few days ago. This loaf is a crusty, chewy, large air-hole artisan-style bread that is great with soups or for hearty sandwiches.
There are many recipes out there and I’m not sure I’m the qualified baker to speak with any authority. However, ask and you shall receive as someone once said so here it is:
3 cups flour (I use about 3/4 c. whole wheat and 2 1/4 bread or all-purpose flour)
1/4 tsp active dry yeast
1 1/2 tsp salt
1 1/2 cups lukewarm water
In a large non-reactive bowl mix the dry ingredients thoroughly and add the water. Mix by hand until just combined. The dough should be a little on the wet and sticky side, so add a few drops extra water as needed. Cover and let stand about 18 hours (a little less is okay).
Turn out the dough onto a clean, tightly woven cotton towel that has been dusted with flour or cornmeal and form into a rough, wide, circular shape. Pull the right side across to the left then the left to the right; turn 90 degrees and do this again as if you were wrapping the dough up on itself.
Dust the top of the loaf with flour or cornmeal and flip over so the seam side is down and pull the towel over the loaf. Let stand 15 minutes to one half hour.
Preheat the oven to 500 F (260 C) with the Dutch oven inside (I put the lid on the top shelf to let air circulate inside while preheating). Let the oven heat a little beyond when it claims to be hot enough to insure the cast iron is ready.
Place the dough seam side up in the center of the Dutch oven, cover, and close the oven door. The seam allows the loaf to expand and serves in much the same way a slit on top of the bread would in a traditional loaf.
Cook for 30 minutes then uncover. If the loaf is not a rich golden brown, continue to cook with the lid off for 5 -10 minutes (ovens vary).
Turn out the loaf onto a rack or a bread board (if you don’t use a rack let it cool upside down for the first 15 minutes or more). Cool thoroughly then eat.
This recipe has worked well for me in many variations over the years and can be modified in many ways. I have a multi-grain seed bread I make more often than this that is a bit more complicated and maybe I’ll share it when I get time.
I found this video which may help visualize the process. It’s nearly the same as I relayed above with a slightly different size loaf.
I try to live by the creed of learning and making something good every day.
The Minimalist Wallet
As we have been pondering the holiday season it seemed a good time to get a jump on some leatherworking projects I’ve had in mind the past few months. This morning, before getting to work on other chores, I decided to take a little time and work out a slightly modified Minimalist Wallet. If you have followed this blog for long, you may have seen a couple earlier wallet projects we shared HERE and HERE. This isn’t a complicated project and might be a good one to start with if you trying your hand at leatherworking for the first time.
The All-Encompassing Symbol of the Age
Making the Pattern –
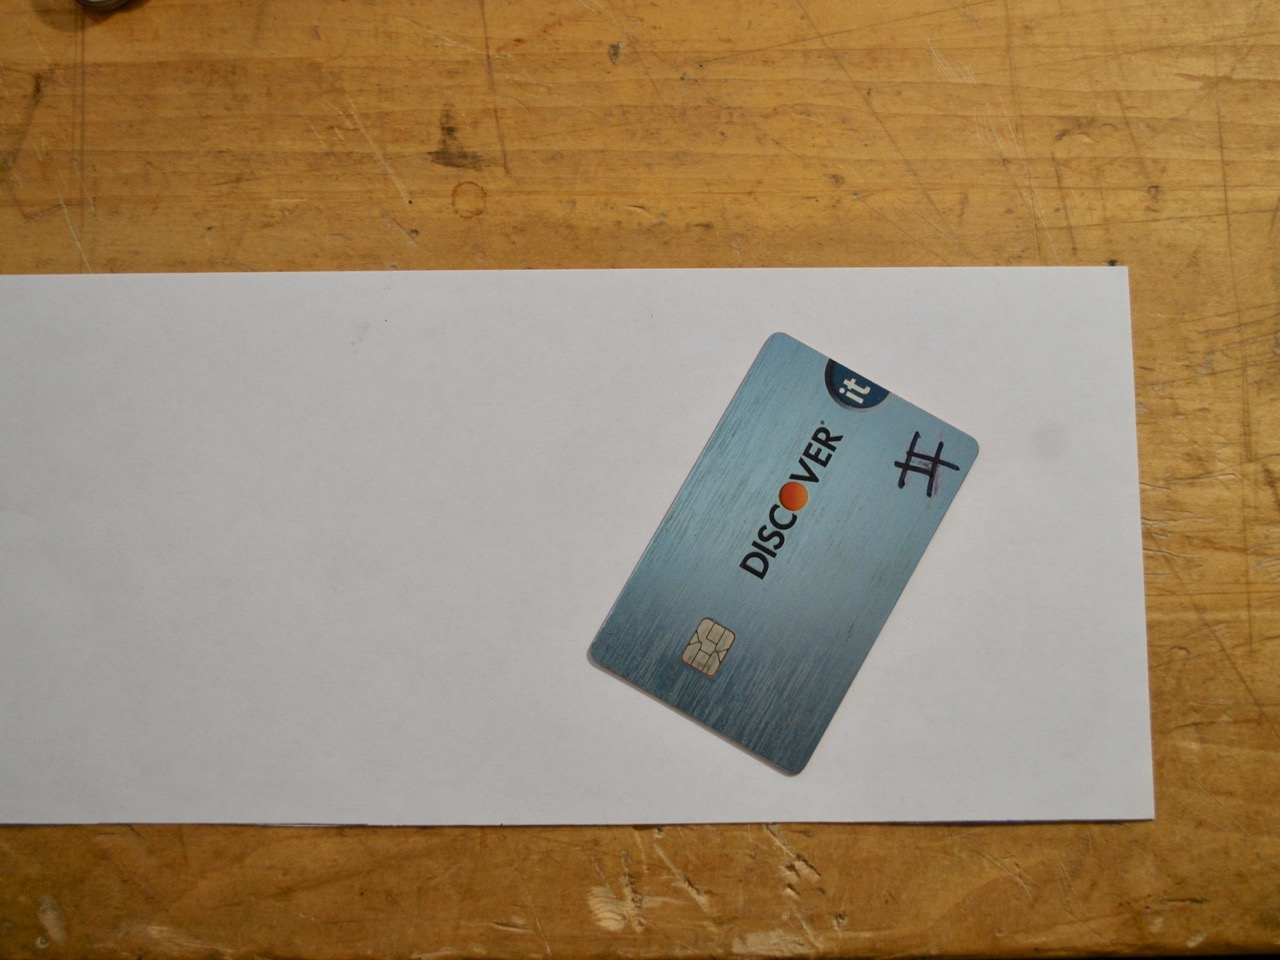
It would be pretty optimistic to just dive in and start cutting out a wallet without knowing what needs to fit. I used a debit card for scale as there will inevitably be a couple of these in just about any modern traveler’s pocket. I didn’t put a lot of time into the pattern as I have made a similar style before and knew the basics of what I wanted; essentially two pockets and very little sewing.
A Bit of Sloppy Origami to Test the Dimensions
To create two pockets, there needs to be three layers; two on the outside and one to divide. To make the cards more accessible, the outer pocket will be a “reveal” and I chose to do this the simplest way possible, by a diagonal straight line.
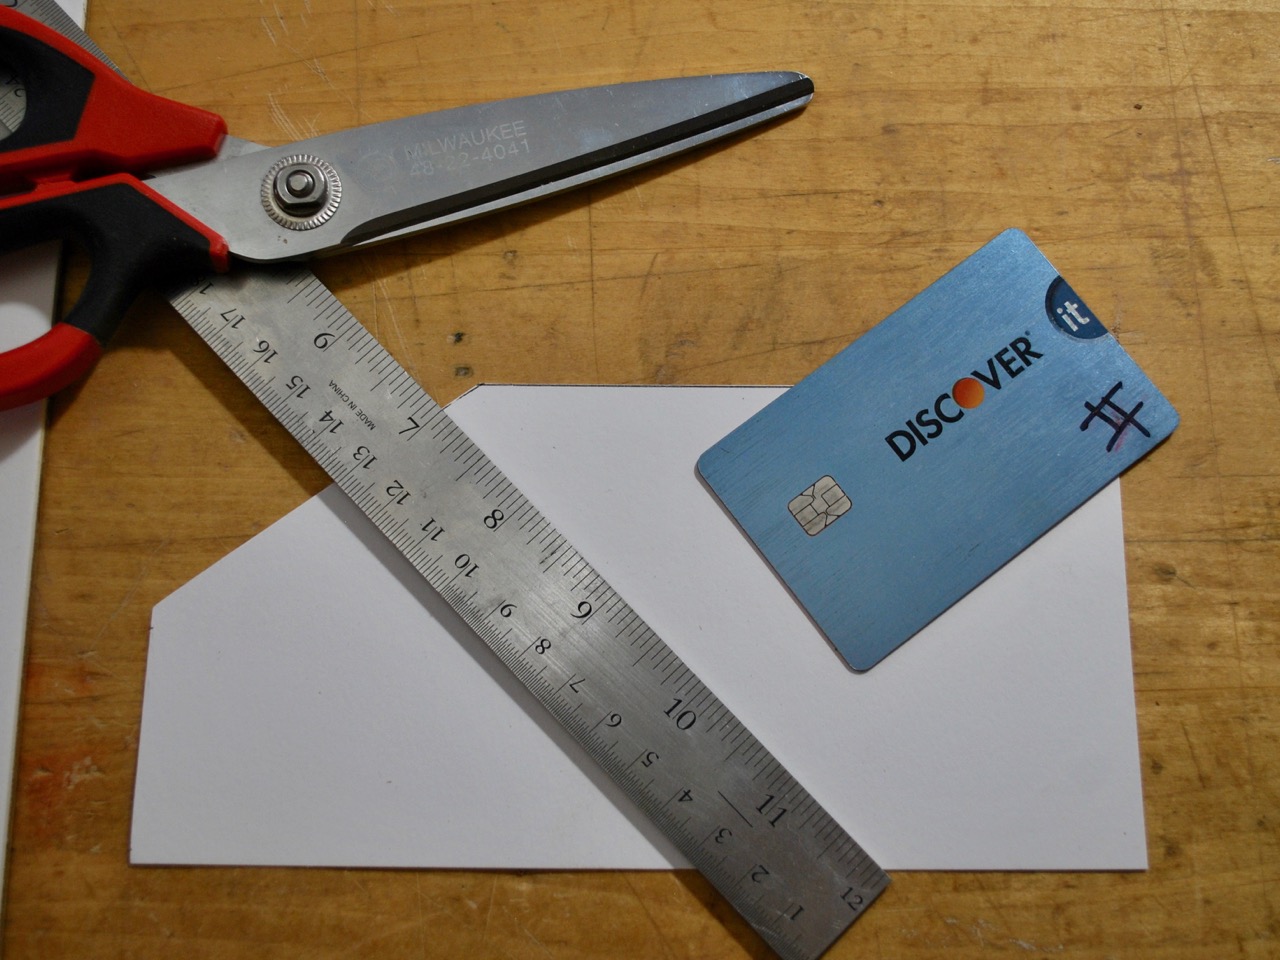
Test Fitting and Trimming the Draft Pattern
I ended up tightening the width and lengthening the entirety just a bit from my original estimates for a better fit. The difficult part is over.
The Draft is Transferred to Stiff Bristol Board for Multiple Uses
After the pattern is transferred to the card stock, it can be used many times without fuss. It is a good idea to label your patterns before storage as they begin to look alike when you amass a large folder of them (was this a pocket, part of a shoe, some sort of handle cover?).
Getting Down to Business –
The next step is to cut out the pattern on appropriate leather. I’m using Hermann Oak 1.5 mm tooling side that was leftover from an earlier project. Neatness in cutting is very important as it will affect the look of the entire piece if the cuts are even a millimeter or two off or wavering in any way. Since most people seem to prefer dark leathers for this sort of thing I chose to dye it Medium Brown with Fiebings Leather Dye.
Wet with Dye
After the dye sets you’re free to move on. I started by marking and awling the stitching holes at about a 5 mm increment. I will admit, this was not my straightest set of stitching lines ever.
Punching the Holes
I almost always use a double needle saddle stitch when sewing leather as it is the best and strongest choice in most cases. I chose a contrasting thread to give it a fine finished look.
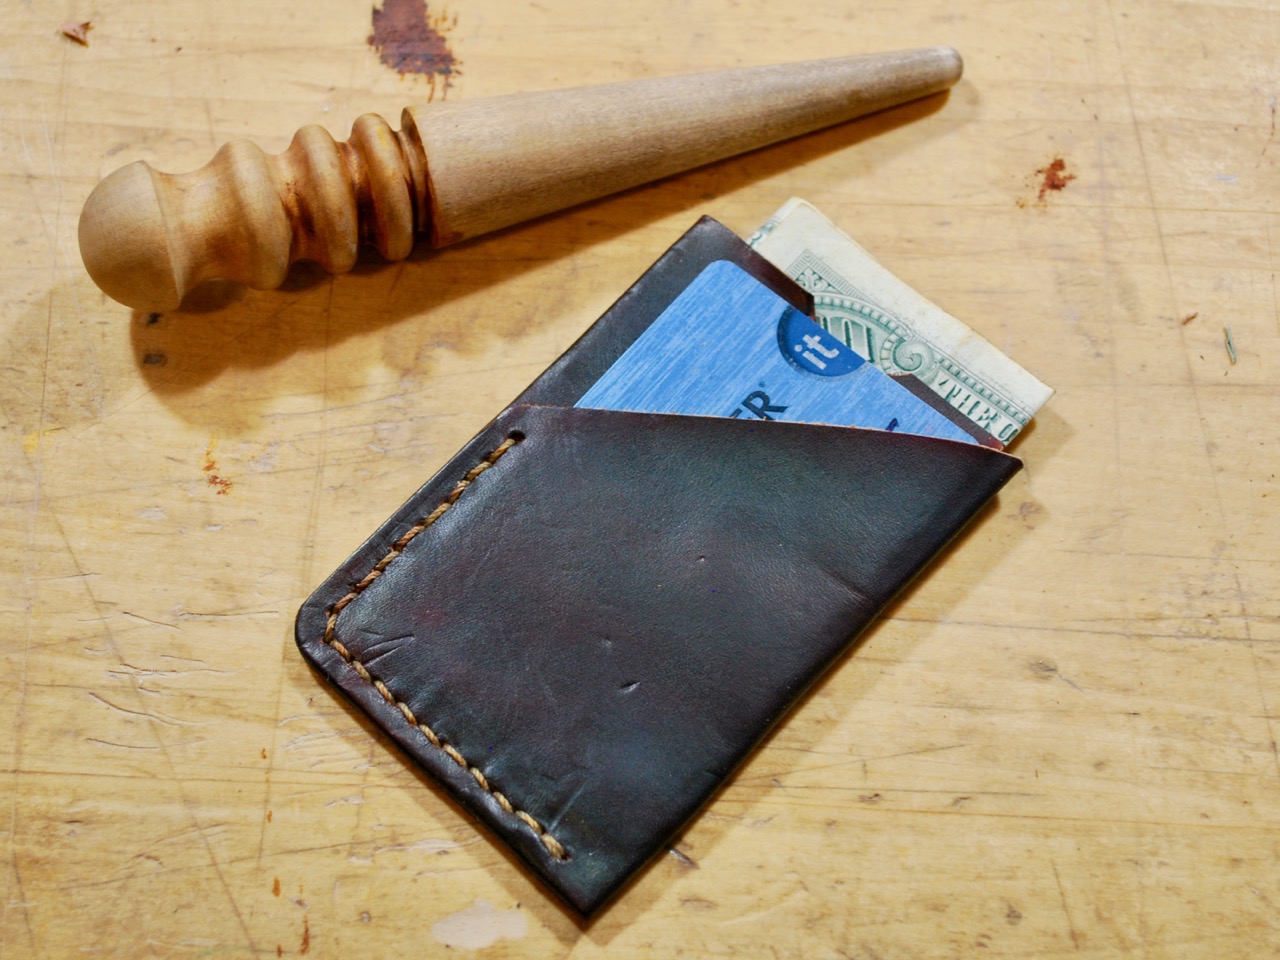
Finishing Up
And finally, the edges were dyed again and burnished to create a smooth, finished look. Overall, I’m quite satisfied with the outcome. This one will be the prototype to work from and I’ll be able to take a little more care now that I have learned from this one. If I ever get around to making enough to sell, I’ll put them on my Etsy Store.
To view this project on Instructables, click the link here: Minimalist Wallet
I have a slightly more complex project laid out for later. If I take the time to document it, I’ll post it up here.
I am very happy with returning to Dutch oven bread. It’s easy and fairly controllable to cook in and holds the moisture well. The only down side is that, with it sealed, it is difficult to sneak a peek inside.
Hot out of the oven.
This is inside a 12 inch Dutch oven. I have no idea how old it is but it was old when I got it 30 years ago. It is a lifetime investment but a bit heavy to transport. Another tool that makes me happy.
Broke into for a late lunch. Perfect with a hot bowl of soup.
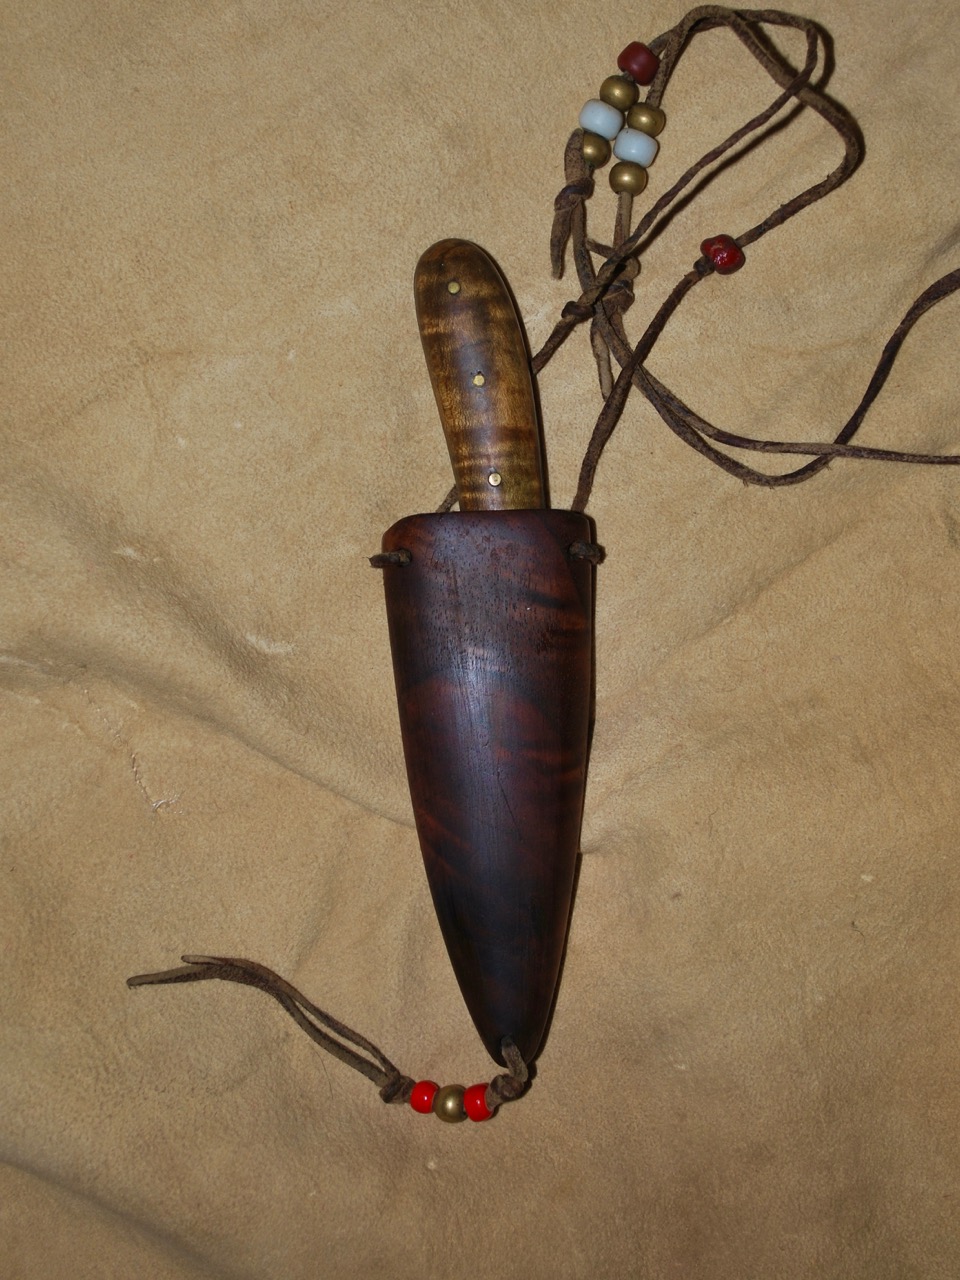
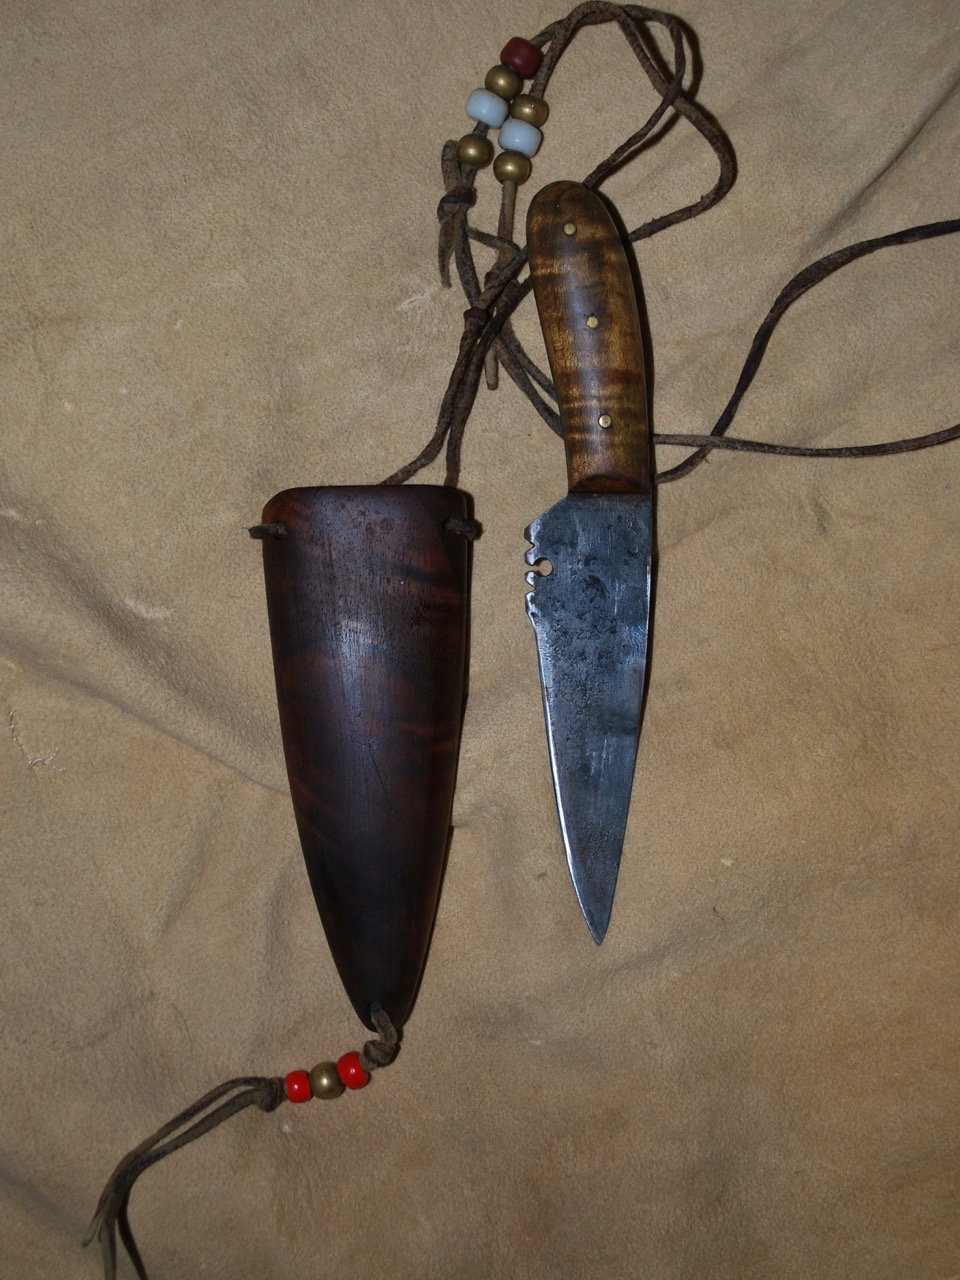
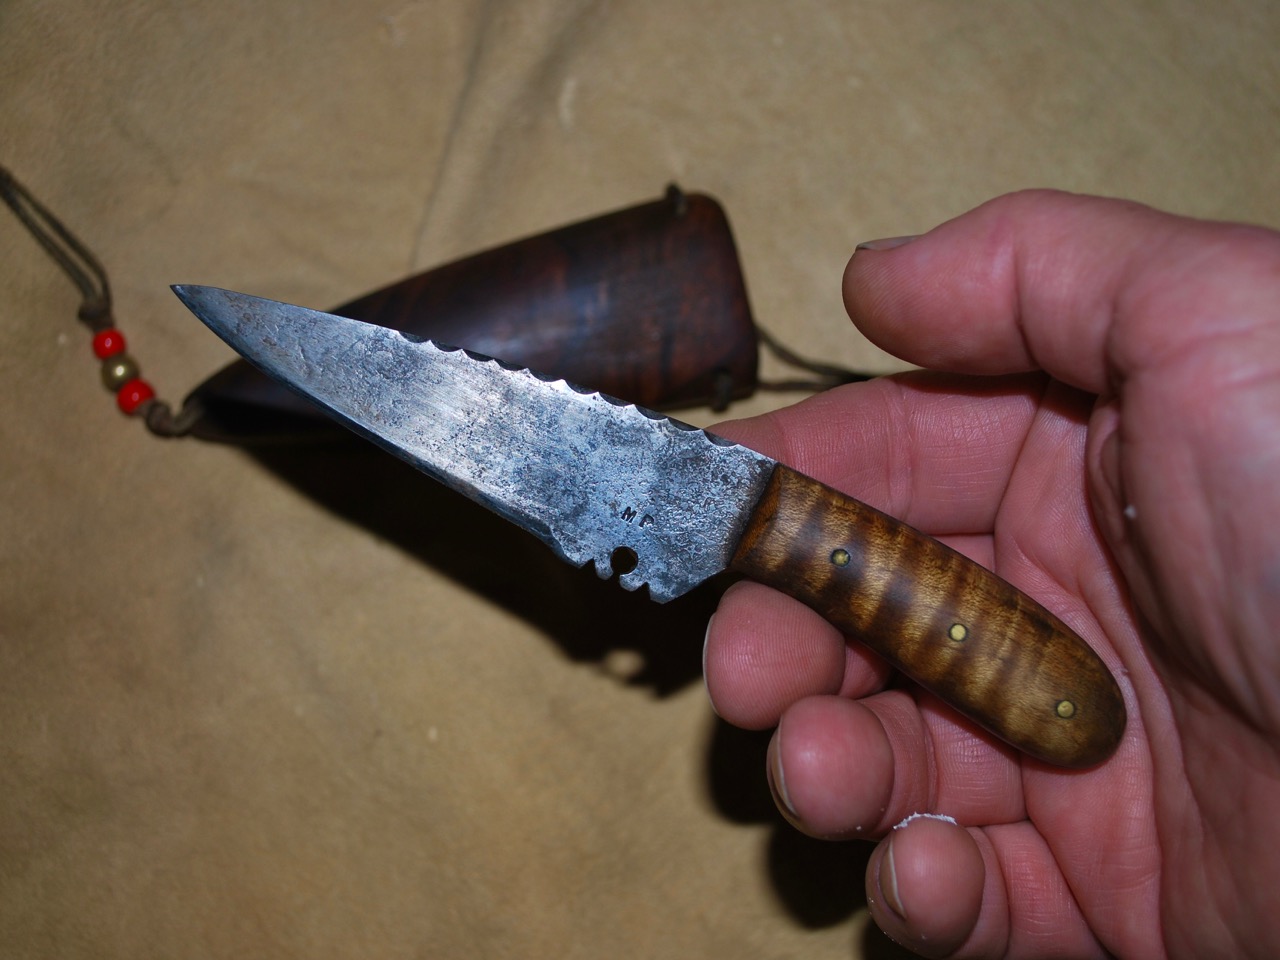
In the spirit of the internet Bushcraft trend of pulling out our tools and comparing I decided to join in the fun. This is the patch / neck knife I purchased back around 1986 when I first started getting primitive.
A poor photo of the walnut sheath.I went with wood as I was wearing this almost constantly whle working a backwoods program for the Scouts. I decided it might just impale me through the sternum or neck if I took a bad fall so the wooden block sheath was the solution.Human hand for scale.
This one was made by a bladesmith from an antique crosscut saw and has a beautiful tiger-striped maple handle. This is probably its third sheath but it’s the one I’ve stuck with since around 2001. It’s been camping and on thousands of miles of field projects, not always around my neck but almost always close-by in my pack. For some reason, our society thinks you’re a little weird if you wear a knife around your neck all the time.