Here are a couple of photos of the one I still think of as the “new horse.” It is made up of mostly recycled and scrap wood that I was hoarding for just such a project. More than ten years later, I am still quite happy with the size and design of this one. It isn’t perfect for everything, but what is? It has produced bows and darts, spears and walking sticks, and held dozens of other projects along the way. It is a sturdy saw bench and a nice place to sit and have a beer at the end of the day.
The bench itself is made of pine and fir dimensional lumber. The working portions are red oak, white oak, hickory, and popular. The large bolts are salvaged from an old Ford truck spare tire holder.
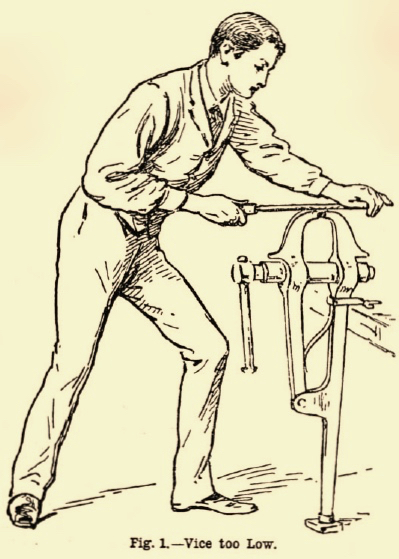
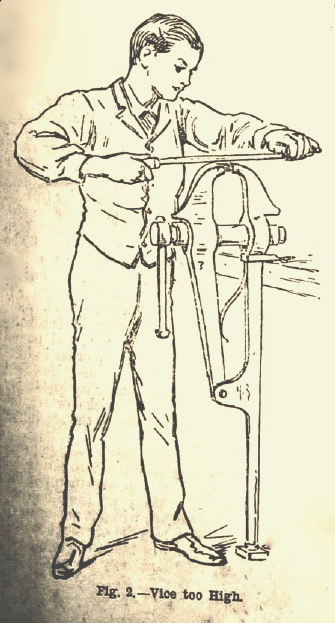
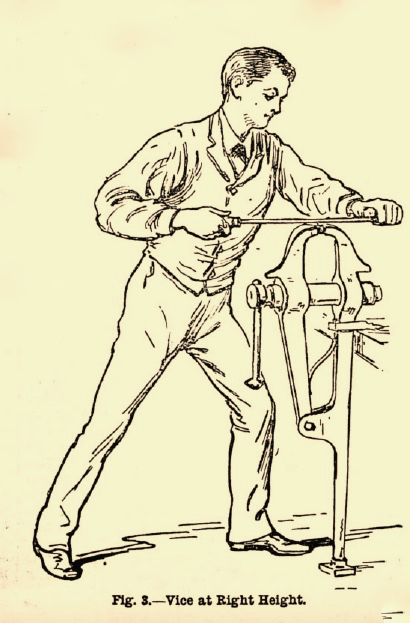
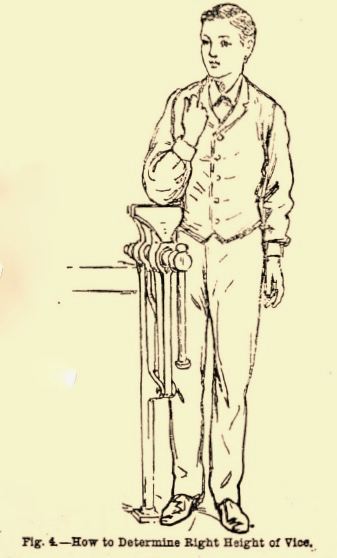
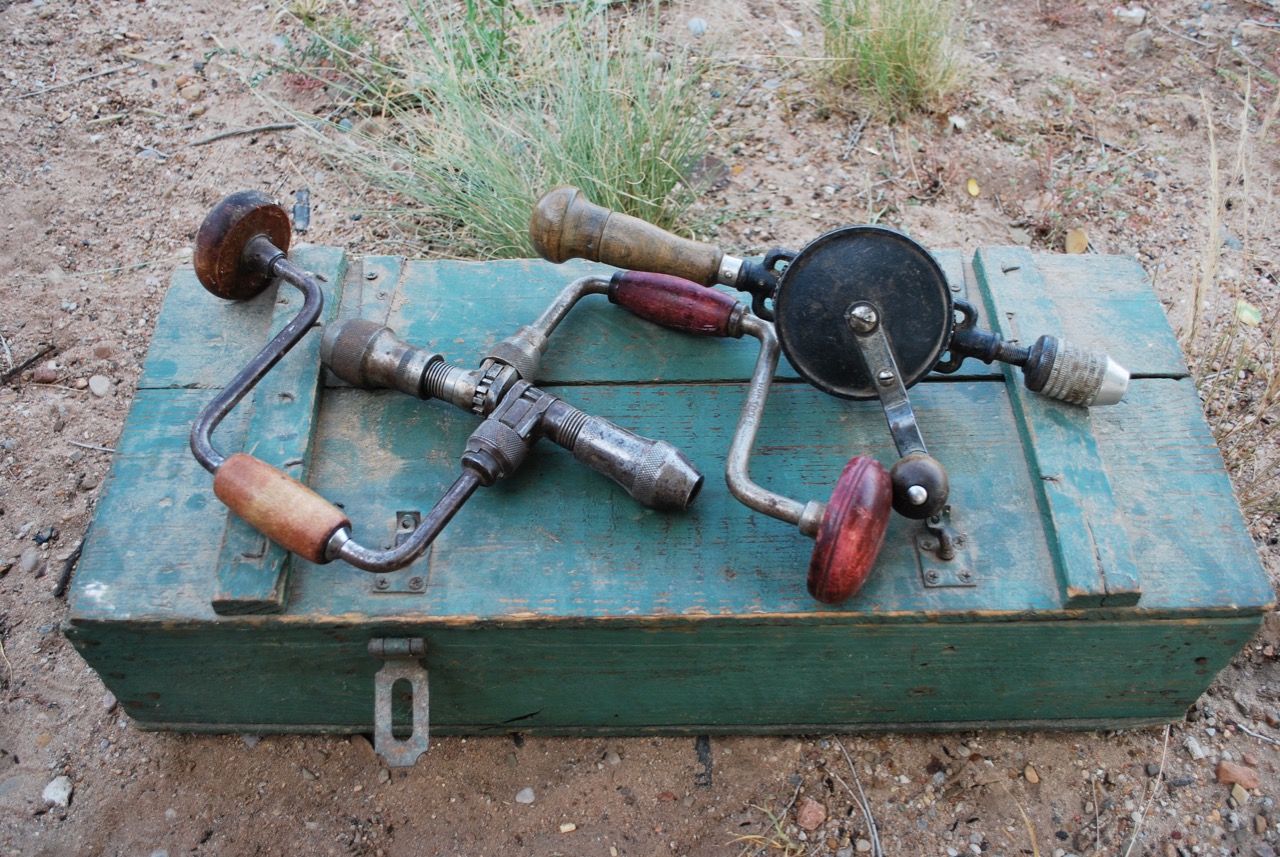
When setting up shop it is important to set your tools and surfaces to the optimal working height. Here is some advice for setting up your mechanic’s vise for best use.
I began version one of my Vardo Caravan eleven years ago this month. As I published updates and details along the way people have for a detailed “how to” for building a vardo. Since everyone’s needs, skills, and resources are different, I will leave the task to others. My suggestions are this. Decide on your basic design wants. Traditional or modern construction? Consider size and weight (I went for the minimum of both). Consider materials. This will determine construction technique. As for traditional or modern? Go look at some used RVs for sale and see how flimsy they are built; not to mention probable issues from toxins in the plywood, pressboard, adhesives, plastic veneers, etc.
Drink in as many details as possible about other wagons. Are they for show or can they take the hammering of bad roads? How do you think they will hold together in a wreck? What kind of long-term maintenance are you prepared to perform? This is why modern RVs are covered in sheet metal or plastic. If you convince yourself that you want to use materials others don’t, then ask yourself why. Are you building an RV that looks “old fashioned” or are you deciding to build with traditional techniques? (Neither is bad, but it may not be practical to mix and match).
Final sketch that built the Vardo.
Above is the written plan I used to create the Vardo. This is obviously not exactly how it turned out as changes were made based upon availability of materials and constant reconsidering of different options. The essentials didn’t change. This is how the arc of the roof was calculated and overall dimensions worked out. I chose to use traditional techniques and plywood only in the ceiling (for ease of building and stiffening the structure). Although glue is used in some areas, the structure depends upon screws and bolts in all critical areas. I decided I was willing to maintain my wagon so the exterior finish is simple oil paint over wood.
Sketch, sheet 2.
The second sheet of the plan was mostly used as a way to gauge sizes, raw materials, and habitable space. I didn’t really build from the sheet.
Figuring it all out.
This is just one of many sketches used to figure out space and arrangements. I looked at Irish Open Lots, Vardos, Bow Tops, and Sheepherder wagons. With so much experience out there, the best arrangements have been worked out many times over. Here’s the link to the rest of the photos from the build: https://paleotool.wordpress.com/plans-projects-and-patterns/the-vardo/
Study and read as much as you can about what you want to build. Make many sketches and plans. Cut out little scale paper dolls to measure out spaces if it helps.
I am stunned to hear from several recent misguided enthusiasts to the gentle art of wilderness skills that their new hobby costs them so much money… I guess even our low-tech approach to life can be marketed and sold to the right customer with our ingrained need for newer, quicker, and “approved” gear. Let’s hope this ailment isn’t catching.
Making something for one’s self is, in itself, an act of rebellion in these troubled times so I thought I would share what I’ve been up to in the idle hours these past few days.
After someone sweet-talked me out of my last (and personal) bucksaw I was in need of a replacement. I lucked upon some beautiful walnut last year and set some aside to make a few saws. Straight-grained, strong, and beautiful, this 5/4 sawn chunk was ripe for carving into something nice. I spent far too much time in finish and detail on this one but a beautiful tool is much nicer to use than an ugly one and curves appeal more than straight lines to this gentleman.
There isn’t much need for a lengthy instructable for this design but notice that the straight grain was respected in all dimensions and runs the length of each arm. As for hardware, it was my intention to inset square nuts into the handles and connect the blade with round-head machine screws. However, looking through my hardware on hand, that would have required a trip to a store, so for now, we use carriage bolts and wing nuts.
The devil is truly in the details and it is a joy to carve such fine wood with sharp tools. The entirety is polished with Lundmark carnauba wax as it brings out the color and grain while providing excellent protection against water.
I never touched a tool in high school. When I was there, kids were openly placed in two “tracks;” either Academic or General education. I know I wasn’t the sharpest student and I generally disliked almost everything about being in school but I was placed among the Academics. In lieu of shop classes (woodworking, metal shop, electricity, etc.) I learned a lot from a former engineer-cum-teacher who taught Drafting and Engineering Drawing. This was the closest thing to shop class a kid on the Academic track could do. Why? I have no idea. We learned about house design, making scale plans, estimating materials, and other useful things.
Engineer drawing.
Fortunately, my grandfather was a handy guy who grew up on a farm and spent his early years in the building trade so I learned the basics of using a square, compass, saws, planes, and the like from him. Also, being left as a somewhat feral child, I was able to use and abuse the family tools and learned many valuable lessons the slow and often frustrating way. When I was sixteen, I began working part-time for a construction company as a laborer with the thought I might make that my profession. I learned a lot, both good and bad, by observation and exposure, and continued to work as a carpenter in various capacities through graduate school a decade later.
Elementary school Sloyd.
Where am I going with this ramble?
It was a long and meandering road for me with many side excursions and dead-ends, and although I feel grateful for all the lessons and training I received along the way, I sometimes lament the loss of craftsmanship and the values of creativity in schools. In short, education isn’t an either/or proposition; that you are either on track for academic pursuits or you will be in the labor force. I have met many geniuses with little formal education and many fine academics who excel in the manual arts.
Teach your children well. Real life skills are too important to be left to others.
This is the prototype saw I used for teaching a bushcraft class at Echoes in Time in 2014. Unfortunately, a split in the original wood spread last winter and I had to rebuild it. Actually though, that is a beautiful thing when you can make your own tools. I didn’t spend any abstract money for a new one, I didn’t have to trow away some sort of useless and polluting garbage, and I could readily improve the design based on several year’s use and observation. I’ve sold about 20 of these now so the pattern is firmly ingrained in my brain and sinews while tweaking each batch to make them more pleasing to use and efficient to make. without losing the aesthetic of this ancient design.
Saw ready for assembly.
It has been a very successful class for me at both Winter Count and Rabbitstick over the years and I’ve honed the teaching so that each student can really get them most out of it. Not only is there basic shaping and carving, but also learning to make a simple blind mortise and tenon joint, drill holes by hand-power, and think about design options. I hope to be teaching this one-day class again soon as it is a great introduction to hand woodworking while building a manageable and extremely useful tool.
I’ve been working on a new hand reel to keep in my pack with my travel fishing kit. I didn’t have much of a plan when I started so I drilled out a couple of one-inch holes a little further apart than the width of my hand and started from there. The wood came from the scrap pile and is a very solid chunk of walnut. I’m a little concerned about the possibility of cracking but this piece is old, well-aged, and extremely solid so I suspect it will be okay in the end. It will be heavily waxed to waterproof the wood and I’m working on making and trying a few silk leaders. Anyone with experience with hand-made fishing gear have any thoughts on this?
The hand reel and the primary tools used.
These little projects are a nice way to spend the evening in a productive way. After looking at so many artifacts over my career it becomes apparent that our ancestors often created works of art and beauty that truly come from within maker and their influences throughout their lives.
When you make for yourself, your tools and possessions become a reflection of who you are, not where you shop.
I collect old plans for projects I never seem to get around to making. With winter here, maybe someone would want to build this fine sled. This comes from an old Delta Tool company publication and the procedure is about as simple as can be.
I lived on the flat Plains for quite some time and I’m rediscovering the joys of hill country.
From the book Toys, A Deltacraft Publication, DELTA MFG. DIVISION
There’s not much to it really. An couple large project scraps and two long boards for the runners will just about do it.
The recipe is simple:
The frame is 1/4″ birch and the top boards are 3/8″ birch. Fasten together with countersunk, flat-head wood screws.
The runners are made from ash. Make a simple form with an 8″ radius from scrap wood. Soak the ends Of the runners in hot or boiling water for about an hour, then clamp onto the form and allow to dry for 24 hours. Ash takes to bending very well in my experience.
Finish body of sled with varnish or paint. Apply several coats of shellac to the runners and wax.
Maybe one less plastic tub sled will end up in the landfill.
Here’s the link to the website where I found the plans. There are some fun and simple projects to you busy in the coming fall. I recommend the “retro” section for some good stuff.
Dowel Cutter – A useful tool for large-scale production
A version of this post appeared here in 2012 but here is an update as prelude to a coming post.
I’ve been using a Veritas dowel and tenon cutter to rough out arrow shafts from planks. Quite a while ago I posted about the jig I built for cutting the shafts and thought it might need some follow-up. Although I didn’t have much in the way of appropriate wood available for arrows on the day the cutter arrived, I did have one well-aged straight-grained poplar board that had been set aside to age for arrows to experiment with. The cutter, once set up, takes a piece of square stock of 7/16″ – 1/2″ and cuts it down to a 3/8″ dowel.
Looking through the feed end of the dowel cutter.
When the shaft comes out of the cutter it tends to start wobbling and the effect increases quickly. The solution is to create some sort of guide for the shaft so I came up with wooden blocks, as seen below with slightly oversized holes drilled inline with the cutter. There is a second identical block set back a few inches further to increase stability. After the first few experiments I could really tell that the stabilized shafts were much smoother than the unstabilized ones.
Shavings as they exit the cutter.
The wood can be turned by hand or a wrench or, as in this case, it can be driven by a drill motor chucked with a square socket (not pictured). The drill motor is not only faster but seems to cut smoother due to the high rate of rotation.
Before and after a light sanding. Sharpening the blade reduced this spiral of fuzziness.
The above photo is blurry but the right shaft demonstrates the rough “fuzzy” state as they come out of the the jig and the left is after a few minutes with some 100 and 220 grit sandpaper. They are subsequently burnished and await nock reinforcements as the next step. After putting a better edge on the blade, the shafts come out a littler smoother but it really seem to vary with the type of wood being used.
Image from the English War Bow Society. Click the image to link to their site and find out more about English warbows.
I was able to turn out eight experimental shafts in a short time. Two were rejected immediately as they has little kinks in the grain and two were rejected during sanding due to blemishes in the wood. They’ll probably be okay for light weight kid’s bows but are not acceptable for heavy, fast bows. The spine feels a little light to me but I’ll hold out to see what comes of them. The goal is to create some fairly standard issue British war bow arrows and see how they perform. Since I use wooden dowels to peg together many other projects, very few shafts have gone to waste since this purchase.
Note: many great arrows have been cut with the Veritas cutter since the original post in 2012 and I will do my best to continue documenting the work.