I only know Kelly vaguely but I know she is an extremely talented artisan. I am continually impressed by her skill level and ability to make it all seem so effortless. I believe that is an indication of true mastery. Here is a short documentary of her work to inspire the inner-Maker in you.
Watch artist and primitive potter Kelly Magleby learn about and make Anasazi style pottery. Kelly went into the backcountry of Southern Utah with a knife and a buckskin to try to learn about Anasazi Pottery by doing it the way the Anasazi did it. “Earth and Fire” is a documentary poem about a passionate artist. Funded by Primitive Found (.org) Music by Jason Shaw @ audionautix.com Check out Kelly’s art at anasazipottery.net This the 1st video of 2016 for The Talking Fly short documentary project by filmmaker Steve Olpin, Enjoy!
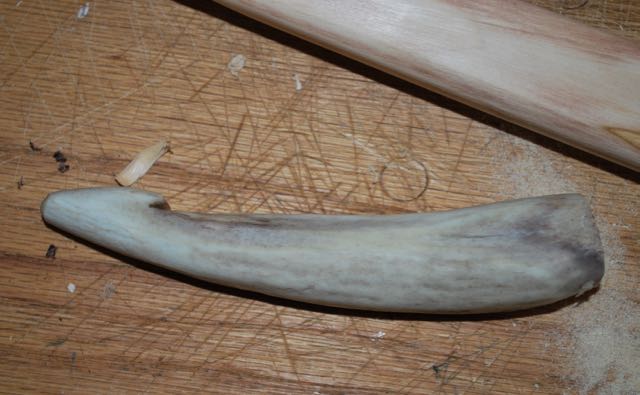
Despite my lack of free time currently, I have been re-inspired to get back to antler and bone as a medium for tool production. My only issue with them is that they are enormously time intensive. Even using a modern saw and occasionally a steel rasp these take a lot of energy to make. However, the end product is amazing and I would really think they are often underestimated in the archaeological and primitive technology communities. The rarity of these materials leaves most of us with such a lack of familiarity with them that they take a back seat to lithic weapons in study. A little experiential archaeology goes a long way to clarify the devastating effectiveness these points have.
Antler point and “scraper”-like tool used to produce it.
Archaeological terms that include function in the name are loaded from the beginning. The term scraper is bandied about with little regard for the tool’s actual function. I believe, and experiments bear this out, that the type of unifacial knife-scraper-planer combo, shown above, was the essential backbone of a hunter’s tool kit for much of our prehistoric past.
More antler points.
I don’t have ready access to the beautiful reindeer or caribou antler so treasured by our Upper Paleolithic ancestors but large mule deer, white tailed deer, and elk can suffice in a pinch. Just as in Europe 15,000 years ago, these would be effective weapons against land or marine mammals of all sized. My fairly limited use of antler points in “real life” indicates that antler is much tougher than stone and is easily resharpened if it is dulled or damaged.
Tanged arrow point of antler.
The pithy cancelous (spongy) tissue inside some antler makes them less than perfect for large points. The denser tissue on the outside can be cut off and works well for flat projects, like buttons or, in the above case, an arrow point.
Sewing kit.
I find that one of the tougher tasks for the primitive craftsman is the making of eyed needles. We know these have been produced for many millennia so we can imply some fine sewing. I find the eye particularly difficult to make but, for what it’s worth, here is what I have learned.
After getting the needle close to it’s desired finished size, flatten the area that is to become the eye on each side. This flat area keeps the flake from rolling off the work piece while piercing the bone. Instead of circular drilling, I find it a little more efficient to just scrape a tiny oblong hole by moving the flake tool back and forth. Be patient, this takes a long time. Holding it up to the light will tell how deep you’ve gone. When you are nearly through, flip the needle over and finish the hole from the other side. Once you are through you can slowly widen the hole until it’s large enough to take your intended thread. Finally, you can narrow the cylinder around the eye to make it as small as possible after the eye is safely made. And note: you will break some; those become the short ones.
The indispensable awl.
An awl for heavy stitching can be made simply from the metapodial (lower leg) bone of most grazers. This is a tough and dense bone useful for making fish hooks, needles, knives, etc. The knobby end (metapodial condials) fit in the human hand very comfortably and make a great handle or grip. More tool experiments and replicas are being made around here in the long winter’s evenings and I hope to post them when I get some photos taken.
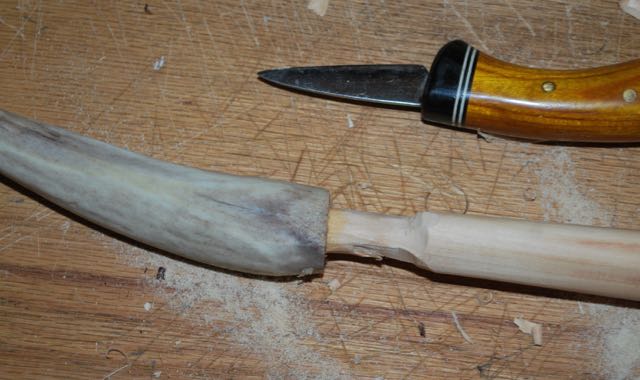
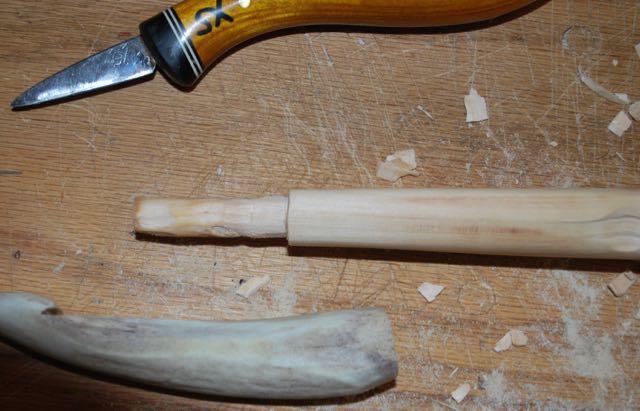
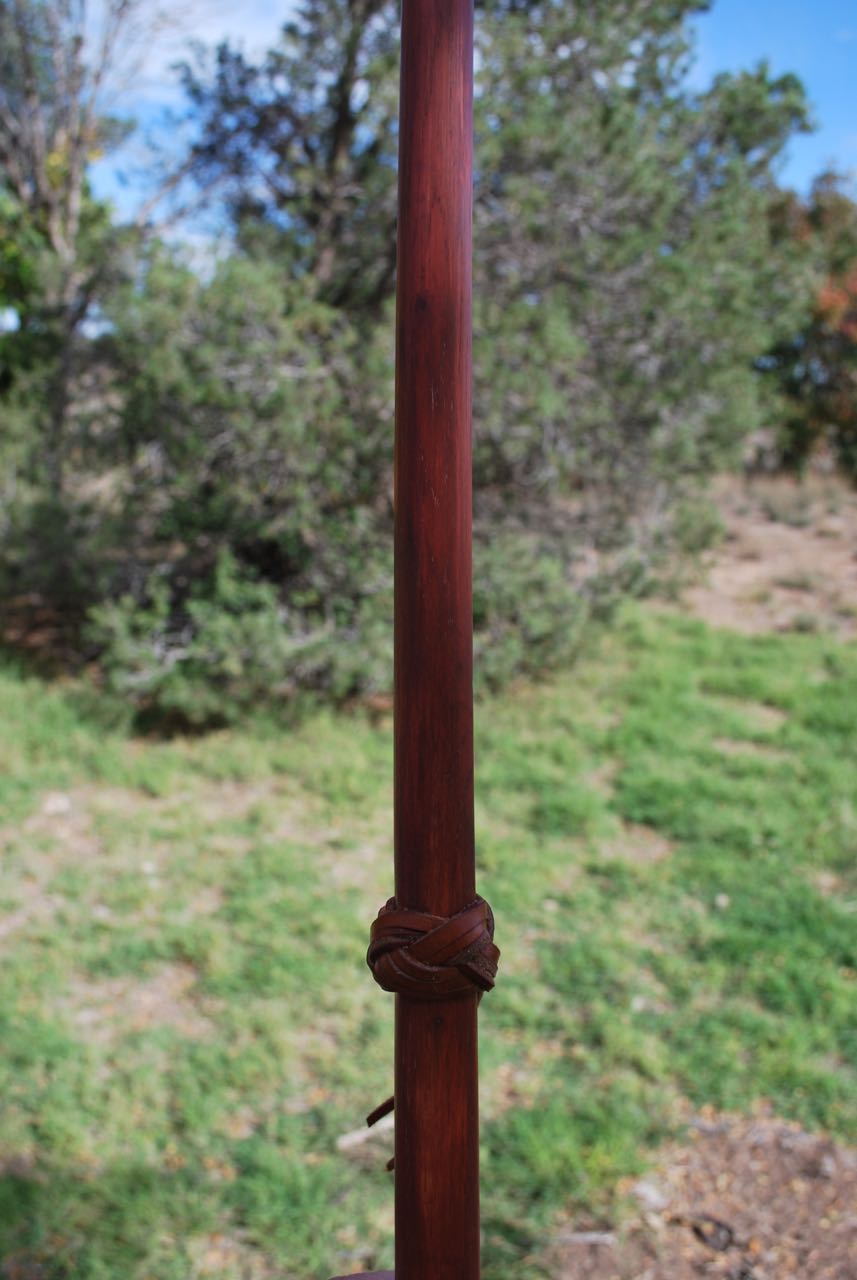
I recently finished another Paleolithic inspired spear thrower (a.k.a. atlatl). This came about due to some throwing over the past year that re-energized my feelings about this technology and it’s sporting aspects. As usual for this type of project, I made several at once since the tools were at hand. Here’s a quick rundown on the process of connecting an antler hook to a wooden handle.
I cut the antler and rough out a notch for the hook. A few hours soaking in water will soften the cancellous core for easy working.Drilling can easily be done on the softened antler with a narrow knife, stone flake, or tapered drill bit.Once the hole is drilled (I take it down to about 3/8 inch or a little thicker) the handle can be roughly whittled, testing periodically for fit.Argh! A moment of distraction means the snap of a stone bit!A process of trial and error will eventually make a tight joint.Nearly there.Cleaning of the shoulders of the joint makes for a much neater look and solid connection.If the fit is tight, the drying cancellous tissue in the horn sticks surprisingly well. However, I want this to be maintenance-free for the owner so a drop of wood glue will insure decades of strength. Now the slow and tedious shaping can commence.Antler hook after shaping.Here is the hickory handle after being painted with red ochre.And, for mine, I added a turk’s head knot in vegetable-tanned leather to keep hand placement consistent.
My favorite style is the Western European Upper Paleolithic “hammer-handle” style thrower. It works well with heavier darts and is a solid companion.
An advertising card from when people appreciated hand made archery equipment. No training wheel, gizmos, releases, or sights. There is no date on the image but I suspect that late 18th century or early 19th century would not be too far off. Apparently javelin throwing was in vogue at the time as well. Now we have television, video games, and the internet. I feel fortunate to live at a time when primitive technology is making a resurgence. We felt very alone 20 years ago doing these things but an upside to the world-wide-web is connecting people with so much to teach each other.
Click the image to access the British Museum page for this item.
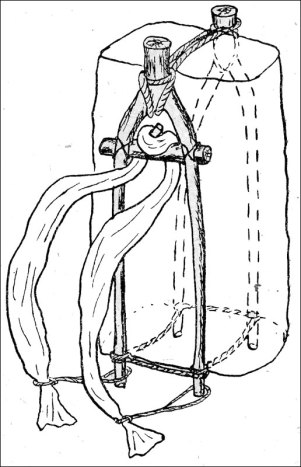
Thanks to Survival Sherpa for posting this look at making a pack frame. Making a quick, three stick pack frame is a valuable bit of knowledge. How serendipitous that this came up (seems to be a lot of convergent thinking around my world lately) as I am beginning to tweak my own wooden pack frame for some experimental travel. And while we’re on the subject here’s a link to a broad look at pack frames from around the world on Markus Kittner’s fine web page.
Have a look at Survival Sherpa by clicking the link below.
There are still Huaraches north of old Mexico. As I prepare to resole my huaraches I thought it might be good to look back on them as a very viable hand-made shoe.
For a long time while searching for huarache construction techniques, I could only find the simplest tire sandals and many links to “barefoot” style running sandals. However, a few years ago, I found Markus Kittner’s Huarache Blog and scoured it for inspiration and design secrets from real huaracheros in old Mexico. He has done excellent work in documenting the process.
My first beautiful huaraches drying after being soaked to shape to my foot. They were subsequently oiled and slicked down. I owe much to the Huarache blog for so many great images and descriptions of traditional huaraches.
As a craftsman of sorts, I understand that making a “one-off” of something does not imply expertise. Only replication builds a real understanding and mastery of the object being produced. However, this is not my first leather working or shoemaking project but a major improvement on a theme. This style shoe is made on a last. The shoe lasts I purchased on Ebay have finally been used to actually make a shoe. I documented the process as it came together as best I could; my mistakes and changes included in the process. This is not really a “how to” recipe for making a huarache but shows the process I used.
The lasts I found on Ebay. The sole cut out, punched for strapping and nailed to the last.
The last shown here fits me well but are an Oxford dress shoe style, meaning they run a little long in the toe. As I am making an open-toe design, I let the last hang over slightly in the front, squaring the sole to the shape of my actual foot. New lasts are pricey (ca. 50 euros/$70 US), but I think it will pay in the long run to invest in a better design for myself and those people I might make shoes for.
Wetting out the first strap.
I didn’t show the strap cutting process as there is little to be learned about that. It is a skill in itself, even if you have a strap cutter. My Osbourne strap cutter can be seen in the upper right of this photo
Since this project was experimental, I used scrap leather, meaning I could only get about three foot (one meter) straps. In future, I’ll probably use 6 foot or longer pieces (2+ meters).
Nailing the strap to the last.
I pre-punched holes in the mid-sole and away we go. A little tallow on the straps helps cut the friction of the leather but ended up being not worth the trouble. They were kept damp throughout the process.
Placing the twining thong.
This is a signature of the style I chose. The vamp or tongue-like piece was later removed as I didn’t like the way it looked. I’ll experiment more with that later.
Lacing and twining.
Unlike normal, I completely finished the first shoe and removed it from the last to check size and shape to determine any major changes that would need to be made.
A heel piece was added and laced up the back. I think this step shows the evolution of the strap sandal to the modern huarache.
The straps running under the mid-sole look like a problem here but are ultimately skived down, dampened, and hammered flat.
Straps ends as added in. Longer straps would lessen the ends here.
I used simple wire nails (as is traditional) to attach the soles but sewing would work too.
Ends to be trimmed and skived, and a finished sole.
Pulled from the last, they actually matched. I don’t know why I was surprised but that made me really happy.
Preparing to nail the sole.
The method I chose to attach the rubber is fast and efficient, and I suspect rather tough. The nails are pressed through the leather and rubber into a thick leather scrap below. Otherwise, you would need to pry it up from the work board. One surprise I learned over time was that the nails actually wore off on the underside before the rubber.
Nailing the sole.Bending the nails in preparation for clinching.
The nails are bent over (inward) to prepare to “clinch” them. There are no photos of this part of the process but this was done by setting the shoe back upright on a small anvil and hammering the nails down tight with a punch. The pre-bending causes the nail to curl inward and back up into the sole. Voila! The Huaraches below have about five miles of hiking on them now and they’re beginning to have some character.
Huaraches you say? Do tough guys wear such things? In an era of cheap, slave-made garments, its easy to forget how self-reliant our ancestors were for such things as raiment. I include this photo of Capitan Alcantar I found on the Huarache Blog as a great historical image of a man of action wearing his huaraches and ready for war.
Click the image for more historic photos like this.
I hope this prompts someone out there in the world to take on the project of making their own shoes, whether for survival, uniqueness, or just as a challenge. Making for yourself is a small act of revolution against a bad system.
A fun and relatively tame primitive technology event for a good price located in southwest Missouri put on by good friends of mine. Here’s some information from their website:
This unique event has two parts – a free knap-in/native arts-crafts show starting Thursday, with top-notch knappers, artists, and crafters from a 20-state area making and selling their work. In the Workshop Area starting Friday, a pool of some of the area’s finest instructors offer workshops on various wilderness skills and crafts. You can learn the survival skills of our ancestors, and in many classes, take home a completed project.
Overnight camping and vendor-knapper setup – $5/night, a limited number of electric sites available on a first-come basis – $15/night. If you arrive before Wednesday, leave camping fee in the deposit box, Wednesday and after, please pay at the Registration Booth. Food Concession provided by the Dade County Historical Society.
Admission to the Workshop Area – $60/day or $150/3 days:
Get your hands on it, and learn with some of the finest primitive skills instructors in the midwest!
Below is a partial list of workshops available – the list may change to to instructor availability, check registration for an updated schedule.
Friction Fire
Flintknapping
Flute-making
Basketry and Pottery
Deadfall Traps
Pine Pitch and Hide Glue
Pump Drills
Bow and Arrow Construction
Atlatl Construction
Bone Tools
Tracking and Trailing
Primitive First Aid
Bowls & Containers
Knife Sharpening
Primitive Cooking
Braintan Buckskin Hide Tanning
Buckskin and/or Cattail Moccasins
Cordage & Netting
Shelter
Rivercane Blowguns
Edible, Medical Useful Plant Identification
Edible Insects and much more!
HEAD OVER TO THEIR WEBSITE FOR MORE INFORMATION, MAPS, ETC.
Pack frames are nearly universal historically as most cultures encounter the drudgery of carrying heavy loads over long distances. I am always searching for historic images to delve into to look for inspiration. Here is a nifty pack frame from the early 20th century of a charcoal maker from Japan. The frame looks like simple through-tenons in a rectangle. The pack basket appears to be fairly simple twined straw and I think the shoulder straps are woven fiber. He is also sporting some nifty looking waraji sandals.
This is what I could find out about the image:
RUSTIC OLD JAPAN — The Charcoal Carrier
From a Sample Set of Classic Meiji and Taisho-era Japan Stereoview images by Japanese Photographer T. ENAMI (1859-1929).
Photo by T. Enami, ca.1898-1905. View number S-392 from Enami’s 3-D Catalog.
For the past twenty or more years the technology of the spear-thrower has become more and more well-known as a sport. Popularly called an atlatl in the Americas as that was the name the Nahuatl-speaking Aztecs gave it. This is a world-wide technology and arguably one of the greatest technological leaps for early modern humans. I feel fortunate to have lived through this increasing popularity and to see the growth of the sport.
Have a look at some remarkable throwers recreating an ancient training game reported to be from South America.
For a more European take on the subject, check out speerschleuders at this fine German website. Finally, possibly the oldest image of a spear thrower in action from Lascaux Cave.
The bird on a stick in the lower left is believed to be an animal effigy spear thrower widely known in the region from the later Pleistocene.
Finding “handedness” in archaeology… using the fletching of arrows as an example. As a professional archaeologist AND primitive technologist I am very skeptical when someone claims they can determine which hand of a maker is dominant on an ancient tool or weapon. One reason for the distrust is that the archaeologist may not have experienced creating the object in the same way the original maker did. I think the Leatherworking Reverend has a valid point in the following article (and not just because it affirms my own experiences).
At most find-sites that have arrows there will be a non-equal mix of S- and Z-wrap on the bindings. The dig report will assert that left-handed fletchers were responsible for those that aren’t the majority direction arrow binding, probably without mentioning whether it’s the Z- or S- that they are talking about. I can’t find where it was written down the first time, but it has been repeated until it became lore. Consider the Ötze website:
According to technical archaeologist Harm Paulsen, the two arrows could not have been fashioned by the same person. The fletching shows that one was wound by a left-hander and the other by a right-hander.
and the Mary Rose Trust:
Hopkins (1998) studied 408 shafts from chest 81A2582 (O9) and recorded that, in every case, the binding thread had been wound in a clockwise direction from the tip end of the shaftment (ie, the portion of the arrow…