I keep a couple tool rolls for specialty fixes but I really like this setup from over a century ago. I think I need to make and “essentials” kit like this for general travel to keep the tings I truly need in need place and handy. It might be a little heavy for the rambler on foot but could be invaluable on the cycle or in the truck.
From The Army and Navy Co-operative Society Store, London 1907.
I think I would need to make an image of each tool in its place as I have found in my other bespoke tool kit that the loops and pockets all start to look alike when there are too many empty ones at once. The only potential problem with tool rolls is that they can get thick and bulky in a hurry if you aren’t careful with what you put in them.
Duluth Trading Company’s tool roll available for about $50 US.
I find that tool rolls aren’t that valuable when working from the home shop as they take up a lot of surface but are a very handy way to travel and stay organized on the road. I use four tool rolls myself currently, one for holding large brace bits, one for wrenches (mainly for working on the scooter or truck), one for chisels, and one for carving tools.
With a little forethought, I think a traveler’s kit like this could be very useful.
I’ve been working on a new hand reel to keep in my pack with my travel fishing kit. I didn’t have much of a plan when I started so I drilled out a couple of one-inch holes a little further apart than the width of my hand and started from there. The wood came from the scrap pile and is a very solid chunk of walnut. I’m a little concerned about the possibility of cracking but this piece is old, well-aged, and extremely solid so I suspect it will be okay in the end. It will be heavily waxed to waterproof the wood and I’m working on making and trying a few silk leaders. Anyone with experience with hand-made fishing gear have any thoughts on this?
The hand reel and the primary tools used.
These little projects are a nice way to spend the evening in a productive way. After looking at so many artifacts over my career it becomes apparent that our ancestors often created works of art and beauty that truly come from within maker and their influences throughout their lives.
When you make for yourself, your tools and possessions become a reflection of who you are, not where you shop.
This is what happens as you travel, receive gifts, buy better stuff, always need a good knife, etc.
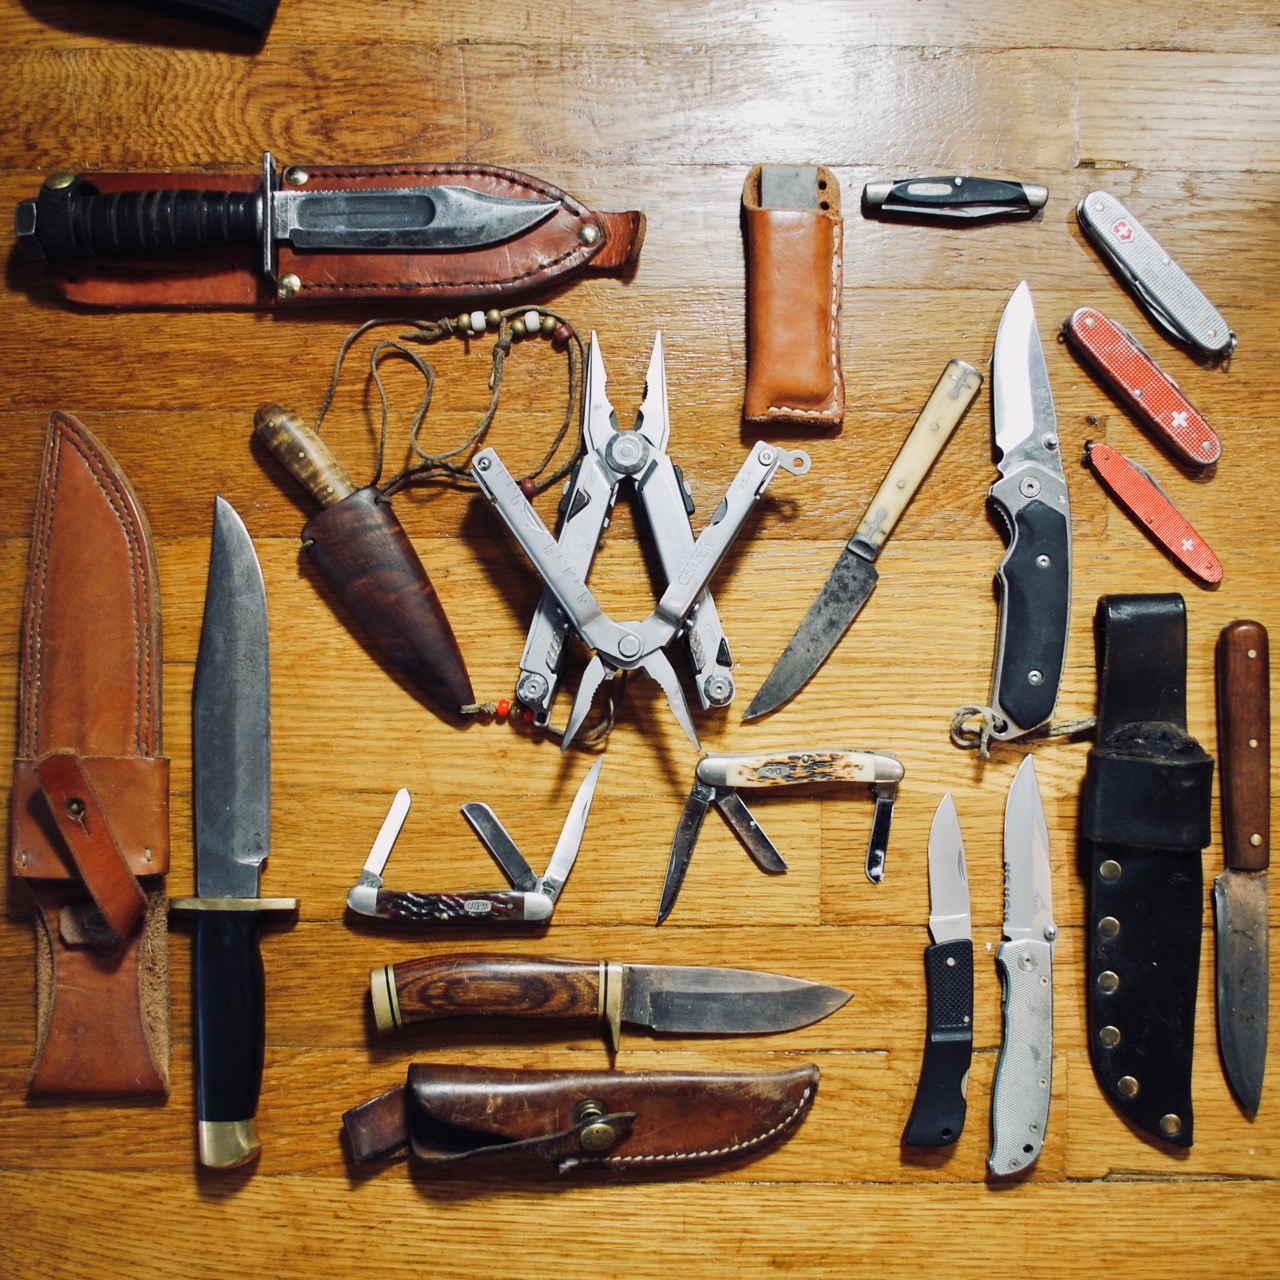
From the upper left: Camillus 5-1967 (a friend carried this through Vietnam), my small Arkansas stone for field touch-ups, Buck folder, two classic Victorinox Pioneer knives (I’ve carried this style every day since high school) and a small pen knife, a lock-blade Buck made in Idaho, a 19th century bone handle knife cut down from a larger eating knife, two Gerber multi-tools (the original is from 1990 and a more modern, but heavy version beneath), a hand-made patch knife by M.P. with walnut neck sheath I’ve had since 1986, a Solingen-made high carbon Bowie knife with ebony handle, two classic Case XX folders, two small folding Gerbers, a hand-made camp knife from a fine Colorado maker, and at the bottom my “go to” Buck field knife that has worked on archaeological projects, cut up animals, dog holes, and performed about every other imaginable task.
This photo came about as I decided to organize my camping gear. While emptying packs and bags I realized there were knives in every one, usually in more than one pocket. After throwing them out on the floor and arranging for a quick photo I began to think about the ones in various tool boxes, my wood carving knives, a couple collector knives I can’t seem to part with, and others stashed away around the house. My search for minimalism is failing when it comes to good tools.
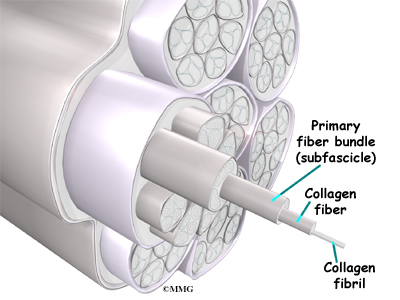
Sinew is the term used to describe tendon or ligament in more formal English. It is the cord that connects muscle to bone or bone to bone in skeletal animals. Like rope, it is made up of bundles of bundles of bundles as shown in this anatomical illustration.
For our purposes, sinew is a true gift to the primitive technologist, survivalist, or low-tech hunter as it provides us with so many possibilities. Sinew is the fiber stripped from animal tendons and used as a strong thread or it can be braided or plied together to make a stronger cord or rope. It can be used to make bow strings, tie objects together permanently, backing and strengthening a bow, or lashing spear or arrow points onto their shafts. It binds well with hide glue, having almost identical chemistry (collagen). This causes it to act a lot like duct tape, binding and sticking to most surfaces.
It is also important to know that every human on Earth had access to and likely utilized sinew in the pre-modern world. It is a gift of nature that aided our ancestors in the making of compound and composite tools.
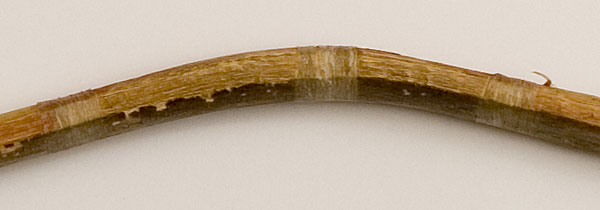
Here are two recently hafted spear points points. If you haven’t worked with sinew, its difficult to convey just how amazing and useful this material is. It has been called the “duct tape” of prehistory but it is even better than that. It not only holds well and is remarkably strong, but shrinks and strengthens as it cures. The points above were hafted (tied on) with sinew dipped in hide glue to create a solid and tight hold on points. This method holds up very well for throwing darts or spears and is nearly impossible to break.
Sinew backing and binding on a Nez Perce bow. Courtesy of NPS.
If you hunt (or know someone who does), you can acquire this from the legs and back straps (the strap covering the tenderloins) of nearly any animal of size. Elk, bison, and deer are obvious candidates for long pieces and are readily available in North America. Smaller animals such as rabbit can be used, but as in so may things, longer can really be better. The main issue I have with the shorter sinews is that it is more difficult to work wet as it must be continually added while binding.
In preparation for summer teaching I recently spent some time making a couple new pump drills for demonstrations and hands-on activities. While some modern tools were used in the production, these are entirely hand-made with no purchased parts or plans. As I have only made two of these previously I spent a little time perusing images of old pump drills to find good examples to use as models.
Beginning at the end. The first pump drill of the weekend.
The pump-drill is an ancient technology that was used world-wide for at least the last 5,000 years. As most (sometimes all) of the parts are perishable, archaeologists are often limited to conjecture on the finer points based on a few surviving parts or images available. Despite its immense antiquity, pump drills (and their cousins the bow-drills) maintained their currency in the maker’s tool kit well into the Industrial Revolution and, in some places, into the 21st century.
The components of the basic pump drill: shaft, drill bit, flywheel, cross-arm, cord, and flywheel key.
The components can be easily gathered around the house or the wood pile. The flywheel, in this case, is steatite, a soft soapstone that is easily carved but has a high mass. Wood or other materials can be substituted if they are more readily available. My first drill, many years ago had a flywheel from a mesquite wood log. I chose it for its relatively high mass and availability.
The “chuck” shown here was created by drilling a small hole lengthwise down the shaft and cross-cutting with a small back saw. This allows a square shaft drill bit to lock in place as the shaft is lashed tight.
The shaft for this project was split out from some aged oak and worked into a cylinder with a diameter of just over 1/2″ (13 mm). The shaft needs to taper slightly, widest part at the bottom, to keep the flywheel from sliding off. I drill the flywheel hole 1/2″ wide and slowly reduce the shaft size until it finds a snug fit.
The central hole is “keyed” to keep the weight from sliding around the shaft as it reverses direction.
I learned long ago that through hard use, the stone will sometimes slip around the wood shaft. Cutting a key slot on the shaft with a corresponding one on the stone will solve this problem with the insertion of a sliver of hard wood or “key.”
My fancy oak key is just a sliver wood. You can literally use a toothpick if you have one in the pantry. Imagine the labor it will save.
Someone could create a nifty GIF animation of this but I think the photos below will assist in understanding how the key works.
A small groove on the shaft holds the key in place while the flywheel is slid over the shaft.
A bit of glue would probably help but I don’t think it necessary if the pieces all fit securely together.
The wheel (or whorl) is slid down the shaft holding the key in place will securely lock both pieces together.
Soapstone is easily worked and can be slabbed, by hand with a hacksaw. A rasp or an assortment of sandpapers are all that are needed to shape the stone.
A simple metal bit can be easily shaped from a square masonry nail.
To make a bit from a masonry nail, simply heat it until it is cherry red and let it cool naturally in order to anneal it. This makes the metal soft and easily worked with a file, stone, or grinder. After it is shaped the point can be re-hardened by heating the point to a dark cherry red again then plunging it in water to cool.
What I didn’t document here is the lashing method. After fitting the bit in the shaft, the chuck was secured using heavy cotton thread coated in pine tar. I think that a long-term solution would benefit from using wire but I wanted to keep these simple. We’ll see if they last. If you aren’t concerned with “primitiveness” then a strong and permanent connection could be made with JB Weld or two part epoxy.
Anything fun worth doing is worth doing twice. Here are the sibling projects from the weekend.
The second drill, on the left is rigged in a different fashion. All the connections are made with clove hitches. We’ll see which we like better.
The rain drove me indoors but it seemed like a good time to take one for a test run. Drilling a block of steatite.The drill, which hasn’t had it’s final sharpening yet, made it through about 3/8″ of the stone in about 15 seconds.
Spade bits like this one tend to bind as they come through the opposite side so the hole will be finished by flipping the stone over. Still, the hole is peeking through and ready to finish.
Broken down for storage or easy packing.
Pump drills are an awkward shape to pack when assembled but I discovered early on that they easily disassemble to fit into a very small space.
If you are considering a primitive project as part of your summer “to do” list, give a pump drill a try. Lots of fun, can be made in a day, and it will impress your not-so-primitive friends. As a final note, I put an Instructable up based on this post as well. Have a look if you don’t mind and give comments if you see fit: https://www.instructables.com/id/Primitive-Pump-Drill/
Follow-up. Drilling slate pendants.
While preparing materials for a primitive tools class I decided to test the new drill on a piece of slate. This is a little harder than soapstone and more abrasive. I didn’t have any lubricant handy (e.g., water) but decided to try it out anyway. It cut like a charm! Just a note to those not familiar with these low-tech drills; the hole is generally cut until is just barely pokes through the other side then the object is flipped over and drill from the rear. This keeps the bit from binding as is comes through.
I cleaned out my recently revamped tote that holds the my key leather working tools. It was good to see the bottom of the box again and pull out the non-essential items. The less used items have their own canvas tote bag of similar proportions.
The above photo shows how the handle removes to access the full box when working. This old English design is seen on boxes like this through the colonial period in the Americas.
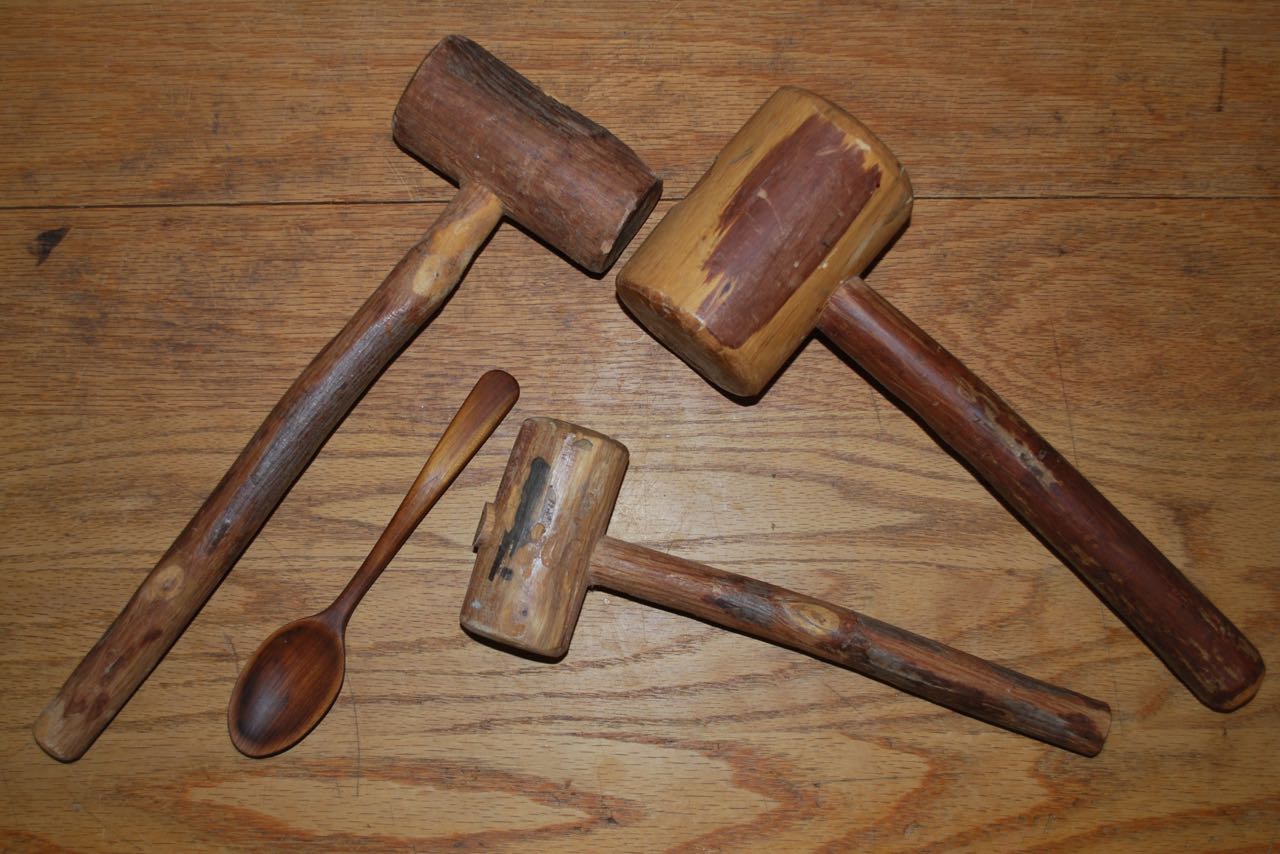
Various hickory mallets and a spoon from Osage orange.
As I sort and cull my tools (and life) I want to share some past projects that may seem too simple to consider. I am not always on the path to a handmade life but I’m also never far from it.
From “Mountains and molehills; or, Recollections of a burnt journal” 1855, page 355.
Looking through old books online I’m constantly reminded of how easy we have it in the 21st Century. I still remember seeing my grandfather and great-grandfather ripping the occasional board by hand. Neither had a table saw and it was often too much trouble for a single cut to replace the blade in the circular saw. I feel like I have rip-sawed miles of lumber in my life and many projects I have undertaken wouldn’t have occurred without the table saw. As I have cut down on the large power tools I own I have a difficult time dismissing even the small table saw.
Roubo framesaw ripping thin planks from a log.
So, I’ve been putting off resawing a wide mahogany plank intended for an instrument back and, because of the width, it will need to be done by hand. I have put it off for over a week now as I realize there is some dread about diving in. It’s a skill that needs practice like any other and isn’t going to kill me. Time to take a deep breath, clamp it down, and start cutting.
Reposted from 2008; what a different life it seems now.
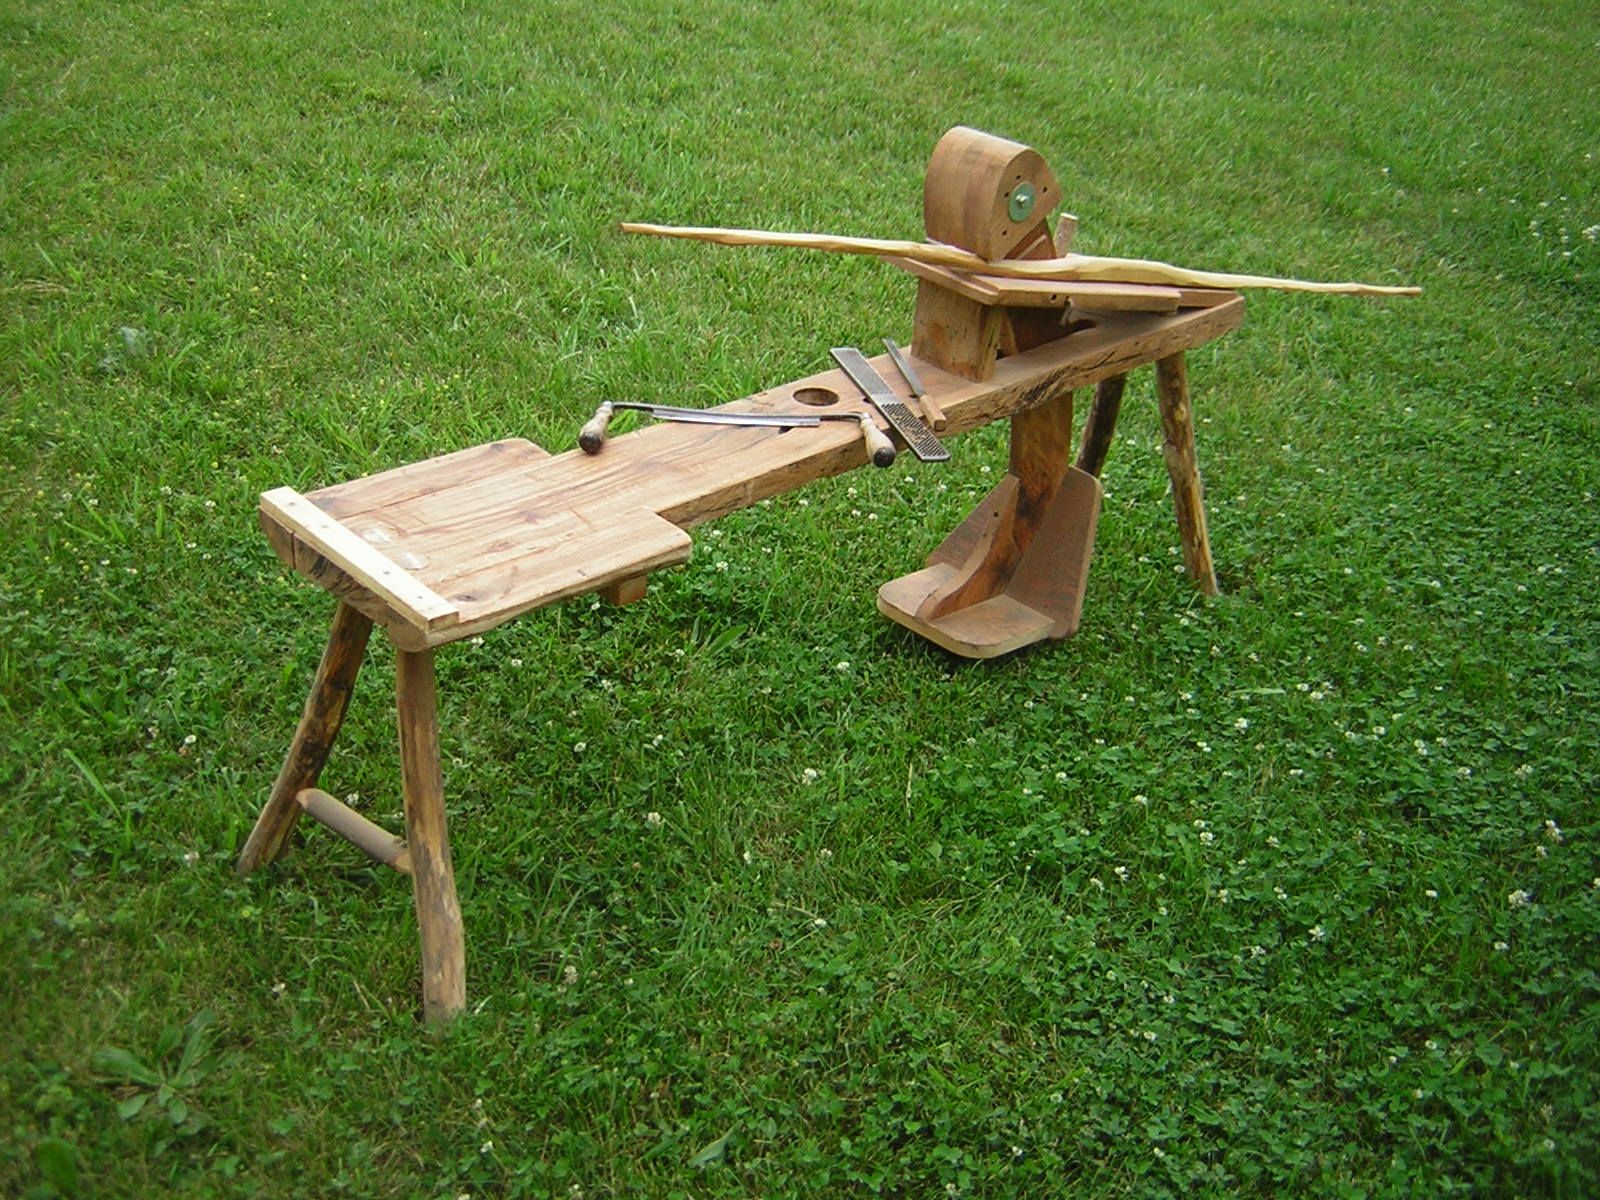
Here is one of my favorite old shave horses. It is made from a plank chainsawed from an enormous pin-oak limb that came down during a storm years ago.
It weighs quite a bit but the weight means more stability when using it as a work bench. All my other horses have had an adjustable table but this one is set to a good angle strictly for working bows.
There are plenty of depictions in old art and many made specifically for every occupation in Diderot’s Encyclopedia from the 18th century. I made my plans for this one based on several I measured over the years and made lots of adjustments to my first one to get the right “fit”. My second and third attempts got better and better. Total cost estimate: about $5.00 for bolt and a few screws.
Talk about convergent timing … It seems that Paul Sellars was reading my mind when he put up another useful video early today.
This is a bit of a ramble I’ve been pecking around on for a while now. Sometime in the 1980s we seem to have forgotten how to sharpen our own tools. That was an era when the woodworking and camping gear market was flooded with jigs, guides, angle-finders, and other contraptions came in a flood to the common shop. Suddenly, a whetstone and strop were out of fashion. I can’t even count how many times I was scolded for sharpening a plane iron by hand! An excellent carpenter friend of mine wouldn’t even attempt a chisel without his low-speed Japanese wheel system with an automatic water drip feed. Anything else was impossible. I was a carpenter/rigger and semi-serious college student by then and needed a knife every day.
I had fortunately learned to sharpen tools from my grandfather and expanded on this knowledge with the aide of several knowledgeable Scout Leaders throughout my youth. There were even tests in the Scouts to make sure you learned about safety, handling, and maintaining tools. On the home front, a dull knife was met with gentle but stinging ridicule.
My first real knife was a Camillus BSA. A good beginning.
In our early teen years, it became a matter of some pride in my little circle of friends to carry a well-tended, razor-sharp pocket knife for everyday tasks as we camped, hunted, and fished. For this, you had to learn your way around a whetstone. For many years, I had only three stones in my life; a two-sided mechanic’s black stone, a small medium-hard Arkansas whetstone, and a very old two-sided razor stone. With these few tools, and a good bastard file, there is nothing I own that cannot be sharpened; from lawnmowers to axes, chisels, or knives. It is a skill I am glad to have acquired.
The missing element is TIME.
This is NOT a “how-to” post for sharpening but encouragement for someone intimidated by the whole process. There are plenty of print resources and good information on the Internet as long as you know that sharpening takes time, patience, and attention to detail which only comes from practice. Big Box sporting good and hardware stores can lead you to believe you need several-hundred dollar sharpening “systems” before you can do anything at all. These are labor-saving devices, not magic pills.
And finally, there is more than one way to skin the proverbial cat.
There is no one way to sharpen or polish an edge onto steel and this leads to some belief in “right and wrong” ways to accomplish he same outcome. Even recently, I had a young bushcrafter tell me he didn’t think I was “doing it right” when he saw me touching up a blade. When I asked why he thought this it was because he had learned a different method in a half-day class and wanted to know “who’s class did I learn that in?” In an ensuing discussion it was posited that there was no way to hand sharpen a knife to an edge comparable to a modern wheel system. This is advertising propaganda gone wild. Think Japanese sword polishers or old-time straight razor makers; it just requires the skill and time.
Learning is an ongoing process, not an event.
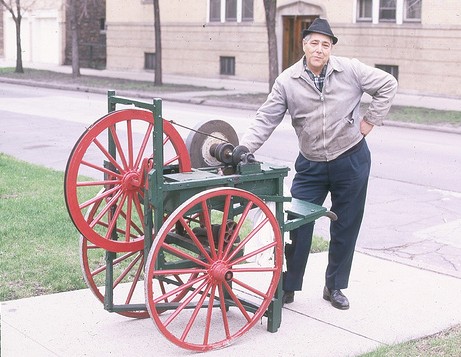
Different tools require different approaches but the essential are the same; finding the angle of the edge, direction of motion, consistency, lubrication, etc. It becomes a real Zen thing to practice. I’m not shooting down the contraption-based sharpening either. They have their place, especially in a busy shop. As I said before, sharpening takes time. For this reason, and probably a certain level of laziness in the family, we sent things to specialists like the knife grinder. Growing up in South St. Louis, we still had a knife grinder making a circuit around the neighborhood who got our business of kitchen cutlery and grandma’s best dress-making scissors. This isn’t him, but I’m glad to see the business still flourishes.
St. Louis Knife Grinder.
Back to the point.
Don’t be intimidated or misled about sharpening your tools. You can certainly do it without an expensive setup. If it becomes too much, there are sharpening services at sporting good stores and elsewhere to help you out. It’s easier to maintain a sharp tool than it is to start from scratch so keep it sharp! Your ancestors did it and so can you.
Now, have a look a Paul Sellars newest video. As always, it’s excellent stuff.


 The more you know…