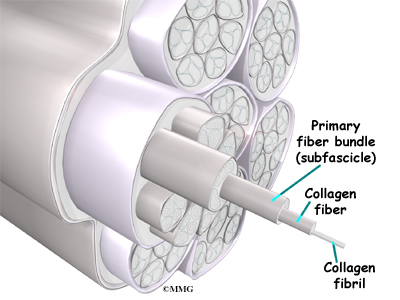
Sinew is the term used to describe tendon or ligament in more formal English. It is the cord that connects muscle to bone or bone to bone in skeletal animals. Like rope, it is made up of bundles of bundles of bundles as shown in this anatomical illustration.
For our purposes, sinew is a true gift to the primitive technologist, survivalist, or low-tech hunter as it provides us with so many possibilities. Sinew is the fiber stripped from animal tendons and used as a strong thread or it can be braided or plied together to make a stronger cord or rope. It can be used to make bow strings, tie objects together permanently, backing and strengthening a bow, or lashing spear or arrow points onto their shafts. It binds well with hide glue, having almost identical chemistry (collagen). This causes it to act a lot like duct tape, binding and sticking to most surfaces.
It is also important to know that every human on Earth had access to and likely utilized sinew in the pre-modern world. It is a gift of nature that aided our ancestors in the making of compound and composite tools.
Here are two recently hafted spear points points. If you haven’t worked with sinew, its difficult to convey just how amazing and useful this material is. It has been called the “duct tape” of prehistory but it is even better than that. It not only holds well and is remarkably strong, but shrinks and strengthens as it cures. The points above were hafted (tied on) with sinew dipped in hide glue to create a solid and tight hold on points. This method holds up very well for throwing darts or spears and is nearly impossible to break.
Sinew backing and binding on a Nez Perce bow. Courtesy of NPS.
If you hunt (or know someone who does), you can acquire this from the legs and back straps (the strap covering the tenderloins) of nearly any animal of size. Elk, bison, and deer are obvious candidates for long pieces and are readily available in North America. Smaller animals such as rabbit can be used, but as in so may things, longer can really be better. The main issue I have with the shorter sinews is that it is more difficult to work wet as it must be continually added while binding.
Gourds have played an important role in human history in both the Old World and New. The origin, domestication, and spread of this and other plants was a topic of much conversation when I was in graduate school. It seems now that its antiquity and introduction to the Americas is becoming much clearer. This humble but amazing plant is securing its place in early American prehistory.
Ancient Humans Brought Bottle Gourds To The Americas From Asia
Thick-skinned bottle gourds widely used as containers by prehistoric peoples were likely brought to the Americas some 10,000 years ago by individuals who arrived from Asia, according to a new genetic comparison of modern bottle gourds with gourds found at archaeological sites in the Western Hemisphere. The finding solves a longstanding archaeological enigma by explaining how a domesticated variant of a species native to Africa ended up millennia ago in places as far removed as modern-day Florida, Kentucky, Mexico and Peru.
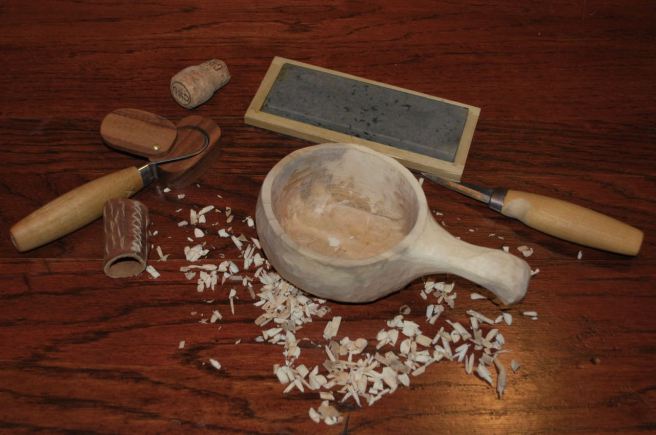
Today I’m prepping to present some primitive skills on Saturday, from raw materials to finished goods. I’m also getting some kid’s activities together to draw in the latest generation.
An assortment of stone-age technology laid out to take to the public.
Several years ago, I made a shoulder bag that I still often carry today. It is the perfect size for a small field bag or hunting pouch. It was a lot fun looking at various designs, mostly from the 18th century to try and come up with something that would fit my needs.
My bag, several years and many miles later.
When I first joined Boy Scouts at about age eleven, I envisioned myself as a mountain man-explorer who was going to learn to live off the land. The first merit badge book I bought with my little money was Wilderness Survival and it spoke of the possibles bag that early explorers carried that kept everything they needed to live off the land and cover every emergency. At least, that’s how I remember it. Later, as a an actual wilderness explorer, traveler, and archaeologist, I learned to appreciate the “kit” bag on a more realistic level, and how this bag transforms for different purposes and places one travels. It is the unsealed* survival kit to be used and replenished as needed based on the situation. My current favorites, though too big for general daily wear, are the Mountainsmith Approach pack and my Filson Medium Field Bag. I can live out of either almost indefinitely and both make handsome weekender bags.
On to the Shoulder Bag
After much deliberation and review of mostly 18th century gear I decided I wanted a small outside pocket, a small inside pocket, a larger, closable outside pocket for important things like a compass, and main compartment large enough to hold a notebook and daily essentials. I decided to make the main flap in a stitched-down style so that it would keep things in, even if it wasn’t buckled shut.
In the end, I went with a fairly standard English-American shooting bag style as seen above. It works well for me and after using it for several years now, I don’t believe I would change anything about it.
Large external pocket with button.
Outside open-top pocket
Closed for travel.
Dimensions: the body of the bag is 9 x 10″ with a gusset exposed at 1″. Reinforced ears, riveted for strength. All stitching is two needle saddle stitch, except the body, which is laced. Three pockets, and a 1 1/4″ shoulder strap, adjustable by about 12″.
All the parts of the body except the main gusset.
When laying out a complex sewing project like this, you need to decide in what order to begin the assembly. The back wall of the bag has an internal and external pocket that were sewn down first (beginning with the smaller one inside).
Outer pocket attached.
The outer pocket has a gusset that was sewn inside-out before being sewn down to the front wall of the bag. You’ll probably notice that the edges of the flaps are raw but if I were using thinner leather I would bind them with a soft buckskin or something similar. The raw edges were smoothed and burnished to create a nicer look than just a sharp cut edge.
The assembled bag.
Finished! It’s hard to gauge work time but since that is generally the first thing anyone asks I will estimate about eight hours of stitching and assembly for this project. There is one inside patch pocket, an outside rear pocket, and a gusseted pocket under the flap. Eleven pieces plus the strap (four pieces). Hardware includes a one inch bridle buckle, a 5/8″ buckle, and two solid one inch “D” rings.
The back-side with simple pocket.
Internal pocket just showing.
Now, what to keep in it…
*The modern sealed survival kit was developed for conscripted soldiers and airmen to keep them from rifling through and using up the goods and having nothing when they truly need it. This has carried over into survival-skills-for-morons programs world-wide and creates a product to be sold and consumed by the inept. If you cannot trust yourself to update, change, use, and modify the contents of your personal survival kit, by all means make or buy one and seal it up, awaiting the day it will come in handy. If nothing else, you can enjoy all the surprises you will find while you wait for someone to rescue you. ~GTC
In preparation for summer teaching I recently spent some time making a couple new pump drills for demonstrations and hands-on activities. While some modern tools were used in the production, these are entirely hand-made with no purchased parts or plans. As I have only made two of these previously I spent a little time perusing images of old pump drills to find good examples to use as models.
Beginning at the end. The first pump drill of the weekend.
The pump-drill is an ancient technology that was used world-wide for at least the last 5,000 years. As most (sometimes all) of the parts are perishable, archaeologists are often limited to conjecture on the finer points based on a few surviving parts or images available. Despite its immense antiquity, pump drills (and their cousins the bow-drills) maintained their currency in the maker’s tool kit well into the Industrial Revolution and, in some places, into the 21st century.
The components of the basic pump drill: shaft, drill bit, flywheel, cross-arm, cord, and flywheel key.
The components can be easily gathered around the house or the wood pile. The flywheel, in this case, is steatite, a soft soapstone that is easily carved but has a high mass. Wood or other materials can be substituted if they are more readily available. My first drill, many years ago had a flywheel from a mesquite wood log. I chose it for its relatively high mass and availability.
The “chuck” shown here was created by drilling a small hole lengthwise down the shaft and cross-cutting with a small back saw. This allows a square shaft drill bit to lock in place as the shaft is lashed tight.
The shaft for this project was split out from some aged oak and worked into a cylinder with a diameter of just over 1/2″ (13 mm). The shaft needs to taper slightly, widest part at the bottom, to keep the flywheel from sliding off. I drill the flywheel hole 1/2″ wide and slowly reduce the shaft size until it finds a snug fit.
The central hole is “keyed” to keep the weight from sliding around the shaft as it reverses direction.
I learned long ago that through hard use, the stone will sometimes slip around the wood shaft. Cutting a key slot on the shaft with a corresponding one on the stone will solve this problem with the insertion of a sliver of hard wood or “key.”
My fancy oak key is just a sliver wood. You can literally use a toothpick if you have one in the pantry. Imagine the labor it will save.
Someone could create a nifty GIF animation of this but I think the photos below will assist in understanding how the key works.
A small groove on the shaft holds the key in place while the flywheel is slid over the shaft.
A bit of glue would probably help but I don’t think it necessary if the pieces all fit securely together.
The wheel (or whorl) is slid down the shaft holding the key in place will securely lock both pieces together.
Soapstone is easily worked and can be slabbed, by hand with a hacksaw. A rasp or an assortment of sandpapers are all that are needed to shape the stone.
A simple metal bit can be easily shaped from a square masonry nail.
To make a bit from a masonry nail, simply heat it until it is cherry red and let it cool naturally in order to anneal it. This makes the metal soft and easily worked with a file, stone, or grinder. After it is shaped the point can be re-hardened by heating the point to a dark cherry red again then plunging it in water to cool.
What I didn’t document here is the lashing method. After fitting the bit in the shaft, the chuck was secured using heavy cotton thread coated in pine tar. I think that a long-term solution would benefit from using wire but I wanted to keep these simple. We’ll see if they last. If you aren’t concerned with “primitiveness” then a strong and permanent connection could be made with JB Weld or two part epoxy.
Anything fun worth doing is worth doing twice. Here are the sibling projects from the weekend.
The second drill, on the left is rigged in a different fashion. All the connections are made with clove hitches. We’ll see which we like better.
The rain drove me indoors but it seemed like a good time to take one for a test run. Drilling a block of steatite.The drill, which hasn’t had it’s final sharpening yet, made it through about 3/8″ of the stone in about 15 seconds.
Spade bits like this one tend to bind as they come through the opposite side so the hole will be finished by flipping the stone over. Still, the hole is peeking through and ready to finish.
Broken down for storage or easy packing.
Pump drills are an awkward shape to pack when assembled but I discovered early on that they easily disassemble to fit into a very small space.
If you are considering a primitive project as part of your summer “to do” list, give a pump drill a try. Lots of fun, can be made in a day, and it will impress your not-so-primitive friends. As a final note, I put an Instructable up based on this post as well. Have a look if you don’t mind and give comments if you see fit: https://www.instructables.com/id/Primitive-Pump-Drill/
Follow-up. Drilling slate pendants.
While preparing materials for a primitive tools class I decided to test the new drill on a piece of slate. This is a little harder than soapstone and more abrasive. I didn’t have any lubricant handy (e.g., water) but decided to try it out anyway. It cut like a charm! Just a note to those not familiar with these low-tech drills; the hole is generally cut until is just barely pokes through the other side then the object is flipped over and drill from the rear. This keeps the bit from binding as is comes through.
I’ve been researching more ethnographic data for trapping techniques to get beyond the same handful we have all seen since our Scouting days; the Paiute, Figure-4, spring snares, etc. While not looking at all I came across this interesting image from the archives of the Smithsonian from 17th century Italy. The more I research, the more I learn that trapping, in the old days, was a passive-active activity, not just set the trap and go away. Leaving the animal for any significant time allows the prey to escape or be taken by other, craftier, predators.
Text authored by Giovanni Pietro Olina, , about 1622; and illustrated by Antonio Tempesta, 1555-1630 and Francesco Villamena, ca. 1566-1624.
This trap is a great example of the active-passive nature of hunting and trapping. The hunter, disguised as a cow is slowing pressing the flock into a tubular net, guided by the short fences on either side.
There are more tried and true ideas where this came from so hopefully I’ll be able to tease them out of the available archives and share a few more as I find them.
I was looking up a link for someone and rediscovered the video today showing how to make tough and durable sandals from discarded tires. This style is well-known in Southeast Asia, particularly in poorer areas.
If you are interested in sandal-making, you can hardly go wrong with this design if you have access to old tires. I suggest watching the video if only for the remarkably sharp knife this maker is using. Using tire material is a little heavy but will truly last a lifetime. The straps fit purely by friction so they are continuously adjustable while the waterproofness of the material makes them perfect for the wetlands and jungle.
I understand this style was created in the 1940s when old tires became abundant and some creative shoemaker had a Eureka moment. There is also a short write-up on this style on the always interesting Huarache Blog if you are seeking more information about this shoe.
Another step toward self-sufficiency and off-grid knowledge for the Mayhem Shoe Collective.
Finally, after stepping away from this little project for two months, I’m nearly finished with this wooden noggin cup. I set it down in despair early on when the block started to check along the radial grain. Luckily though, storing it in a moist bag seems to have saved the project and I was able to remove the cracked ends to reveal this little mug inside.
Canoe cup, noggin, kuksa, or guksi. Whatever you call it, it’s nearly done.
The walls might be a thinner than is really prudent but I believe that once the maple fully cures it will fairly stable wood. I knew of these as “canoe cups” from the historical references and their use by reenactors, but I’ve noticed that they have become very popular among the Bushcraft crowd the past few years. I’ve only made one large size cup like this (many years ago) but it wasn’t a thing of beauty and it is long since lost.
I can’t quite decide where to stop fiddling with it but it is essentially ready to use as is. If I remember, I will post another, better photo, when it is complete.
I was lucky to learn this method as a young Scout and have stayed proficient over the many years since. To become truly skilled at this, I went through a period of making a coal every day with either this method or by hand drill. I spent a couple days and nights out in the snow and drizzle and decided to share a bit of my experiences for anyone patient enough to watch. I hope you enjoy.


 The more you know…


")


")