Banjo redo

Last winter I had an important epiphany about myself as a musician.  I am under nor delusion that I will ever be more than a closet or campfire player.  For me, for now, that’s going to have to be good enough.  Although I love the fiddle more than any other instrument, I went back to my roots and picked up a Deering Good Time five string banjo a couple years back to see if I couldn’t revive my banjo playing.  I hadn’t really played much in over a decade but discovered that not only did the brain still remember some old tunes, but my big, beat-up fingers were actually still suited to it.  Ham-hands I’ve heard them called!

c-gt_100-150_large
Deering “Good Time” open backed 5-string banjo.

After playing the “Good Time” for a couple years, I felt I outgrew it as a player.  Don’t get me wrong, it’s a great instrument for the price (ca. $650), American-made, and travels well but I just wanted a little more substance and a thumpier traditional sound.  Not being able to afford anything fancy, and my playing not really being up to any professional par, spending a load of money I don’t have was out of the question.  It became apparent to me that it was time to make something better myself.  This isn’t quite as outlandish as it may seem as in my woodworking days in my early twenties, I made a couple banjos, a handful of mountain dulcimers, and some mandolin parts that were fair to partly decent instruments.  Anybody who knows me knows I hoard parts and hardware so fortunately I had a set of tuners, some fret wire, a tension ring, and a bracket set for a banjo (obviously the universe conspired for this to happen). For the rest, a quick trip through the Stewart-MacDonald catalog located the missing elements (e.g., a White Lady Vega-style tone ring, brass arm rest, bridge, and tailpiece, as well as a maple neck blank and rosewood fingerboard, and a calf-skin for the head).

Banjo3Unfortunately, time and energy were against me when I made the initial build last summer.  I was traveling and teaching for the university while working on this so I didn’t document the process.  So, I essentially built this one twice.  Once, to have something to play while traveling over the summer, then a rebuild in the fall to tweak the set-up and put a better finish on it (tung oil).  The photos don’t really do it justice here but hopefully, it gets the idea across.  Making an instrument is a doable thing.

Banjo1
Banjo back to show construction. Steamed hoop comprised of three core layers of shagbark hickory with an inner and outer laminate of american black walnut. Neck made from a “flamed” piece of curly maple.

I won’t even attempt to describe the process and there are many better instrument makers who have done this before me (see the Foxfire books, Irving Sloane, Earl Scruggs and plenty of others).

Sloane
This book, and others, made instrument making an approachable thing for me 25-30 years ago.

To make a banjo, you essentially need a few, more-or-less mechanical parts, then find a way to attach them together in a fairly precise and meaningful way; that is to say a neck, complete with a fretted fingerboard and tuners, and a drum-headed hoop of some type.  Having some experience with steam bending, this part was not as intimidating as it might seem the first time around.  My choice for the body was a hickory core with walnut laminates for the outside.

Banjo4
Plain headstock. Rosewood head plate, fingerboard, and heel.

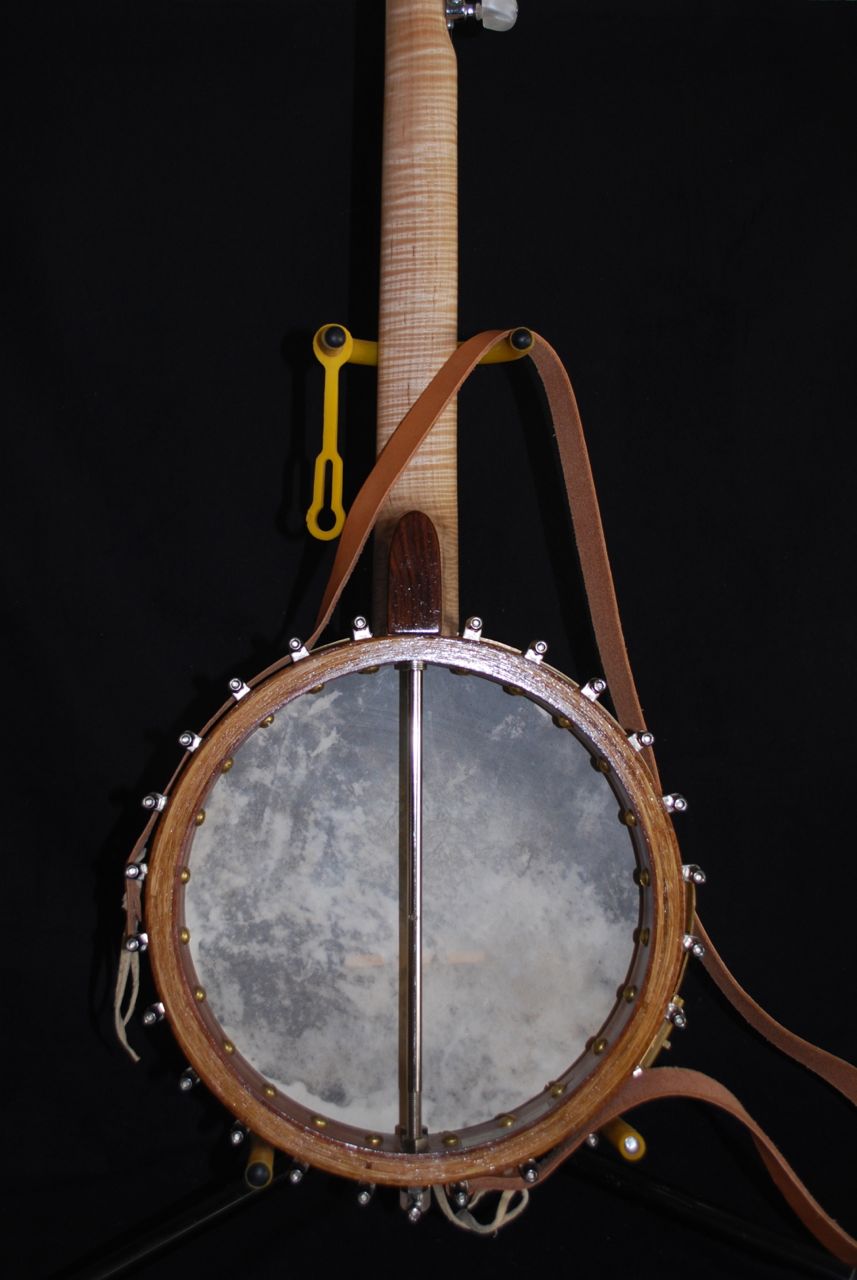
These pictures already show the six months of use and she already needs a good cleaning.  As can be seen though, there’s little ornamentation on the instrument; no inlay or bindings, just an octave marker on the side of the fingerboard.  I did steal the peghead design from Earl Scruggs’ book where he stole and printed the Mastertone design himself.  It was just too classic.

Banjo5
Rim detail to show laminae. Core (3) are hickory, outer and inner are walnut.

I had intended to veneer over the back but after completion, I liked the raw look that shows the construction.  Maybe I’ll change my mind about this later but for now, this is it. The calfskin head can be a finicky when traveling as it is affected by humidity.  Some players remedy this with a thin layer of spray-on silicone.  I may try this in the future just to see how it works.

Banjo6
This photo doesn’t do the maple justice. The Flame is very nice in the sunlight and has some real depth.

I rarely see a reason to hide a beautiful wood grain.

Banjo7
Rosewood heel cap made from a scrap. No necessary, but gives it a finished look.
DSC_0062
Detail of “the pot” as the body of a banjo is called. The walnut is s little bleached out in this image.

The components that make up the pot of the banjo are illustrated above.  From right to left: brass tension hoop, edge of the rawhide over wire, nickel-plated tone ring, tension brackets, and wood hoop.  the armrest is just visible in the lower right.

Banjo2

It’s remarkable how fast the weight adds up.  24 brackets, brass screws, tone ring, tension ring, tuners, and armrest make for some significant weight.  I think it’s a good idea for any artisan to sign their work, even if it’s never intended to sell.  This separates the hand-crafted from the mass-produced and show the care and the soul that goes into a hand-made work.

Now, time to practice.

More Woodworking Tools on the ‘net

Here’s some  images from a short eBook on woodworking by Peter C. Welsh.  A quick read with some good stuff in it.

icover_th

Not just eye candy, there is good information contained in this study of tools.  But really, I’m just in it for the tool porn.

image7a

I particularly like the comparison of tools owned and used by actual people.  For instance, in a Virginia workshop of 1709:

“John Crost, a Virginian, owned, in addition to sundry shoemaking and agricultural implements, a dozen gimlets, chalklines, bung augers, a dozen turning tools and mortising chisels, several dozen planes (ogees, hollows and rounds, and plows), several augers, a pair of 2-foot rules, a spoke shave, lathing hammers, a lock saw, three files, compasses, paring chisels, a jointer’s hammer, three handsaws, filling axes, a broad axe, and two adzes.”

A man could get a lot done with that tool kit.

image4a

In 1827, a Middleborough, Massachusetts, a carpenter lists his tools and their value.  This is likely a representative set of tools for an actual tradesman of the time.

1 set bench planes $6.00
1 Broad Axe 3.00
1 Adze 2.25
1 Panel saw 1.50
1 Panel saw 1.58
1 fine do— 1.58
1 Drawing knife .46
1 Trying square .93
1 Shingling hatchet .50
1 Hammer .50
1 Rabbet plane .83
1 Halving do .50
1 Backed fine saw 1.25
1 Inch augre .50
1 pr. dividers or compasses— .71
1 Panel saw for splitting 2.75
1 Tennon gauge 1.42
1 Bevel .84
1 Bradd Hammer .50
1 Architect Book 6.50
1 Case Mathematical Instruments 3.62-1⁄2
1 Panel saw 2.75
1 Grafting saw 1.00
1 Bench screw 1.00
1 Stamp 2.50
1 Double joint rule .62-1⁄2
1 Sash saw 1.12-1⁄2
1 Oil Can .17
1 Brace & 36 straw cold bits 9.00
1 Window Frame tool 4.00
1 Blind tool 1.33
1 Glue Kettle .62-1⁄2
1 Grindstone without crank 1.75
1 Machine for whetting saws .75
1 Tennoning machine 4.50
Drafting board and square Bevel— 1.25
1 Noseing sash plane with templets & copes 4.50
1 pr. clamps for clamping doors 2.17
1 Set Bench Planes—double irons.— 7.50
1 Grindstone 300 lbs @ 6.25
1 Stove for shop—$7.25, one elbow .37 & 40
lbs second hand pipe $4.00 11.62
1 Bed moulding 2.00
1 Pr. shears for cutting tin.— .17
1 Morticing Machine 10.75
1 Grecian Ovilo 1.13
1-3⁄16 beed .67
1 Spirit level 2.25
1 Oil stone .42
1 Small trying square .48
1 pareing chisel .37
1 Screw driver .29
1 Bench screw .75
1 Box rule .50
1-3⁄4 Augre .41
11 Gouges 1.19
13 Chisels 1.17
1 small iron vice .52
1 pr. Hollow Rounds .86
4 Framing chisels 1.05
1 Grove plough & Irons—Sold at 4.50 5.00
1 Sash plane for 1-1⁄4 stuff 1.50
1 Copeing plane .67
1 Bead 1⁄4— .75
1 Bead 3⁄4 1.00
1 Rabbet (Sold at .92) .92
1 Smooth plane 1.50
1 Strike Block .92
1 Compass saw .42
6 Gauges 1.83
1 Dust brush .25
1 Rasp, or wood file .25
1 Augre 2 in. .76
1 Augre 1 in. .40
1 Do 3⁄4 .30
1 Spoke shave .50
1 Bevel— .25
1 Box rule .84
1 Iron square 1.42
1 Box rule 1.25
1 Spur Rabbet (Sold—1.17) 1.33
1 Pannel plane 1.25
1 Sash plane 1.25
1 pr. Match planes 2.25
1 Two inch chisel or firmer— .42
1 Morticing chisel 3⁄8 .25
1 Large screw driver 1.00
1 Pr. small clamps .50
1 pr. Spring dividers .92
1 do-nippers .20
1 Morticing chisel 1⁄2 in. .28
1 Ovilo & Ostrigal 3⁄4— 1.25
1 Scotia & Ostrigal 5⁄8— 1.08
1 Noseing— 1.08
1 Pr. Hollow & rounds 1.33
1 Ogee— 1⁄2 inch 1.00
1 Ostrigal 7⁄8 inch 1.00
1 Bit— .15
1 Beed 1⁄2 inch .83
1 Claw hammer .67
1 Fillister 2.50
2 Beeds at 5⁄8 1.83
1 Pair Quirk tools 1.50
1 Side Rabbet plane .83
1 Large steel tongued sq. 1.71
1 Saw & Pad .67
1 pr. fire stones .50
1 small trying sq. .50
1 Set Bench planes double ironed without smooth plane 6.00
1 Bench screw .75
 

from “A Yankee Carpenter and His Tools,” The Chronicle of the Early American Industries Association (July 1953), vol. 6, no. 3, pp. 33–34.

I could ponder this list for a long time and find only a few things to add from our modern arsenal of gadgets and labor-savers.

image5a

Overall, Welsh does a decent job of outlining the changes in woodworking tools over the last three centuries, and provides great period illustrations too.  Read the complete book for free HERE.

image3a

Making a Traditional Turning Saw, part 1

1907Tools-frame saw
Image from a 1907 turning saw add.

Bucksaws, bowsaws, and other frame saws are often lumped together into a single category in modern American or British English (unless you happen to be a traditional hand woodworker of course).  And why should anyone care anyway?  Bucksaws are replaced by chainsaws, bowsaws have become cheap, pot-metal, throw away abominations, and turning saws are replaced by band saws, scroll saws, saber saws, or even cheap coping saws.

The firewood bucksaw is the biggest of this family and one I’m glad to have in my toolkit.  Yes, I still own a chainsaw but find I use it less and less in favor of the quiet bucksaw that takes no petroleum and spews out no noxious fumes.  I have read that most homes kept a big bucksaw handy as the easiest means of creating firewood and I can certainly understand why this would rank above the axe for cutting logs to length.

Firewood bucksaw, the grandfather of the family.

Skipping even the practicality of being able to make your own excellent tools for a few dollars (or less if you are energetic), there is a great beauty and practicality in this ancient design that our ancestors hit upon a couple thousand years ago.  The basic premise of this design is to create a structure that will put a very thin strip of serrated metal under immense tension to simulate the stiffness of a much thicker material.

I regret that we’ve come to a point in our history where making a tool is odd, yet making something with our tools is not (yet).  Where working for hours at some other thing, we get tokens of cash to purchase something we could have made ourselves in far less time and probably less energy spent.  I believe Thoreau was on to this sort of thinking.

DSC_0916
Splitting out the pieces.
Halving and halving again to make straight grained boards.
Halving and halving again to make straight-grained boards.

Choosing a length of straight-grained oak in this case, an axe is, by far, the fastest method of reducing it into the constituent pieces for the saw parts.  This is far faster and better than sawing, creates no noise or dust, and ensures that each part is exactly in alignment with the grain.

Finished in seconds.

For a quick and dirty saw, these could be worked almost instantly into the mortice and tenon.  However, as we always intend to make a tool we will cherish and pass on, some shaping is in order with an eye for form and comfort.

Template on card stock.

I have a file of templates I keep from past projects so I don’t have to continually reinvent these things and I highly recommend this.  I find it helpful to write the details on the card stock, as well as label and date them (the notes on the one above are on the underside).  Now comes the somewhat tedious task of shaping the arms for which I didn’t take a photo (maybe I’ll remember next time).  I saved a few minutes by using the belt sander to taper the upper portions of the arms to save on shaping later.

Cutting a mortice.
Cutting a mortice.

After marking up the arms, I cut the mortices with a bench chisel.  These are easier than many people think but do take a very sharp chisel and a little practice.

Drilling for the blade and handle connection.

I used a 5/16″ doweling bit for this as it leaves a very clean, precise hole for the 1/4″ brass rod to run through and turn freely.

DSC_0963
Finally, the tenons are cut with a thin backed saw.

Cutting the tenon is very easy if the lumber is split precisely with the grain as opposed to sawn out on a table saw (ignoring the natural grain).  After the cheeks are cut, its a quick matter to pop off the waste with a sharp chisel.

DSC_0955
Auguring the handle for the brass rod.

I used a spare file handle for the primary handle.  A 1/4″ hole is augured about 1 1/2″ deep for the 1/4” brass rod that will become the connection for the blade.

DSC_0965

The rod is driven into the handle and will be cross-pinned for security.

Come back for Part 2.

Some thoughts on drawknives

D.B. Laney's avatarA Woodworker's Musings

Like all other hand tools, the drawknife is a simple machine designed to provide the user with an advantage that will; give him (or her) more control, increase his (or her) productivity or shorten the workday.  (Or all three, if you’re lucky.)  Of course, there is the added benefit of being every bit as therapeutic to use as a spokeshave.

Most folks new to working with hand tools may have developed some faulty notions about the drawknife and its use.  Let’s explore this simple, but extraordinarily useful tool and how to get the most out of it.  First, let me throw out a caveat here.  As always, let me state, that is no absolutely right way to use any particular tool.  The way that works best for you, is the “right way”.  That said, there are a few things that you should understand about the drawknife that are, pretty much…

View original post 852 more words