Here are a couple of photos of the one I still think of as the “new horse.” It is made up of mostly recycled and scrap wood that I was hoarding for just such a project. More than ten years later, I am still quite happy with the size and design of this one. It isn’t perfect for everything, but what is? It has produced bows and darts, spears and walking sticks, and held dozens of other projects along the way. It is a sturdy saw bench and a nice place to sit and have a beer at the end of the day.
The bench itself is made of pine and fir dimensional lumber. The working portions are red oak, white oak, hickory, and popular. The large bolts are salvaged from an old Ford truck spare tire holder.
I began version one of my Vardo Caravan eleven years ago this month. As I published updates and details along the way people have for a detailed “how to” for building a vardo. Since everyone’s needs, skills, and resources are different, I will leave the task to others. My suggestions are this. Decide on your basic design wants. Traditional or modern construction? Consider size and weight (I went for the minimum of both). Consider materials. This will determine construction technique. As for traditional or modern? Go look at some used RVs for sale and see how flimsy they are built; not to mention probable issues from toxins in the plywood, pressboard, adhesives, plastic veneers, etc.
Drink in as many details as possible about other wagons. Are they for show or can they take the hammering of bad roads? How do you think they will hold together in a wreck? What kind of long-term maintenance are you prepared to perform? This is why modern RVs are covered in sheet metal or plastic. If you convince yourself that you want to use materials others don’t, then ask yourself why. Are you building an RV that looks “old fashioned” or are you deciding to build with traditional techniques? (Neither is bad, but it may not be practical to mix and match).
Final sketch that built the Vardo.
Above is the written plan I used to create the Vardo. This is obviously not exactly how it turned out as changes were made based upon availability of materials and constant reconsidering of different options. The essentials didn’t change. This is how the arc of the roof was calculated and overall dimensions worked out. I chose to use traditional techniques and plywood only in the ceiling (for ease of building and stiffening the structure). Although glue is used in some areas, the structure depends upon screws and bolts in all critical areas. I decided I was willing to maintain my wagon so the exterior finish is simple oil paint over wood.
Sketch, sheet 2.
The second sheet of the plan was mostly used as a way to gauge sizes, raw materials, and habitable space. I didn’t really build from the sheet.
Figuring it all out.
This is just one of many sketches used to figure out space and arrangements. I looked at Irish Open Lots, Vardos, Bow Tops, and Sheepherder wagons. With so much experience out there, the best arrangements have been worked out many times over. Here’s the link to the rest of the photos from the build: https://paleotool.wordpress.com/plans-projects-and-patterns/the-vardo/
Study and read as much as you can about what you want to build. Make many sketches and plans. Cut out little scale paper dolls to measure out spaces if it helps.
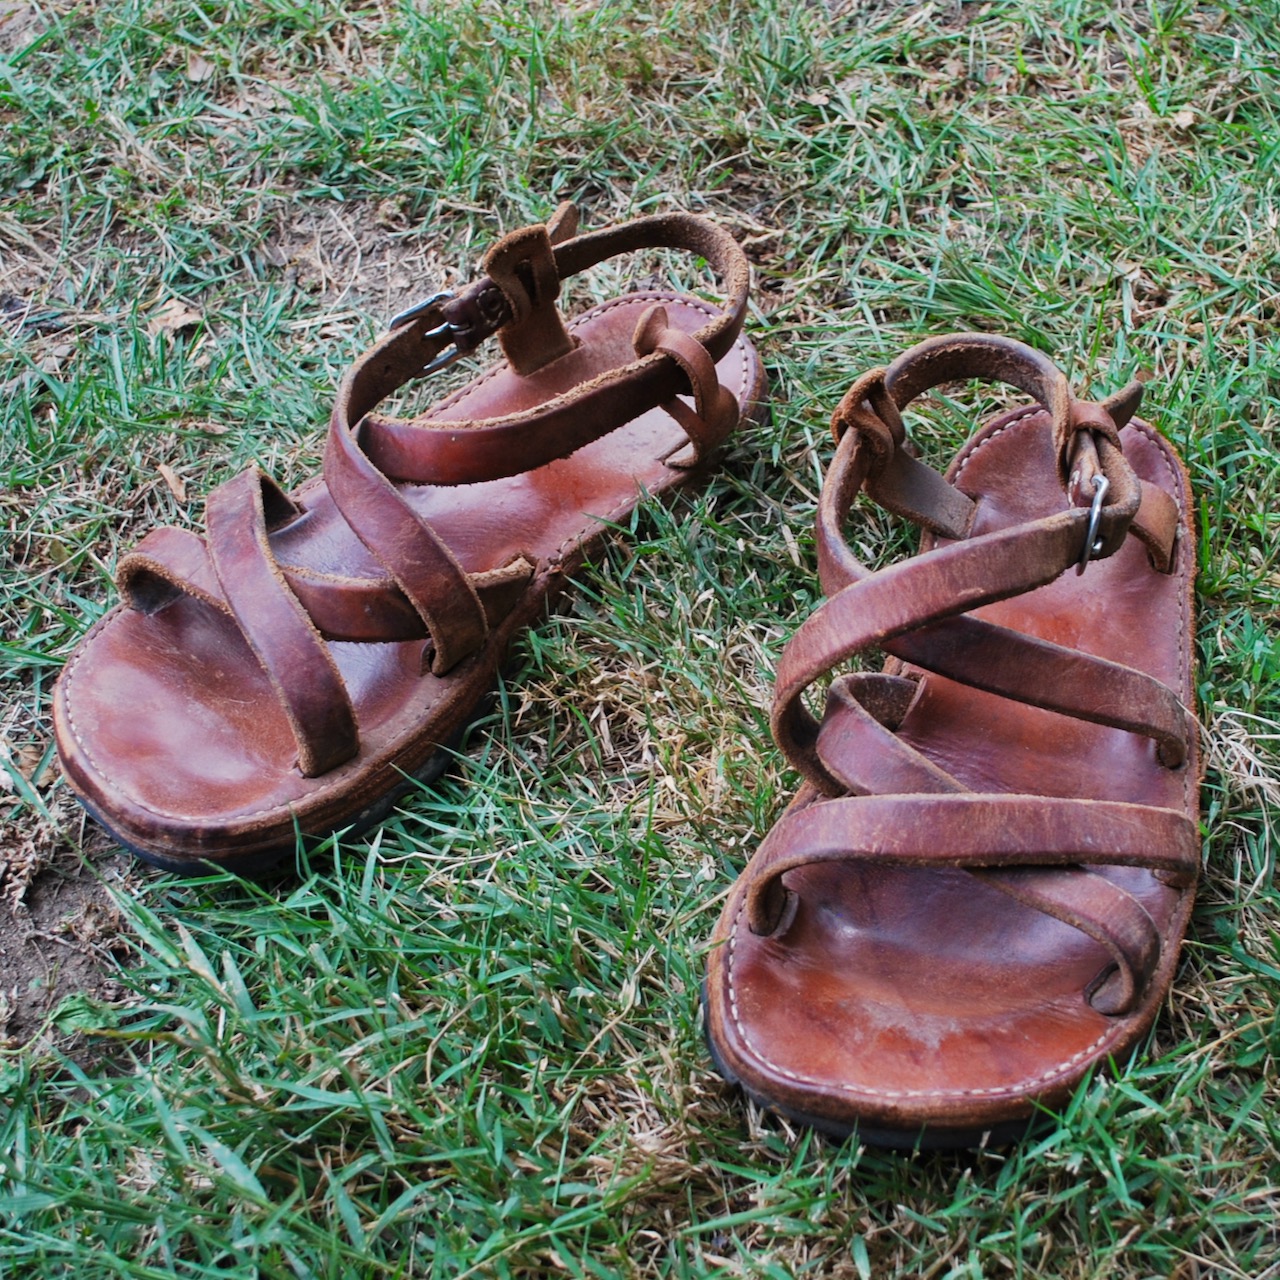
If you have ever taken a class with me you might know that all the intimidating sewing isn’t as bad as it looks. The sole is three layers thick but the use of a good, sharp awl makes the double needle sewing go quickly. A lot more work goes into these than I would have initially thought but I really think they come out great in the end. It took several pairs to get the pattern just right but research into design and construction led me to this final design. The sole is three layers thick (or more historically) and have been made this way in Europe and North Africa for more than 2,000 years.
The thickness of additional layers isn’t just to provide safety for the feet but the central layer provides a path for the straps to travel through without lumping under the feet. The parts consist of an insole (medium weight oak tan leather), mid-sole to allow tunneling the straps through, and an outer sole, in this case, leather. The straps are 48″ per foot plus the heel yoke.
This is how they looked when I thought I was finished. Shortly after, I added buckles and have since been through a few more soles. Currently they are shod with rubber.
Nine years on and still going strong. The patina that good leather takes on cannot be simulated. They get a coat of dubbin every six months or so but otherwise, need little care. I hope to get back to a time when I can wear them daily again.
I want to re-share this camper I posted about back in 2010. I would still like to know more about it but love what I’ve seen so far.
I see some definite similarities to my own concept of a vardo but I really like to metal sheathing as a modern, low maintenance exterior. Also, the rounded front was a long consideration in my plans but in the end I chose a more “old-timey” look.
You can just about see the evolution of the Airstream design in this construction. They also have a nice Tiny House that’s worth checking out here: http://www.protohaus.moonfruit.com/
For those who don’t follow the Tiny House Blog, check out the ProtoStoga here:
I collect old plans for projects I never seem to get around to making. With winter here, maybe someone would want to build this fine sled. This comes from an old Delta Tool company publication and the procedure is about as simple as can be.
I lived on the flat Plains for quite some time and I’m rediscovering the joys of hill country.
From the book Toys, A Deltacraft Publication, DELTA MFG. DIVISION
There’s not much to it really. An couple large project scraps and two long boards for the runners will just about do it.
The recipe is simple:
The frame is 1/4″ birch and the top boards are 3/8″ birch. Fasten together with countersunk, flat-head wood screws.
The runners are made from ash. Make a simple form with an 8″ radius from scrap wood. Soak the ends Of the runners in hot or boiling water for about an hour, then clamp onto the form and allow to dry for 24 hours. Ash takes to bending very well in my experience.
Finish body of sled with varnish or paint. Apply several coats of shellac to the runners and wax.
Maybe one less plastic tub sled will end up in the landfill.
Here’s the link to the website where I found the plans. There are some fun and simple projects to you busy in the coming fall. I recommend the “retro” section for some good stuff.
Dowel Cutter – A useful tool for large-scale production
A version of this post appeared here in 2012 but here is an update as prelude to a coming post.
I’ve been using a Veritas dowel and tenon cutter to rough out arrow shafts from planks. Quite a while ago I posted about the jig I built for cutting the shafts and thought it might need some follow-up. Although I didn’t have much in the way of appropriate wood available for arrows on the day the cutter arrived, I did have one well-aged straight-grained poplar board that had been set aside to age for arrows to experiment with. The cutter, once set up, takes a piece of square stock of 7/16″ – 1/2″ and cuts it down to a 3/8″ dowel.
Looking through the feed end of the dowel cutter.
When the shaft comes out of the cutter it tends to start wobbling and the effect increases quickly. The solution is to create some sort of guide for the shaft so I came up with wooden blocks, as seen below with slightly oversized holes drilled inline with the cutter. There is a second identical block set back a few inches further to increase stability. After the first few experiments I could really tell that the stabilized shafts were much smoother than the unstabilized ones.
Shavings as they exit the cutter.
The wood can be turned by hand or a wrench or, as in this case, it can be driven by a drill motor chucked with a square socket (not pictured). The drill motor is not only faster but seems to cut smoother due to the high rate of rotation.
Before and after a light sanding. Sharpening the blade reduced this spiral of fuzziness.
The above photo is blurry but the right shaft demonstrates the rough “fuzzy” state as they come out of the the jig and the left is after a few minutes with some 100 and 220 grit sandpaper. They are subsequently burnished and await nock reinforcements as the next step. After putting a better edge on the blade, the shafts come out a littler smoother but it really seem to vary with the type of wood being used.
Image from the English War Bow Society. Click the image to link to their site and find out more about English warbows.
I was able to turn out eight experimental shafts in a short time. Two were rejected immediately as they has little kinks in the grain and two were rejected during sanding due to blemishes in the wood. They’ll probably be okay for light weight kid’s bows but are not acceptable for heavy, fast bows. The spine feels a little light to me but I’ll hold out to see what comes of them. The goal is to create some fairly standard issue British war bow arrows and see how they perform. Since I use wooden dowels to peg together many other projects, very few shafts have gone to waste since this purchase.
Note: many great arrows have been cut with the Veritas cutter since the original post in 2012 and I will do my best to continue documenting the work.
Several years ago I starting documenting some of the arrow-making I do. I wrote the original version of this piece in 2012 but as it always draws a lot of interest I have re-edited it and am posting it again.
Arrows have been much on my mind after seeing how ratty some of mine have become. Even though shooting takes its toll on the fletchings, it seems they get at least as much damage in storing and travel.
I was intending to start with a set of British longbow style arrows but having received some beautiful arrow bamboo (Pseudosasajaponica) from a friend who grows the stuff, I changed plans to suit the new material. Prior to this project I had never used real arrow bamboo but have used it’s distant cousin the american bamboo or rivercane (Arundinariagigantea). It could not be much more perfect for the job.
Since I hoped to do this right, I decided to photo document the process as best I could. Good arrow making isn’t easy or fast so unless you are dedicated to perfection, you are probably better off buying them.
Matching shafts.
High-grading the materials
The first thing to do is to select shafts. I didn’t have hundreds to choose from but these were pre-selected for diameter (hence spine), straightness, node alignment, etc. so this made my work easy. I parsed out a half-dozen I liked for starters and cut them to length. Note similarity in diameter and node alignment. The scale above the shafts is in inches. I could hardly ask for better.
A preview of shafts selected, straightened, and cut to length.
Attributes to look for in bamboo or cane shafts
Your arrows should be a consistent diameter, consistent weight, similar spine, long lengths between nodes, similar node placement, with very little taper overall. Most people seem to think that bamboo is straight coming right out of the ground but this is rarely the case. Expect to heat straighten and you shafts. Your best work will be done in groups to get a consistent set, not just a one-off product.
After a lot of reading, I decided to approximate Korean style arrows with inserted wood nocks. These have worked well for me in the past but I have never started with this great of bamboo.
Remove the flares at the node sections.
Cleaning up the shafts
Raw bamboo has a flair at each leaf node that must be removed for a smooth arrow shaft. I do most of this with a knife but a small plane or file will suffice. You don’t want something bumping over the hand or bow as the arrows is loosed.
Smoothed node.
The node above is cut smooth.
Further smoothing.
I have a neat little shaft plane (made by Dick Baugh) that helps at this stage but a rasp or sandpaper will work too. You might have a divot at the joint but this won’t really affect your arrow.
Nodes are smooth.
The nodes of the set are now relatively smooth. Now, any final straightening should be done over gentle heat. This can take several hours so don’t rush it. Keep fixing little bends and make sure to heat the entire shaft to temper it. I stand over the stove for this but have used coals from the fire in a pot to achieve the same purpose. Wear gloves and be patient.
Whittling nock inserts.
I selected Osage orange for the nocks. Horn or other hardwoods can be used here as well. The above photo shows a blank and finished nock preform.
More whittling.
This photo shows the basic method. With a very sharp knife, score a ring around the nock. Whittle away from the score to narrow the piece slowly. Repeat until it fits the shafts. At this point I will say that I omitted a photo of an optional, but I think important, step. That is, to wrap the end of each shaft with sinew and hide glue to prevent the shaft from splitting while pressing in the wood. If, for some reason, sinew isn’t available, silk thread can be used in its place but you should top the silk with a little thinned white glue to help prevent it unraveling through abrasion. As sinew is free and carried around inside all the higher life forms, it should be pretty easy to get some.
Almost a tight fit.
As you get close, keep test fitting the nocks until they are a perfect fit.
A perfect fit.
You can see the sinewed shaft ends being fit with the inserts. Glue the nocks in place with a water-soluble wood glue for easier repair.
Steps in forming the notch.
At this point, several simple steps create a nice notch. First, wrap the joint with more sinew and coat in a thin layer of hide glue. Second, drill a small hole through the nock, preferably at 45 degrees across the grain. Make a small saw incision to start the carving and remove the waste with a small knife. Use a very small file or sandpaper to open the notch and smooth the surfaces.
The finished product.
At this point, you have the essence of an arrow.
Foreshafts, points, and fletchings
The next step to make these fancy sticks into arrows is to fletch them with feathers. To make fletchings, the best feathers must be selected. I am using some goose wing feathers given to me by a friend which have been graded to the last three per wing. Perhaps common knowledge in the fletching world but it worth noting that all three feathers must be from the same side of the bird (i.e., all right wing or all left wing). I cut a template from Bristol board to serve as a guide so that all the fletchings are the same size and shape. After the quills are split and trimmed, the bases (where they will be glued to the shaft) must be trimmed smooth and sanded flat to lie against the arrow. This is a very time-consuming task but critical in proper fletching.
Feathers to fletchings.
Again, there are only about three feathers on each wing suitable for fletchings and all three on an arrow need to come from the same wing to have the same shape and twist. To produce the needed 18 fletchings I cut about 24 as some may go to waste. I always ruin a few in the final trimming or end up weeding them out due to defects. Save them for later repairs if you have any left over.
Serving the feathers with silk.
After gluing them in place by hand, the ends are served with two layers of fine silk. This is a slow and tedious job and neatness really shows but the end product will be sturdy and handle a lot of abuse through shooting.
Silk in the sunlight.
The arrow above is now fletched, reinforced, and has a sturdy wooden nock. Real silk is strong and shimmers beautifully in the light and comes in virtually any color.
Inserted wood nock and goose fletching.
It takes me nearly an hour for each arrow so I took a break after the first four.
Footings
The foot is the front portion of the arrow that reinforces the shaft and connects to the point or head. This was done exactly as the nocks above but instead of drilling and cutting a slit, they are tapered to match the heads they are to be attached to.
Bodkin, foot, and sinew reinforcement.
As for points, I chose some traditional bodkins since they are good looking and very efficient. Many cultures came up with this essential design. These are English copies and are known to punch through heavy armor. They are surprisingly sharp and tear through most targets easily.
Bodkins test fitted. The joint at the wooden “foot” is reinforced with sinew.
For the photo, I dropped these from about six inches above and they all stuck in the oak. I should mention that these points haven’t had the final fitting yet and are just stuck on by friction. If you look closely in this photo, the ferrules don’t quite fit the foreshafts yet.
First four finished.
Arrows are difficult to photograph so I took this high oblique shot to show them as nearly done. I hope these images help a fledgling fletcher somewhere as it isn’t an easy task. Be patient, don’t lose hope, and be consistent. Good things take time and it really shows in their performance and longevity.
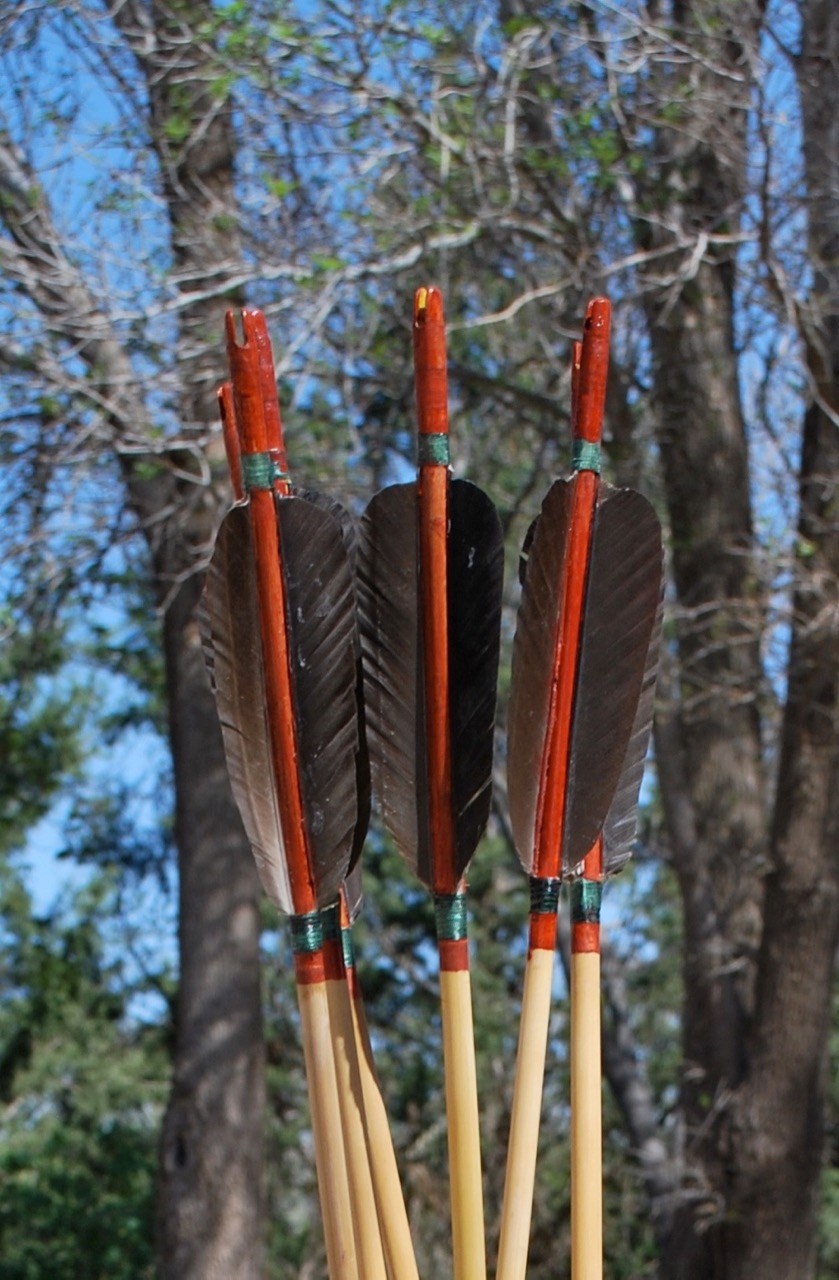
A bit of red ochre paint completes the set.
I marked my shafts with a little ochre paint made with a base of boiled linseed oil with a drop of turpentine and ground pigment. I love the natural look of ochre and enjoy knowing I found and ground the pigment myself.
These remarkably fast and true arrows suit my bow very well. A little luck, experience, and patience pay off big rewards in the end.
Every woman, high or low, ought to know how to make bread. If she do not, she is unworthy of trust and confidence; and, indeed, a mere burden upon the community. –William Cobbett
Today this should probably read “Every homemaker” instead of “Every woman” but, as Cobbett composed this treatise in 1821, he assumed that the home and cooking were the domain of the women and the men were to labor outside the home.
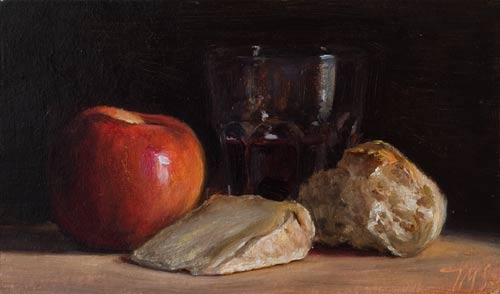
Bread
I have a mixed relationship with bread. I love to make it and eat it, and have for many years, yet I don’t eat a lot of it as it seems to easily fatten me up and doesn’t always sit well in my gut; the same reasons I rarely drink beer these days. However, I am very aware that bread, in one form or another, has been a staple in the Western World for millennia and should not be overlooked so I occasionally dive in and start making bread regularly again. I can’t stand the modern garbage marketed as “bread” as it barely resembles the greatness of a real, leavened or fermented loaf.
By the early 19th century, big business was already encouraging families to buy bread instead of bake at home and there can be some sense in this, especially in the city (fuel cost for cooking, the efficiency of oven sharing, etc.). Cobbett thought this purchase instead of make mentality was one of the many atrocities that kept laboring families unnecessarily poor. Foolish practices that kept the poor from ever improving their lot was a major theme of his life and we can learn from this.
I love these the old sheepherder camps. I’ve seen quite a few parked on ranches from Colorado to Idaho and even a few in Arizona. I know they aren’t highway capable but it seems they could provide a real housing alternative for low-income minimalists who have access to land. Far better than a housing complex or apartment for sure if you can deal with a small footprint.
Originally designed on a narrow wagon box, the builders took advantage of every square inch of space. Since weight wasn’t really an issue, many have large stoves like the one above for heating and cooking. As most of these wagons were homes for ranch workers in the western U.S., they needed to be prepared for extreme cold and windy environments. When I was building my vardo, I took a fair amount of design inspiration from these wagons, adding their vibe to the more European designs I was ingesting. My stove is small and I envy this one above; at least the cook top.
Off-the-shelf or build it yourself? It’s the details of hand-built structures that make them stand out and this chimney cap is no exception. This looks far more interesting to me than the local hardware store option.
The photos are from Ken Griswold’s Tiny House Blog. If you haven’t figured it out yet, I’ve been a fan of his site for a long time now and recommend it for anyone with an interest in Tiny Homes. Here’s a link to the full article about Lorna’s wagon.
Several years ago, I made a shoulder bag that I still often carry today. It is the perfect size for a small field bag or hunting pouch. It was a lot fun looking at various designs, mostly from the 18th century to try and come up with something that would fit my needs.
My bag, several years and many miles later.
When I first joined Boy Scouts at about age eleven, I envisioned myself as a mountain man-explorer who was going to learn to live off the land. The first merit badge book I bought with my little money was Wilderness Survival and it spoke of the possibles bag that early explorers carried that kept everything they needed to live off the land and cover every emergency. At least, that’s how I remember it. Later, as a an actual wilderness explorer, traveler, and archaeologist, I learned to appreciate the “kit” bag on a more realistic level, and how this bag transforms for different purposes and places one travels. It is the unsealed* survival kit to be used and replenished as needed based on the situation. My current favorites, though too big for general daily wear, are the Mountainsmith Approach pack and my Filson Medium Field Bag. I can live out of either almost indefinitely and both make handsome weekender bags.
On to the Shoulder Bag
After much deliberation and review of mostly 18th century gear I decided I wanted a small outside pocket, a small inside pocket, a larger, closable outside pocket for important things like a compass, and main compartment large enough to hold a notebook and daily essentials. I decided to make the main flap in a stitched-down style so that it would keep things in, even if it wasn’t buckled shut.
In the end, I went with a fairly standard English-American shooting bag style as seen above. It works well for me and after using it for several years now, I don’t believe I would change anything about it.
Large external pocket with button.
Outside open-top pocket
Closed for travel.
Dimensions: the body of the bag is 9 x 10″ with a gusset exposed at 1″. Reinforced ears, riveted for strength. All stitching is two needle saddle stitch, except the body, which is laced. Three pockets, and a 1 1/4″ shoulder strap, adjustable by about 12″.
All the parts of the body except the main gusset.
When laying out a complex sewing project like this, you need to decide in what order to begin the assembly. The back wall of the bag has an internal and external pocket that were sewn down first (beginning with the smaller one inside).
Outer pocket attached.
The outer pocket has a gusset that was sewn inside-out before being sewn down to the front wall of the bag. You’ll probably notice that the edges of the flaps are raw but if I were using thinner leather I would bind them with a soft buckskin or something similar. The raw edges were smoothed and burnished to create a nicer look than just a sharp cut edge.
The assembled bag.
Finished! It’s hard to gauge work time but since that is generally the first thing anyone asks I will estimate about eight hours of stitching and assembly for this project. There is one inside patch pocket, an outside rear pocket, and a gusseted pocket under the flap. Eleven pieces plus the strap (four pieces). Hardware includes a one inch bridle buckle, a 5/8″ buckle, and two solid one inch “D” rings.
The back-side with simple pocket.
Internal pocket just showing.
Now, what to keep in it…
*The modern sealed survival kit was developed for conscripted soldiers and airmen to keep them from rifling through and using up the goods and having nothing when they truly need it. This has carried over into survival-skills-for-morons programs world-wide and creates a product to be sold and consumed by the inept. If you cannot trust yourself to update, change, use, and modify the contents of your personal survival kit, by all means make or buy one and seal it up, awaiting the day it will come in handy. If nothing else, you can enjoy all the surprises you will find while you wait for someone to rescue you. ~GTC


")


")

