

Part 1 – An Overview of the Vardo, Originally Published
January 2010 (Updated August 2015)
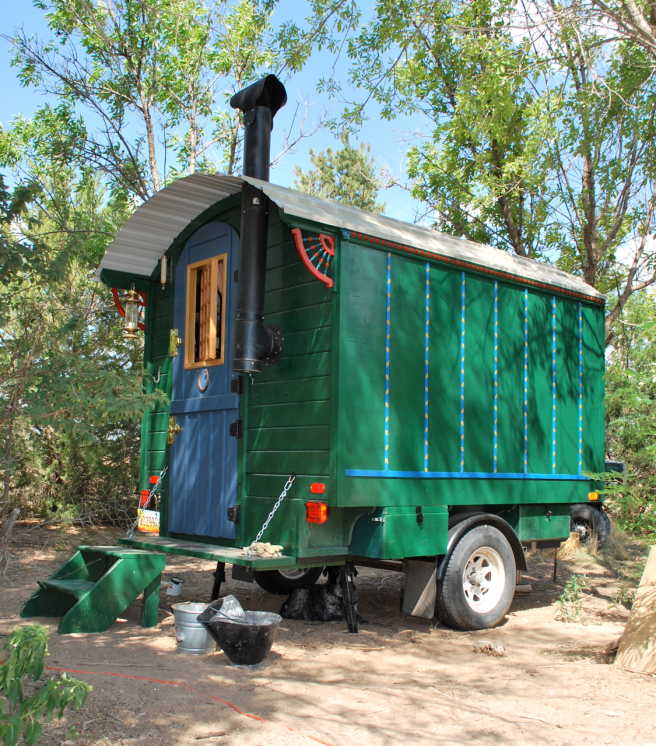
First Iteration of the Vardo. No kitchen box and plywood sides.


Things were still changing at this point but we were settling into some finality. It takes some living in and thought to figure out what works and what doesn’t in a tiny space; especially when it’s shared.

The following pages chronicle the build from beginning to almost the final condition (before the complete tear-down and overhaul). The original build is is also detailed here with descriptions and lots of questions & answers on the Instructables website.
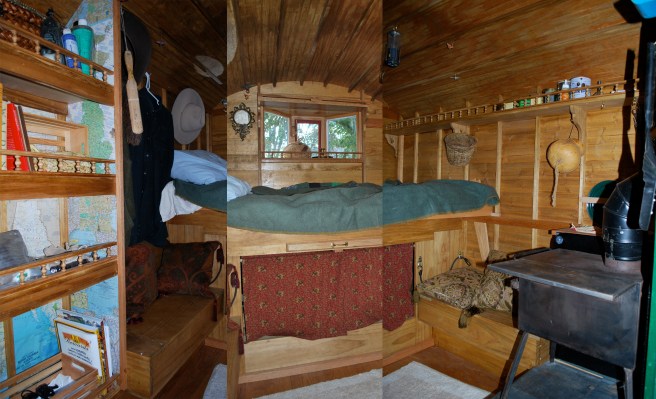
Here’s a panorama mosaic of the inside from the doorway. Its difficult to get a good perspective through the camera lens.

Click the image above or HERE to go to the next page on how the Vardo came to be.
If you are seeking the Instructables Page on how to build the Vardo, then look here: http://www.instructables.com/id/Building-a-Gypsy-Wagon/
вардо vardo wagon waggon gypsy reading wagon ledge wagon bowtop traveller
nomad traveler paleotool Schäferwagen

Very cool! I can’t wait to see more pictures!
I know you are in New Mexico and I am in Colorado, but I was just wondering about how you go about registering one of these to be legal on the road. Do you wait until it is completed or before you start to build?
Thanks. I appreciate it.
Tim McDonald
I would check with your DMV. I suspect our states are very different. And build it well.
I recently got a home made trailer registered here in the Northwest. I took the trailer to an inspection station after first having obtained a legal certificate of empty weight. The concern (at least with homemade trailers) is properly attached safety chains and lights. They took some measurements and stamped a vin number on the frame.
I asked about camper conversions (which I’m currently doing), and was told “no problem.” Just make an appointment, get it weighed, and bring it in. The DOT, according to fair-use tax laws, just wants its money. In the Northwest, you pay according to what you weigh (probably the same everywhere).
It is kind of nerve wracking though–to do all that work and then be told to never ever put that @#% on the highway. That would sure be the rough end of the pineapple.
That is similar to us here in NM. They wanted good lights, chains, etc. Mine had a VIN and when I asked about the conversion, the person (the Director of our branch) didn’t think it really would be an “RV” without plumbing, heat, electric lighting, etc. and could just be looked at as an odd cargo trailer. I was told to have it re-weighed when done as my fee will go up but haven’t made it there yet.
If you have a registered trailer, you can build the vardo separately and bolt it through the floor to steel plates on the trailer. Then it can pass as a “load” instead of having to get the whole gypsy vardo registered.
tim if you check the vardo started out as a box trailer, there for it has a vin number on the frame….. no registering needed just org. tittle!
Wow, this is so cool. I live in Southern Colorado, and want to learn to build these.
My life mission is to live a permaculture pilgrimage. Eventually I want to live in a donkey or other draft animal drawn vardo, and grow a food forest around me wherever I am.
Excuse me if I missed th e link, extremely slow internet. Do you know of any instructables to build a vardo on something like a garden cart, to be pulled by a dog or goat, for practice?
Thank you for sharing your interesting creations on your awesome website.
My website is http://www.stewardshippermaculturepilgrimage.WordPress.com if you want to check it out.
Thanks!
Look at Conestoga homeless housing.
I built a Gypsy vardo woth Canvas top. Using cattle panels for grid. Weighs less than 800 lbs, can be towed with 4 cyl. Car and could be pulled with horse. I take canvas off frame
Sounds nice Melanie. Pictures?
Lovely to see someone building w/o OSB etc.
Looking forward to seeing your progress on this!
Thanks for noticing. I am trying to keep it fairly traditional but reinforced enough for highway travel. Plywood is limited to the roof and sub-floor.
Really liked both builds.do you have any drawn plans for the matching truck camper? Would love to see them.it seems very safe from high winds&tree branches,thanks for sharing mary
Nice work! Looking great, looking forward to seeing how the Vardo turns out. An idea for you~ the space under the ledges could be used for additional outside storage by constructing boxes under there. Just a thought. Enjoy the building!
Lauren
Definitely! I intend to have boxes on all four sides. The ledges will be a great space for a tool/pan box and probably a battery if I put a solar panel on the roof.
There will be a shallow cooking box outside, next to the door with a fold down table, and a small box on the tongue side for dutch oven and large coking gear.
love the vardo. looking forward to seeing the pics on how you will handle the roof. -billS
Thanks. I can’t wait to see what I do too! I’ll post it as I figure it out.
Love this!!! More pics please!
The roof is looking great. I’ll try to keep checking back but if I get distracted be sure and let me know when it is completed and I’ll do another feature on the blog.
Great Vardo, I’ve been watching your build, it looks fantastic. I was thinking of building a bow top vardo but your’s looks so much better. I think I could build one just based on your photos, but I’m having trouble guesstimating a couple of the measurements.
Would you be willing to share –
What are the floor measurements:
The end height, from floor to top of arch:
What thickness T&G are you using for the planking:
Are you going to paint or stain it afterwards? Good luck with the rest of the build.
Eda
Thanks for the interest. I can put some fairly exact measurements up but I’m not home currently. Floor 96″ x 56″ (I think). Side wall (on top of 11″ ledge) is about 60″. Ends are 3/4″ t&g yellow pine sides are pine paneling t&g glued and battened at 12″ intervals. I’ll get the rest out soon. I would like the look of stain and varnish but I think I will paint it for easier maintenance. Inside will be oiled natural.
Thanks so much for the information, I really appreciate it. Your vardo looks great! Can’t wait to see how you’ll paint it.
Eda
Great Work! I’m inspired. I want to build one now. I’ll keep checking back on your progress.
is that a 4×8 trailer .turned in to a 6×8…did you use 2×4 or 2×2 for frame and is that 1/8 plywood for the sides or planks ,,,what kind of door are you going to put in …I have a 4×8 turned into 6×8 the bottem is metal but Iam going to make the top out of wood…when it warms up..hope to see more picture
It was a 4″8″ x 6′ trailer that was purpose built for carrying scuba gear at a research center. The overhang is essentially cantilevered by the wagon box, primarily supported by the vertical sides and framing. I did fill the underside of the 2′ overhang with 2 x 4 in order to have better fastening for the floor.
The ONLY plywood is the roof and sub-floor.
I have a similar trailer (it’s for hauling a golf cart I do not have) and am watching your progress carefully!
I am at a stand still also …my son has kidnapped my wagon said I didnt know what I was doing …your wagon is what I dreamed of right down to the door on the side instead of center ( son said it couldnt be done ) …I know this is a lot to ask do you have blueprints for sale …how long did it take ..or even a material list would help ..and how did you tag it ..THANKS
oh yeah how tall is your wagon from ground to top and how tall inside
I will put up sketches when I get time. I drafted it many times and build a number of scale models to get it right. Also, I read a lot and looked at old (and a few new) wagons. The roof peak is about eight feet from the ground and it is about seven feet tall inside.
The ledge is 11″ high, side walls 56″ making it about 5 1/2′ at the “shoulder”. Then the arc of the roof was scribed at 62″ to get the proportion right. I was hugely concerned with weight but so far that isn’t a problem at all. I can wheel it around my gravel driveway without much difficulty.
It is attached to the frame by carriage bolts and also with “hurricane” type steel straps that wrap under the frame and are bolted to the ledge. I still doubt it would survive a serious wreck but I hope I never have to test it.
Hello,
Outstanding work, I will likely be replicating this design this summer instead of a Tumbleweed home. Should be towable by car even (only concern is the tongue weight).
Is there any possibility to show where the carriage bolts and “hurricane” steel straps are located on your Vardo? I saw what looks like two hurricane straps on each side close to the tongue of the trailer, but that’s all I can see from the current pictures. And possibly the carriage bolts are were screwed into the frame of the trailer and underside of the Vardo before the plywood floors were put in.
Thanks,
Vinson
I’m not in a position to get photos right now but I don’t know that they apply to you since you will have a different trailer. I have bolts through the plywood floor and frame to the trailer frame itself and straps scattered around. I have felt this might be my weakness as a wreck would really stress the thing into a mess and my future might hold a few welded square stock bars that run full height and a couple more angles throughout.
that is one smart looking door!
WOW this is exactly what I want to build! You are such an inspiration and I will be watching your progress daily. What do you think of a fiberglass translucent roof? I want to use mine for vending purposes and need the extra light.I think the 5×6 should be big enough. Thank you also for sharing your measurements. Sell the plans? Love to buy.
I will gladly put up the basic plans once it is done. Use them as you want and good luck. The overall footprint is about 6’1″ x 8′ not 5′ x 6′. That is the frame size.
WOW!
I just hope mine comes out this good.
Really good job. Looks fabulous. It shows that you put a lot of thought into your wagon. Thanks for sharing your information. You are now an official vardoshavora!
As a fellow builder… excellent work! My next one will be of similar construction design, but a bowtop instead of a ledge. Keep the photos coming!
Thanks Scott,
I was glad to look your photos over too. Your construction is very large and solid-looking. Also, mine is a bit smaller space, taking some ideas from the sheep herder style wagons. Yours is looking very livable. We just took our out for a week of camping in the desert and it gave me a lot of ideas for finishing the interior. Getting to know what you need and how to use the space is critical in such a small living wagon.
what state are you located…if you dont mind…
New Mexico… and you?
Mo.
Really nice. I like your light weight design. I am in the planing stage and your site is very helpful, nice to see we share some of the same ideas and great to see how you have solved problem areas that have consumed my design dreaming. We drive four to five hours to the Oregon coast for our favorite camping spots. At first I considered building a Teardrop, but my wife wants to stand up inside and have a bed that you don’t have to break down the table to use. However, I have had trailers that towed like a bricks. In your first camping trip how did our rig tow at highway speeds? Can’t wait to see your final roofing. Good Luck.
Thanks for the comments. It tows a lot better than a heavy tandem work trailer. The only time it was a struggle was going over mountains into the wind. I drive a manual F-150 with a 300 six cylinder. Not a real towing machine. The flat front of the vardo is its only real flaw, giving loads of room inside and a huge amount of wind resistance. All in all, I am very happy with the decision to go with the old fashion design. I should note that despite heavy winds during the maiden voyage, I never felt it pull side to side. This is probably due to the wheels near the center of gravity and the relative light weight as compared to the truck. I will be very interested to weigh it when it is done.
just purchased a 1954 pierce sheep wagon. I don’t know a whole lot about it yet but am anxious to learn more. There are two plaques on the wagon, one inside and one on the back outside they both are printed with the 1954 pierce,wyoming. It’s in pretty decent shape and can’t wait to get started on cleaning in up,or out. It’s been placed on an old 45 packer frame for mobility. I am very happy to see so many sites on the internet to help me out with the originality factor of these wagons and hope to find out more. Enjoyed your site very much. Your an exceptional craftsman. If anyone knows anything about this particular wagon I just purchased I would love to hear your comments or suggestions. Happy Trails!
I refurbished a sheep wagon and absolutely love it. I use it as a guest bedroom and also take it to the mountains camping during the summer.
Jane O
You’re such an inspiration. Thank you so much for all the photos and details of your build. You’re finishing is fantastic, can’t wait to see more.
I just purchased a used utility trailer to build my own Vardo based on your design. I’m in the process now of prepping all my T&G (base & 2 coats paint for exterior, 2 coats varathane interior). I’ve learned to do all the finishing on T&G before installing, makes for a nicer finished product.
And I picked up some great used doorlites to make into windows (a cheap way to get tempered glass).
I’m thinking of doing a canvas roof (canvas over roofing felt over wood base) and sealing it with acrylic. What are you using for your?
I’ll keep in touch on my build, hope to have the Vardo done for camping this summer. Regards, Eda
Thanks for the comments. It sounds like you are going to make a beautiful wagon. Finishing before installation is very smart. I just needed to see it before I decided on paint or varnish or even just linseed oil. This whole thing has been a big experiment despite the years of reading and planning. I had put a roof on quickly for a trip in February so it is 30# felt covered in very good waterproofed canvas. It will have epoxy coated steel over all this but I have been slow getting it on. I am currently tinkering inside and thinking about what I really want inside. Shelves and hooks are very key.
I would love to see pictures fo your build and if you don’t have anywhere to post them you can put some up here.
Where in the world are you doing this?
I’m in Victoria on Vancouver Island. I belong to the Society of Creative Anachronism (SCA) and a Vardo would be great for medieval camping re-enactments.
Eda
Eda,
That sounds fun. Put it up on old timey wheels and it could easily be an ancient wagon. I have seen many fine SCA craftsmen and some very nice work.
What materials went into the roof?
Thanks! It looks great.
-Dave
The roof is 1/4″ plywood laid over poplar purlins. The wood is covered with 30# roofing felt, then a heavyweight waterproof canvas. That proved to be very water-tight and traveled briefly that way. For long-term durability and to help reflect the sun this is all topped with a low-profile corrugated epoxy-coated steel.
Thanks!
Is the plywood some sort of siding, like t1-11 or similar?
I like the t&g look of the ceiling from the inside.
It is some kind of beaded paneling for interior use. I just liked the look and thought it would make a nice ceiling (and sealing) for a roof.
Very cool, Fun to see what others have built. If I ever get around to it I might post photos of my waggon. Its built on a 14×6′ steering axle all aluminum trailer.
I am a better electrician than carpenter, While its not an example of fine carpentry( it was never meant to be, Just decent craftsmanship..) throughout yet the waggon is very striking.
Its a “Reading” style with its splayed out walls, What serves an excellent job to keep the water dripping off the EPDM sheeting roof and not constantly running down the walls. The walls will still get wet, but just keeping the water not running down the walls makes a huge difference keeping the paint & woodwork in good shape.
Dozens of other clever features, But will save that for my own web-site & story line…
Kind Regards,
H.A.
Still at a stand still on mine but maybe this is a good thing now that yours is done I know what I want thanks for the great pictures …maybe with all these fans you have you can get us all together when we get ours done all meet in a center place for one of a great wk end …Melba
I was just through MO last week, staying in Columbia. Had several great conversations with people that always started with “hey wow, did you build that?”.
Looking absolutely fabulous..just love the interior and am totally inspired to get mine off the ground (or, on the ground). I was wondering if you could post some detail on the fire place? It seems too that on the stack (looking at it from the outside) comes out to a tee fitting, the bottom of which doesn’t appear to be connected to anything. Is this a cleanout? Just curious.
Mick
Thanks Mick,
The stove exits through a thimble (around which I will replace with metal soon), and into a T fitting like on a house. This lets you see up into the chimney and acts as a cleanout as you said. There is a cap on the bottom. I look forward to seeing yours up and running.
Well…….to date i have so far acquired a second trailer to use in replacement of my really nice one. I just need to get it registered and titled which first involves getting a certificate of dry weight, followed by a trip to the state police dept for a “once over.”
I’ll let you know how that works out.
Mick
I just love it! I am trying to do my early 50’s Shasta trailer (12′) Already got the stove installed. I just love your’s . Looks like Utah in the background of your pic. We live in the 4 corners area
That’s Northern New Mexico (my state).
Love the door-love the door- Love the color of the door!
Thanks. The color is the cheap barn red. I wasn’t sure about the color at first but it works well. I just had some very good Valspar paint mixed in the same color and it should be harder-wearing.
Thank you for your lovely site and great pic’s of the build! I’m in the process of planning a vardo, planning a price list, checking for the area Habitat for Humanity ReStore and looking for a flat trailer to start with. I want to go camping and SCA’ing but the commercial travel trailers are too big, too expensive and I feel like I would be taking a hotel room along, so you are so right that a vardo is the way to go. Yes, I want a base for my operations not a year round house. I would like to see your plans and will be checking back to see if you post them. And as Green is my favorite color, now I know how mine will turn out, but I’m planning for yellow on the door.
Heather
Somewhere in the Heart of TEXAS
There are some sketches on the Instructables page. If you haven’t looked, this might helped. Since it didn’t have a full-scale plan, the final will actually be reverse-engineered. My only advice is build as strong as you can but as light as you can. Send photos of your build or post them on the web! Everyone needs to see them.
Found them. Thank you! 🙂
First step: Find a trailer.
I’m currently looking online and searching craigslist for any likely trailers.
Heather
Beautiful, beautiful, beautiful!!!!!!
Love your vardo! I do have a question you might be able to help with. I am currently living full time in a similarly sizes trailer and am having major moisture/mold problems. I am thinking about demolishing it and starting over next summer. Any advice would be appreciated. Thanks, Pete.
Peter we have this same problem on board our boat and a small wood (or gas) stove tends to dry the air out and reduce the problem. A cleaner made of oil of cloves to wipe the surfaces helps keep it at bay.
I’ve probably asked you this before, but what are the dimensions of the door? I’m thinking of the dutch style–where the upper half is split.
Mine is 30″ wide by 77″ tall, split at 31″ from the bottom. Like an old-style wagon door, it laps over the threshold for weatherproofing by about an inch and a half.
That weatherproofing is good to know. Kind of hard to retrofit that later on. Thanks.
Wonderful job, thank you so much for sharing it all. Much happiness and God Bless you always in your travels.
I did leave a post just a few days ago after reading your problems with a Home Owners Association. It was about my own solution to the same problem–but then I just found THIS site! Love all the pictures in one place! It really helps to see the progression.
Just a quick note on a detail…I’ve been saving maps for years with the (original) thought of wallpapering a room/den/office. Since tending more toward mobile and tiny houses now, but still loving maps, I didn’t know what to do with them. It looks like you’ve used them, among other places, to line a bookshelf. Brilliant! May I steal your idea?
And a technical question: I’m building a bow top vardo and getting close to doing the cover. Any comments/suggestions on this: 1. cloth over the supports first with the pattern showing on the inside of the vardo for esthetics, 2. a layer of the type of insulation that looks like bubble wrap with reflective foil on it, and finally 3. a topper layer of UV proof, rain proof tarp. Not the traditional building materials but I need functionality too.
Just a note on some confusion. I’m not sure but I believe you mix me up with someone else about the Home Owners Association. I don’t think I’ve ever lived anywhere with one of those.
Just how insulated do you need to be? Will there be a stove? You should look at some of the modern traditional bowtops as there is much wisdom in tradition. It is common to line the bowtop with thin wood up the sides and carpet (facing in) over the top with a canvas skin over the outside. Look at Les Wattam’s photos http://pets.webshots.com/photo/1540856228027148639vgoeJm or all of his beautiful albums here: http://community.webshots.com/user/leswattam. I don’t imagine that a layer of slippery plastic would be very easy to work with and would not provide any structural advantage.
Thanks so much for the reply. The sites you passed on are fantastic!
How insulated does it need to be? As I write this, it is a whopping 9 degrees outside. Daytime temps haven’t been above 22 in weeks and there’s 2 feet on snow on the ground.
The traditional carpet up the sides would be nice. But doesn’t that still leave the top? Yes, I plan to have a small stove but this is my first attempt and if it doesn’t work out for winter time, my NEXT one will!
I suppose I shouldn’t have waited to build my first vardo until I was a 65 yr old grandmother but with the internet help, I CAN do this! Thanks again!
Hell Paletool,
Wow….love your Vardo. Hey I am in NM also…Alamogordo to be exact. very interested in building something like this on my big tex trailer. Wondering if I can ask you some questions about your Vardo. Drop me an email and I can give ya a call sometime if you wouldn’t mind.
Here is a couple photos of my waggon, august’10. It was far enough along that I could use it that weekend but you see it missing alot of finishing work at that time.
Notably the dutchdoor tops. I want an advantage of double doors for the extra width available(4′) if I want to carry a motorbike, snowmobile or whatever inside, But normally the lt. side will be latched, the rt. side will have the doorknob.
The interior fixtures easily removable or fold-away to allow a clear 4×8′ width & length directly in front of the doors.
The lt. side will also have a small oilstove for heating. Unlike your set-up my stove exhaust will exit the lt. side as that places the stovepipe further away from potential damage by roadside treebranches. (I live in USA)
Anyway, much like your waggon, This thing has been bags of fun designing and constructing.
Kind Regards,
H.A.
It looks good and quite roomy. Let us know when you get some interior photos posted.
Very NICE; do you have measurements?
These are copied from previous comments:
“The roof peak is about eight feet from the ground and it is about seven feet tall inside.
The ledge is 11″ high, side walls 56″ making it about 5 1/2′ at the “shoulder”. Then the arc of the roof was scribed at 62″ to get the proportion right. I was hugely concerned with weight but so far that isn’t a problem at all. I can wheel it around my gravel driveway without much difficulty.
It is attached to the frame by carriage bolts and also with “hurricane” type steel straps that wrap under the frame and are bolted to the ledge. I still doubt it would survive a serious wreck but I hope I never have to test it.”
and
“It was a 4″8″ x 6′ trailer that was purpose built for carrying scuba gear at a research center. The overhang is essentially cantilevered by the wagon box, primarily supported by the vertical sides and framing. I did fill the underside of the 2′ overhang with 2 x 4 in order to have better fastening for the floor.
The ONLY plywood is the roof and sub-floor.”
and:
“Floor 96″ x 56″ (I think). Side wall (on top of 11″ ledge) is about 60″. Ends are 3/4″ t&g yellow pine sides are pine paneling t&g glued and battened at 12″ intervals.”
There are some sketch notes uploaded too. Hope that helps.
very nice little vardo, well built and nice looking. Can you tell me what your opinion is about towing capability if it were much bigger and do you think a four wheeler would be even better??
Are you familiar with trailers? Bigger is always more difficult, more gas, bigger tow vehicle, tougher on hills, etc.
My wheels would do well to be further toward the rear as most of the weight should be forward of the axle. By four wheel do you mean a tandem or something more like this http://www.drivehorses.com/shiloh_wagons.htm. Tandems can be quite heavy and my goal is to be light. I would like something like the Shiloh wagon from the link but they may not be as good for high speed towing. It would be great for just rolling around the camp, no jacks required.
I too am very interested in your Vardo. I do hope you make the measurements avialable for those of us who would like to build on for ourselves…..
Well, my vardo build is on….
http://www.mikenchell.com/forums/viewtopic.php?t=43094
Im building it out of red cedar and paulownia wood which is a japanese cedar. Half the weight of oak and nearly as strong. Used for centuries for making everything from boats to furniture to musical instruments.
Its 9 feet long, 5 feet wide and about 4.5′ inside hight. Trying to keep the weight under 700lbs so it wont kill my poor PT Cruiser lol. Im in the SCA a medieval reinactment group so I wanted something that would work with that as opposed to a teardrop trailer. Today and tomorow if the weather holds I want to start my roof. All tongue and groove paulownia, covered with a layer of foam, then a vinyl coated aluminum. Im curious about your roof. What is the top metal?
thanks
deryk
The outer skin on my roof is a low profile corrugated steel. Factory coated with epoxy paint. My local lumber dealer ordered it from a supplier in utah. They understandably don’t really like such small orders. The metal is thicker and harder than the cheaper stuff from the box stores and has much smaller ridges. It comes in about 30 colors I think. (mine is call “hickory” or in normal language “very light gray”).
Good luck.
PS. I just went to look at your build. Looks good so far.
Thanks. Ive got the wooden roof on today. Pretty soon time to paint and start enjoying it lol. Im going tohave to check out a place my friend recomended and see what they can get for roofing. You wouldnt have a brand name for it would you? I was doin some google searches…I would love a copper roof, but thats a little out of my price range lol. Maybe the one that I will live in I could do that … also when I have a high paying job lol.
Tomorrow Im taking her to get weighed if the weather is decent. I just want to get an idea since my max towing is 1000lbs. The trailer is typically 250lbs but i didnt add the folding mechanism and the roller wheels for when its folded to put it away. So Im guessin I saved 20lbs. Maybe another 300lbs in wood…Im guessin around 600lbs…we shall see.
I think the brand was Fabral. I would have liked copper too but of course a bit too expensive.
Thanks. I took it and got it weighed yesterday I was pretty close. With the 2 windows installed temporarily it came in at 620 lbs. Yeah the copper would look so awesome but just too expensive. Maybe 1 day when I build a standup vardo like yours I will blow the money for it. I found a distributor for the Fabral will contact them to see how much it would run for a 6′ by 10′ size.
thanks again
good
Thank you for taking the time to place such detailed photos online and answer so many questions. If you don’t mind, I’d like to ask you a few more.
1) How many people sleep in the vardo?
2) Where did you get the small stove?
3) Have you gotten a final weight?
Thanks
3) No final weight yet. Maybe I’m just afraid to get it. Actually, I’m reworking the windows, some trim, and adding some weight via wood for reinforcements. This will add up quickly but hopefully will be worthwhile.
2) Three Dog Stove Company. He was great to work with. It was purchased for a tent but decided it would be better in the vardo.
1) So far, only two. it could sleep three comfortably and four or five in a severe weather pinch. I keep a 9 x 9′ canvas wedge tent with a spare 9 x 9′ fly to have room to spread out. It stores under the bottom bunk. With this, I could sleep a whole troupe of circus performers.
Follow-up to the how many can it sleep question: add a few more! I read that with many traditional vardo cultures, the actual vardo was the woman’s domain and the men slept UNDER it! (That would explain why so many of the old ones were full of flowery patterns on the bedding, etc.)
Noted you kept the traditional bay-style window that supposedly enabled a better view of the horses, etc. that would be tied up near-by. It must give it a sense of bigger space for you.
Can’t wait to read of on-the-road adventures!
Agreed. Everything I have read about pre-war culture of the vardos in Europe describe everyone, with the occasional exception of the very young, sleeping outdoors on the ground. It would be very confining to be in the wagon too much. In bad weather, I seem to remember reading about 14 people in a wagon not much bigger than mine. There is also a good sheep herder article in an old Mother Earth News describing growing up in a small wagon with two adults and several children. The kids were booted out the door as soon as they were awake.
Thankyou for your hard work… I purchased a pop up caravan that was only worth it for the chasis for the purpose of building another pop top. I was excited while researching for Ideas and knowledge to find your Vardo, and am now going to do something very much along those lines… however as I work in metal am going to be using aluminium to achieve the structure with marine grade ply as I live in the semi tropics and everything goes mouldy.
Thankyou for some much needed inspiration!
Thanks for the comment! It is good that there are more and more inspiring projects like this out there on the web. Just two or three years ago it was very scarce. I think we all inspire each other. Good luck with the build. Hope to see photos.
love the job you did! Looking to keep camping “primitive” but comfy for wife and i and this would be perfect! I would love to see the plans, etc for this when they are up! If you could shoot me an e-mail that would be great! Adam
What a great Vardo. Did you remove the canvas before putting the metal roofing on? I have a bowtop that is canvas covered. I want to put a permanent roof over it. I don’t feel the metal roofing will add that much weight. Any thoughts?
Thanks Vardotraveller.
Wow. Now that is just awesome! Very cool. I wish I had the use for one. Maybe someday, when the kids are in college! Thanks for sharing.
very good
tebrik ederim
The Vardo is beautiful one day!!! But I am getting a 4 dog stove and I have a question. The stove pipe, did you get it from 4 dog? I didn’t see the configuration you have on their site. And what size is the pipe.
Thank you Victoria
I went with a pipe expansion to 6″ from the stove. As it is readily available at most hardware stores it will be easy to repair that way.
Thanks for answering. But I have a couple of other questions. How did you seal the hole going thru the roof? And is your pipe the insulated piping? I’m receiving my stove in a couple of days and installing it on a porch with a galvanized roof. I’ve looked and questioned many on this and I know it can be done simpler then most say to do it. Any help you could give me I’d appreciate.
Victoria
I avoided any holes in my roof. Mine goes through the back wall with a pipe thimble. You can get various types where you get your chimney pipe. It does run up through the overhanging roof but since it’s outside it doesn’t need to be water tight. There are insulated pipes with some kind of gasket to prevent leaks but they are beyond my knowledge.
man this is a cool little wagon…absolutely love it….my daughter said I got to build one for her but she wants more windows….
check out this cool Lil’camper this is the coolest thing
😀
Was great meeting you at WC. This is Jim, the Canadian guy. Thanks a lot for letting me check out your rig…. still real inspired to get my own on the go. Any weights yet? (Yep, gonna keep bugging you till I get one!) Take it easy.
Don’t hold your breath for the weight! Build it, then weigh it Jim! Send photos too. Great to talk to you and hope to meet up again in the future.
Impressive!
Can you comment on the total cost of the build?
Thx !
Thanks! I think I put some numbers down here somewhere or over on Instructables. Essentially, I spent about $500 for the used trailer and approximately $2000 for everything else.
Hi I have enjoyed your website. I live on Sunray Kelley’s homestead. It is nice to see others build wonderful gypsy wagons. I just started a blog and hope I can add you. 😉 http://yurtsandthings.wordpress.com
That’s awesome. He builds such cool stuff. I’d be honored to be part of your blog.
i love your woodworking..the wood is beautiful and the window is so well made and clever …I never saw one like it….I am going to make a window in my guest room like it….it will remind me of the vardo and traveling…thank you gerrie
The Vardo is beautiful, just had to let you know I am greatly inspired by your project and craftsmanship.
I can’t remember what brought me to your site but as I followed the construction the old mind just kept turning. A great project, I may not be quite as innovative as you are, but I have learned how to use tools and attain some consistency in measurements.
We have just purchased a 21.2 acre farm with an old Florida Cracker House built in 1886, the concrete block barn we have converted into a workshop, a long time dream of mine that is just about finished. I will retire in two months and move up to the property.
I have to build one of these, it’s perfect, I plan on having a few Gulf Coast Sheep for milk, wool and demonstrations. I spin, felt, weave, and knit; I enjoy doing historical interpretation and teaching these skills to others. I have also acquired a few other skills along the way, the short list is playing and building musical instruments, blacksmithing, refractory work, machining, woodwork, pottery, leather work, and the cross over arts associated with these basic skills. It excites me that so many of the crafts I’ve practiced could be utilized in a project like this.
Mike in Homestead
I’ve been studying your build for some time now. What a great job you did. Had been looking for a trailer and thought I finally found one and bought it, only to realize I paid too much and didn’t get what I should have. It was originally a 6′ x 10 flat bed with 2 x 8 boards for bed (I removed those yesterday to save on weight). It has the little tiny wheels on it that are only good to 1,045 lbs, so I must build xtremely lite, and cheaply cause I paid WAY too much (he saw me coming!) Unfortunately the original owner welded on 18″ high rails. In order to follow your plan (which I must do, I’m a woman with very, very limited skill and no male help available, but I AM DETERMINED because I will need to live in this for about a year while I build an earthbag home), should I break out the hacksaw and take off those rails or just modify your 11″ to 18″ and bolt on to them? I’m thinking cut them off because of weight. When I finish this I will only drive it one time to property which will be 20-30 miles away from build. I live in mountians of AZ and we’ve been known to get several feet of snow at once, do you think your roof design would accomodate that kind of load? Looks like next winter I will have to head for the desert to stay with friends as I’m not going to have time this summer to get the vardo and bag house completed since I have no help. If you can’t get back to me in 24 hours those baby’s (rails) are gone! Thank you so much.
karin
Karin,
First of all… Male help doesn’t equal good help although in our world males are a little more likely to have picked up some building skills. I CANNOT imagine you can keep it (with anything at all inside) under 1,000 pounds. Did you buy the trailer from a dealer? If so, take it back. Use words like “fraud” to get his attention. If not, can you beef it up a little? Better wheels, etc.? I just don’t think this will work at that weight limit. You don’t want to build something then have it ruined trying to move it.
Anyway, drive very slowly if you get it built.
As for my roof, it will support a LOT of weight. It flexes with me on it and I don’t recommend walking around up there but it can certainly handle a couple hundred pounds in a small area. Snow is no problem.
Anyway, did you happen to see Jack’s Vardo we made last summer?
If the hot link doesn’t work, paste this: https://paleotool.com/2011/08/21/quick-and-dirty/ He used the side rails for strength and I think it’s a good idea. How much can they weigh? You can probably calculate it by finding the weight of similar stock per linear foot.
Let me know what you do. Send photos.
George
thanks George for the quick response. No, I can’t take it back, but I could either spend a couple hundred on better tires, install some brakes on it and try and put in new springs myself (that should be fun). OR, how about I just rough it together (the shell) with only basics of bed and an area to receive the woodstove and finish it off out on the building site? I bought it from individual so I’m stuck with it. Thanks for the link to the quick and dirty. I think I should shoot for something simple like that to keep weight down. Only reason I was shooting to make this thing out to 8′ was I’m in need of 4th back surgery and need a bed that I can hang my feet over. I could consruct a fold up bed on one of the long walls and just build within the 6′ x 10′ area. I do have some building experience, built 4 homes with my dad 30-40 years ago and spent a decade building rustic furniture. I know I can do this, it will just take me longer than a knowledgable and healthy person. Guess I need to make a new parts list. thanks again. karin
That sounds more positive. Jack’s wagon from the “quick and dirty” post came out beautifully. There are a couple photos here: https://paleotool.com/2012/02/22/more-vardos/ but I didn’t think to shoot any inside.
I wouldn’t even consider putting in springs myself. Good luck!
It’s AMAZING! Congratulations on your Road to the Maker Faire win. I have always loved gypsy caravans (perhaps from a childhood reading Roald Dahl) but thought they were only to be had in the UK. I’m a maker at the Faire too and hope to get a chance to see your wonderful creation. Cheers! Sonya
Hope to see you at the Faire!
Well, starting the leap (fall?)…. helped a friend fall and mill up a standing dead Western Red Cedar, mainly into the tapered ship-lap planks for the exterior, ought to be full cured in the next month…. bought old flat deck trailer, built from tent trailer, 6’8″ by 12′, think I’ll be lopping off 2’…. it ought to be … interesting if nothing else…. thinking also going to switch out axle, as just has the little 12″ tires, so wanting to up this to 15″ at least… quite the process this moving home building business…
Great to meet you and see your wonderful vardo at Maker Faire. I’ve been thinking of building one for awhile and am going for it. In case you missed it, there’s some photos of our remodeled 1951 Silver Streak aluminum trailer on our website http://bluelotusproject.net. Also found some photos of an interesting vardo used by a musician couple at billyandgracetea.com. Thanks so much for your generosity in documenting and sharing your build.
Likewise, it was a pleasure to speak with you. I just looked at your vintage trailer and love it. What a massive undertaking! The Faire was truly awesome. Wish I had more time to get out and see all the great stuff.
Hi I am an english gypsy and I live in a bowtop wagon in Swadlincote, Derbyshire, England. The wagon you built is brilliant and it would be great to see more pictures of it. You made a great job of it mate, well done…
Thanks so much. I would love to see yours as well. What photos should I take? Interior?
Paleotool –
Great job. I see you helped make a 10 foot long one also. Do you have any thoughts on making one 12 feet long? Or on a 6 foot wide trailer vs a 5 foot wide one?
Thanks – Dave
You are the most talented person I have ever seen!….Fantastic work on all of your projects!!…
Wow, that’s quite a compliment. Thanks!
Awesome creativity/craftsmanship throughout your ventures. I noticed (from the instructables website) that you were possibly going to come up with some line drawings of your Vardo for a small fee. Any chance they are available yet? Keep up the good work!
hey that was koool have u thought bout adding some solar power for so u can watch tv or a toaster hmmmm……
I have a small solar panel for emergency recharging that I keep tucked away. I doubt I would use it for a tv or toaster though. I use some LED lights that need a battery recharge and keep the cell phone recharged as well.
Love your trailer ❤ Thank you so much for posting the pictures and information.
Anything that heats uses too much power. LED lights – great. I was going to have little fans for cooling, but ddn't.
Here's a link to construction pictures of my little truck camper. I couldn't take interior pictures as I am sensitive to chemicals causing neuron damage. Just got it usuable in time.
http://www.dekatodesigns.net/camper/camperConstructionPhotos.php
or ib FaceBook https://www.facebook.com/media/set/?set=a.10200312686364846.199313.1384695731&type=3
GREAT CRAFTSMANSHIP! I am starting my Vardo next week and have a question about your pull out table. Is the leg attached with a hinge? What is the height of the table from the floor? The height of the benches? and lastly, the height to the master bed? I ask because I’m doing a very similar design (many thanks to you!) but it seems that to get a lower bed that it puts the height of the table a bit high for comfort.
MANY THANKS!
Maliaki
Thanks Maliaki. The seats are 15″, the table 30.5″, and the upper bunk 36″. When we began the second vardo for a friend, he wanted the front bunk to be high enough to sit underneath but that made the bed so high it was ridiculous. Not a lot of leeway for bad planning in such a small space. Glad to hear you are diving in!
Thanks so much for all your beautiful work, photographs, and willingness to share! It’s been an incredible delight and inspiration for my personal project. A modern-ish vardo to live in with my lady and pup. I’m building stick 2×2 walls (to fit insulation betwix) and skinning with sheet metal. Just finished a scale cardboard model, got a double axle 7.75’x14.25′ trailer to build it on. Kinda massive, but to live in full time, with capacity to shelter a group on an extended outing. Although I’ve also built portable canopy to do most of our living under.
I really love your roof, but I’m trying to work a shoestring budget. And those Poplar are a pretty penny. A wood I can’t seem to find in my area for less than $1 a foot; could I use fir instead?
PS. My girlfriend saw your trailer at Wintercount, said it looked just as good in person as your photos. Great job! Her friend Canadian Jim recommended I look you up. Although I’ve already been following your fantastic projects!
~Johnny
First of all, thanks for the compliments. Yours sounds great and practical. If you are living in it, remember the roof is pretty important so don’t skimp too much there. That said, I think Douglas Fir should be more than fine for the purlins as it is stiff and strong. If you have a very long run on the ceiling, you can put in an arch and be able to go cheaper on the purlins.
The vardo is what brought me to your blog. It’s amazing!
Thanks!
Inspired by your work. I’m designing thanks to your effort. I love your form factor.
https://www.facebook.com/media/set/?set=a.10151233494937806.522440.786217805&type=1&l=be88456401
Hello George
Seems like a door on the side would allow for more space inside and better use for outside canopy awning and interior wagon kitchen
you know of very good air tight small wood stove (from Canada?) that i may be able to use wonder if you have the name?
hope i get started and really wanted to see one in person. i will probably use soft maple and birch solid wood ..much better with the env. sensitivities.
Marta
Side doors don’t really work with a low, arched roof or bow tops. It turns it into an RV or “canned ham” shape to account for the door height. Maybe the traditional vardo isn’t the right design for you with the side opening. The best little stoves from Canada seem to be the Cod Stoves from BC.
Great work! Its a beautiful trailer. I’m looking at making mine a little longer. I have a 5 x 10 ft. trailer. It has 2 x 6’s and 2 x 8’s for a floor. Think that will be too heavy? One last question: have you created any plans for your Vardo yet, other that the ones on your Instructable page? If so, where can I find them, or how much are you asking for them?
Hey! I’m stripping a trailer chassis right now for a tiny house project. I was thinking about running the tin horizontally like you did. How is that going so far in terms of leaking? I was wondering how well it would work. Did you screw the ridges or the valleys? Was also thinking about doing the pop out greenhouse window like you did on the hitch end to take advantage of that space over the tongue.
Nice work! We have the paleo-tech thing in common, but I don’t recognize you. I’m not good with faces though… or names… or people actually.
I don’t hang out in California much but I’ve met Tamara. I think she was at the Maker Faire but we were far apart in a sea of humanity there. I just returned from Rabbitstick and almost always attend Winter Count but I’m often hiding away teaching classes. Sometimes I make it up to the Bois d’Arc Rendezvous as well. I don’t get into big crowds but I do like the gatherings. I suspect we know some folks in common. Probably a lot. We all separate into our little sub-clans at these things during our social times.
About the roof, no leaks yet and I suspect there won’t be any unless its from high winds during driving. However, the heavy waterproof canvas and roof paper are it’s saving grace. I think of the steel as the weatherproofing to protect it from the sun as much as anything. The screws had to run in the valleys as I needed to hit the purlins for security. They have neoprene washers so they certainly haven’t leaked yet either. The bay window is great! I’ll put up a few photos of a friend’s vardo this week when I get a chance. I’ll check out your info blog soon too. It looks good.
I don’t have much faith in under-layments once a bunch of holes are poked in them. I think that fasteners are a limiting factor on metal roofs though, assuming the metal isn’t shoddy. The good thing is you can always replace/tighten them. I haven’t had much trouble when I’ve screwed the valleys before, but it seems better not to when possible. I think trailers really are extra prone to leakage because they get moved. Flat roofs and a lack or overhang are the real design flaws I see in most trailers. I’m willing to give up two inches of width to gain even just an inch of overhang on each side. A cool idea I had was to make some lightweight overhangs that can either fold down or simply be unbolted and stowed inside when moving. I like my covered space. Also thinking on the idea of a removable deck/porch. I’m sure we do have lot’s of people in common.
I somewhat agree about the holes in the underlayments but having roofed many houses I know that they don’t leak when done right. I also think of my steel layer as the outermost armor in the system, protecting the waterproof layers below, not the way I’d think of it on a house. The neoprene washers do their job well but I have checked them a couple times per year to make sure they haven’t backed out. This has happened on my barns as the wood ages and shrinks. The steel I have on my roof is very heavy gauge. I have considered making some stiff flashes that run up under the edges of the roof to drop the water further from the sides and ends of the wagon. I’ll probably get around to this over the winter. When or if the roof ever needs to be repaired, I will run the front out further and sacrifice the possibility of catching wind for better rain protection. The old 19th century british wagons had a small gutter down each side. I would worry more about snow-melt on the roof but I currently live in a low snow area.
The only water that has ever penetrated the cabin was during a hellacious downpoor/windstorm in SE Arizona. Massive headwind and a highway speed of about 60 made for hurricane conditions on the wagon. Some water was actually forced through the tongue and grove planks on the front and I lost much of my forward paint from the sand in the air. So far, the roof is sound.
Hello Hello Early winter greetings
i am closer to starting to build small one with some similarities with yours weight is big consideration and we are using hardwoods because of the allergies what thickness of wood did you use for siding i am curious how it is holding up with the travel if you are around santa fe give a call 505 995 9699 and 505 982 4575 Sincerely Marta
Front and back walls are 3/4″ and sides are two layers of 1/4″. Lots of vertical reinforcement (every 1 foot or less). She has about 16,000 miles on now and is structurally unchanged. Needs some paint and trim work, especially in front where it gets sandblasted. Haven’t bee to Santa Fe all year as it has been very busy. Hope to hook up with you sometime though. George
george hello
what weight did yours come in at looks like you used steel trailer and the 1/4 inch siding…is that soft hard wood we are thinking of doing lap siding
if this is global warming oh my december in the rockies and 58 degrees
Hope you are having a Wonder full day Marta
Greetings, Your prototype is very inspiring. I have built the frame for my Vardo, 8′ x16′ , mostly out of 1/4 x2″x3″ angle iron. 2 axles, 3500# ea, 4″ drop,electric brakes, all that weighs 1100# +-.$1500. so far. my roof has a 7′ radius, coruggated steel panels,and ,purlins,to hold it up. I am a blacksmith here in richmond ca. i enjoy your archery posts as well. i built a 6′ flat bow recently, and it took a couple of tries. I make arrow heads, out of old 1″ bandsaw blades. they work great! axes and tomahawks are what i enjoy making the most. Today i have a blacksmithing student, so have to warm up the forge. What is the final weight of your Vardo? .My estimated weight will be 3250# empty.
Mine is way lighter than yours as that was the number 1 priority (and yours is twice as long). I have only estimated based on materials but around 1500 lbs empty (which it never is). Archery is my passion for many years and I can hardly imagine not making my own stuff these days. It is counter-intuitive the ancient and familiar nature of the tool. I have a couple art blacksmith friends and I envy their skills. Your art looks great.
Hey Joseph! You’re in my neck of the woods (assuming you haven’t changed cities). I’m bouncing around ideas for building a Vardo myself, and was wondering what registration nightmares California DMV likes to create. What have been your experiences?
Hello George
yours is light with the hardwood i need to use (1/2 inch) mine is estimated at 2800 pounds and i need it lighter
my nephews are coming this winter and i have been doing archery with them for years
we are out of arrows and wonder if we can buy arrows and possibly bow from you
it is winter..whew
sincerely marta
I don’t have anything for sale right now as I don’t make my living from that these days. It takes so much time and the day job keeps me pretty busy. Good luck keeping the weight down as it will make the driving so much better.
I have studied your build from the pictures and the questions on the forum for months now and your build has really inspired me. I picked up a trailer this week. Now wait for weather to coorporate with me. You really did a great job. Can you explain how you sealed the top of the bay window from the elements?
First of all, thanks! The bay was built on the ground and then attached to the front with screws running from the interior. It was a tight fit and was caulked with silicone. Then, 30# felt roof paper was laid over the top from about 2″ up the front wall. Sheet metal (a scrap of old duct work) was laid over the top. Then the joint was sealed again with a piece of aluminum angle iron screwed in. Hope this helps.
Thank you. Yes that helps. I live in Oregon and we get a lot of rain. It would be exposed to it for days at a time. I’m probably going to copy your build to some degree. My trailor is a 6 x 10 with a 3500 lb tortion spring axle. I’m going try to overhang each end to make the final size 8 x 12. Hope I can stay under the weight limit. I finished a tiny house this past August that turned out well tor the novice that I am. Loved building it but the end results were to big for me.
I will probably put a small bow over the top of the bay. Will use your advice on sealing it. Thanks again.
Wow, that is a great project! I would kill for something like that. 🙂
Thanks! and please don’t!
😉
I started the build a couple of weeks ago, give or take a day or so. It has went along smoothly so far. I’d like to send you some pics for some input ( yeas and nays). If you’ll send me an address to chmwash@gmail.com I’ll get them yo you. My sis is working on an album in skydrive with narratives on the pics. I could have her send you the link. You could watch the day to day progress. I posted a comment in Dec. And used your advice on sealing the bay.
Thanks again Hal M.
Beautiful Vardo my family is part Romany and my mother lived in a Vardo as a child. It has always been my ambition to build a modern version that could be pulled behind a car., much thanks for the ideas. Also i do a bit of Archery myself and your bows look great. all the best
Stephen Munn this is my website where i show people how to make sapling bows and Junk bows
Great Vardo my mother family are Romany and she remembers living in a Vardo as a child I hope to build one myself one day. grat Build. i make bows and teach people how to make bows my link is below. all the Best!
Stephen Munn
Hi George,
I was so impressed with your Vardo I decided to build one myself. I hope you’ll forgive my shameful copying of your ideas. I played around with various aspects of the design but in the end I found your layout was hard to beat. I used a 5′ X 10′ trailer so it’s a little longer. I also insulated it throughout, walls and roof. I’d be happy to share pics. Many thanks for the inspiration.
Mark
Thanks, but the real layout was worked out a couple centuries ago. I just manipulated what was around for my use. I’d love to see some photos for sure.
Is there an email address to which to send pictures? Mark
________________________________
Could you let me have an email address so I can send you some pics?
zcoyotez@yahoo.com
I would like to see more about how you made the rails, bed configuration so that it can extend, store stuff, etc. If you get the chance, can you post pics and stuff? That would be great. Love the design. May attempt it myself. I got an old 4×8 landscaping trailer doing nothing at the moment.
There are LOADS of pictures, descriptions, etc. on my page. Not to be a smart aleck but there are many photos and descriptions here and on Instructables.com. Good luck.
I wasn’t meaning to be ungrateful. Your write up was fabulous. It was just you made a point of sayihng that the collapsible/storage bed was a big point for you and I didn’t see much discussion of how you did that. Thanks anyway.
I see. Check out the book English Gypsy Caravans. Mine is essentially like that. Planks that slide over the bed base with storage cubbies. Also, have a look at my friend’s at http://vrdomayneac-trailerbuild.blogspot.com/
Thanks. I appreciate you sharing your design. This other guy also shared his build experience, and it even survived a major accident. http://thevardo.wordpress.com
George,
I have admired your craftsmanship and woodworking skills for some time by pouring over these pics. Thank you for posting and sharing! I’ve made a few teardrops and studied the vardo designs over the years and think the latter is the way to go. In Flagstaff, we have only one intact sheepwagon from the 1890s intact. It’s resting in the parking lot of the Hampton Inn and I often marvel at the workmanship and simplicity.
We have probably stepped on each other’s tracks at Wintercount in the past and I hope to run into you there some time. If you are ever passing through Flagstaff, give a holler or email me at anester@apathways.com
Thanks again,
Tony Nester
Tony,
Thanks a lot. I know we have nearly brushed shoulders many times and know more than a few people in common. My four years in Flagstaff were busy and usually traveling. I do pass through Flagstaff a couple times a year and would love to get together to talk sometime. In fact, I was there for a couple days last month. Likewise, if you are ever on the Plains of Eastern New Mexico, look me up and we’ll check out the Clovis stuff. I missed last Winter Count but hope that won’t happen again for a long time!
Definitely, keep in touch. You can always find me through the email listed at Backtracks as well for a less public forum.
George
A credit too you, your hard work and craftsmanship. As an ocean traveller I appreciate the thought that goes into making a small space efficient and liveable.
paleotool;ever since I saw your first post on the vardo, I have seen a quit a few vardo type rigs! (sorry i’m a trk driver) and now I too am about to start a vardo! but mine is going to built on a double axle rv frame !
how can I refuse it only going to cost me $50 for the fram!
Oh by the wY MY AOL account has crashed so I moved it to yahoo@
Cool. It’s a spreading movement of homebuilts. Glad you found the blog useful.
George,
Can you confirm the sides? I didn’t quite understand the construction. Are the sides 1/4″ plywood with 3/4″ T & G over it, making the sides 1″ thick? I know the ends are 3/4″ T & G, but can’t make out the sides? Also, how wide is your bed, as I am guessing 30″ x 80″? And can a person get a photo copy of your design you graphed out?
Please let me know.
Thanks,
Dave
The sides are 1″ square stock frames set on 12″ centers. Attached to this is 1/4″ t & g pine with 1″ square stock on the outside mirroring that within (screwed through). this is enough for single layer wagon wall but for insulation there is (currently) veneer plywood over the outermost studs making, from inside out, stud-1/4″ t&g-stud (dead air)-ply. Look at the photos closely and I think it should clarify.
I’m not home now but I think the bed is about 36″ closed and 46″ open.
May I ask how long did it take you to build the vardo and how much does it cost. Me and my husband are thinking about building one. I have always wanted a gypsy wagon.
A couple weeks for the main build. A month before it was on the road, and several years later I’m still tinkering and “finishing”. Most questions are answered on the Instructibles page or here (there have been a lot of inquiries but I will be glad to help if I can. Cost will be a huge variable but I think, after the trailer frame, about $2000 minimum unless you have a source for strong, lightweight wood and fasteners.
Best of luck! Send photos!!
So impressed with your Vardo that I was motivated to ‘have a go’ and build something similar. Going with a scratch build, bow-top design. Not much of an engineer or carpenter but determined to have a go making it from the ground up. Progressing slowly, making it up as I go. Almost entirely of ply of various thicknesses apart from the steel frame. (had to learn to weld)
This is what happens when you get old and need some therapy to fill the day. Its all your fault you realise. I am trying to keep a log of the build with pikkies. When It finally comes together I will try to send a pikky or two to show you what your effort inspired.
Ain’t the internet a wonderful thing?
Cheers … & thanks for getting me off my butt.
Woodduck
The land of OZ(downunder) lol
Steve,
That’s very nice to hear. One of the best comments I’ve had on the Vardo. I hope yours comes out well and I cant wait to see some photos.
George
Great job, I decided on your style for my Vardo, now have trailer and 8 ft. box built. My question : is your bunk 48 in. deep and the seat/bookcase on port side 2 ft. each? Jim Allen
Cool! The bed is about 37″ “closed” and 46″ “extended”. I would like a little more sometimes but its usually just fine. And yep, the shelving units are 2′ and the benches are about 3′.
What can one say? Too cool for words ! Looks like a whole lotta Master Craftsmanships a goin’ on!
Thanks, that’s nice to hear. Glad you can enjoy it.
You need to know the weight, have safety chains, brake lights, turn signals, & marker lights if traveling at night. Brakes are needed over a certain weight , and you will want them. Be patient. And if they feel like it, you get a plate. The Vardo can be “cargo” or a box trailer, if no “toilet” installed. No rv tanks. That is better I think.
Truly an inspiration. I have been reading and re-reading the instructable and your weblog since I discovered them. Thank you for sharing all of your hard work and knowledge.
Thanks! The nearly complete lack of information out there when I was building mine made me want to simplify if for others. I’m glad you find it helpful.
Thanks for all the work you’ve done, this is an awesome inspiration. I’ve been throwing around the idea of traveling the countryside in something small like this for quite some time. But rather with a horse drawn forecart, and this is the perfect size.
i have an original 4×8 kit trailer. it’s old as the hills and needs to be reworked on the wood. i have decided if i have to take it down to the frame I’m going to turn it into a Vardo in the redo. it already has a vin number so i only have to keep up the tags on the original trailer plates and I’m good or least that’s what our DMV said here in Texas. thanks for the inspiration and the photos they will be a lot of help in the rebuild as a guide to how it should go along.
Best of luck from New Mexico! Hope all goes well for you and your build.
I just love looking at tiny homes and dream of having one myself some day. This is the most amazing one I’ve seen yet. Great job!
Thanks so much! That’s quite a compliment. Get building and don’t stop dreaming.
Do you think something built similar to this could be towed by a Honda Civic??? Thank you for letting me know!
Personally, I think if you kept it very light and didn’t over fill it with stuff, it seems doable. Just as long as it doesn’t exceed the car’s towing ability (look in your owner’s manual). However, I bought my current truck (Toyota Tacoma with a towing package) as I didn’t want it to be an issue. Plenty of power and not over taxing the system.
Best of luck!
We’re wrestling with towing right now, too. Looking to buy a beater truck. Hopefully something diesel and tow rated.
Really great site. I am building one for my guest house. I am putting in French doors on the one side. It will be a really fun project. I saw yours in” Tiny Homes” Thanks for the great plans. Also I am doing a salt box roof. Thanks again.
Thanks. I’m glad it may have inspired you or given you some ideas!
I’m inspired by your project, it is beautifully done! I’ve been looking for something light and basic like a teardrop but with more room for a couple of years. Yours seems to have an upper and lower bed and I wondering how the lower one fits between the ledges that run down both sides. If the lower bed frame spans the ledges it looks like the head space would be very limited once a mattress or pad was put in the space. Anyhow, I am wondering because I “dreamed” mine to have two berths for beds (upper and lower) ….seems achievable and any info you provide would give me a starting point.
Yes it spans at ledge level and a full grown adult can almost sit up in it. It is low but serviceable and bigger than a submarine bunk. Look at all the images and it should be apparent. If the lower needs to be bigger there is some room to raise the upper bunk but I wanted to keep that head space as high as possible.
Thanks for the reply. I studied your photos and found a few that make it clear to me now. Your sketches show that the top berth folds out somehow to make it wider. I may not need that feature but its a nice idea. Did you actually build yours that way and if you did how does it work? I spent a good deal of time looking at all of your photos and I couldn’t figure it out. BTW I love northern NM. I spent some time there on several occasions with the scouts at Philmont in Cimmaron. Northern NM is such a beautiful place.
Yes, the top (main) bunk widens by 11″ but can stay closed if alone or you don’t need the room. It’s done just like 19th century caravans where a full width board slides out to rest on the track along the walls. Actually, some caravans often kept extra boards to widen the bed area as needed.
I know it’s hard to see but it’s essentially storing a board under the mattress and that is what the bed edge is attached to. Maybe I need to illustrate that better in the photos! It’s very hard to show everything while photographing in such a small space. I’ll try to get some photos this weekend.
Thanks. Got it. Can you feel the 3/4 inch bump through the mattress when the 11 inch board is tucked under (not extended)?
No, not through the futon but I usually sleep with it extended.
George greetings are you coming to santa fe i am here it is beautiful with a few inches of snow i love the conversation of this bunk bed and such i cant really understand what you all are speaking of any chance to see a picture…thanks Peace Marta
Awesome rig…you have inspired a lot of people to build something with their own hands which is a great gift to people you don’t know. As you have inspired others, you too, have inspired me. I look forward to this project. I can see how you have made adjustments on yours as the years have passed; one surprise to me was the expandable bed. How ingenious! I know you have heard it before but thanks. I will continue to use this site as my guide through my build, so people keep asking questions because we all learn.
I looked up “gypsy wagons” on Google images and yours is the most excellent. 🙂 Thanks for all the pics and details.
Thanks! That’s very nice to hear and the comment is much appreciated.
Last picture is awesome…fiddle-up some spirits out there…
How do you think this would fair in Canadian winters
It will depend upon the Canadian… Think of it as a tiny cabin. If it is “on grid” a small heater on low keeps it snug well below zero. The stove keeps it very toasty but takes a bit of tending if you want it to be like a modern home. Most actual “living” will happen outside with a space like this.
I have always wanted to make myself (and live in) a teepee but I think that this is now in first place. it is truly gorgeous, I am so glad I came across your site, thank you 😉 goodness knows how I am going to go about building it, but with the help of my husband, I may just pull it off …
I’ve been waiting to post until my wagon was finished, but I just can’t wait. Your vardo helped me so very much and I just wanted to say thank you! It took a year for me to build by myself (an old lady of 61 with osteoarthritis). I plan on taking it to Maryland sheep festival May 1st. First I have to take it to the dump to weigh it. I live in Vermont so it is 2×4 frame and insulated. I may have gone too far on the trimmings too. Visit my site at gypsytinker.com it’s under travels. Again, my thanks and blessing to you for you help. P.s. when building I read thru every single blog note putting together as much possible info you have shared. Thanks for being so kind. Patty aka Gypsy Tinker
Patty,
That is really nice to hear. I am so glad that all the babbling here can help a few people. Your vardo looks great and I hope it serves you well for many years to come.
George
a.k.a Paleotool
Words can not describe the envy that I have for this object.
Ive been studying you sketches as well as the great photos you took of the build, I believe I have it all worked out how im going to build mine. Thanks for sharing build if you manage to get a set of working plans or prints I would be interested in them. Great job some really good carpentry going on in you build. Rich
So I have a small camper and have recently bought a two dog stove. I am about to install this stove and am curious what you used as a stove pipe jack since we both have the same stove. My stove pipe will be going strait up threw the roof and I assume you would have a good suggestion on what to safely use. Your caravan is amazing and you’ve inspired me, I have big plans for after winter.
I don’t really have a suggestion for a stove pipe jack. Mine goes through a wall thimble which helps support the rest. I haven’t have a problem.
You may find this of interest ( on the off chance you may have missed it ) : http://www.enslin.com/rae/gypsy/wagon.htm
Yes, thanks. She has been a great source for many people. I think I’m still on her Links page. I get a lot of traffic from there.
Then there’s this one : http://www.maliasmiles.com/ForFun/StrangeRVs.htm
I’ve been trying to send you a picture of a vardo I found on another site. Can’t get it done here.
Can you give me a address where I can get it to you? It has your name on it and is similar to what I’m looking to build.
You can send it to zcoyotez@yahoo.com
D here over at Puyeria Problems. Did you ever insulate yours? We’ve got ours to a point of finally being a box on wheels. The end result will be insulated floor and walls, but not the ceiling… and it gets pretty toasty in it. I might try and convince M to insulate the ceiling, but then we’d lose head room.
Was happy to see the DOT registration comments. That settled some nerves!
I have enjoyed your blog, studied the pictures and hope I’m ready. This is summer to build a vardo for the truck and another fold down for the motorcycle. I got the trailers, and (I hope) most of the materials needed, except for bolts and screws. Now ready yourself for the questions: How are the walls fastened to the ledge board? Could the ledge also have gone over the front?
Yes, the ledge can go over the front. The front and rear walls are the heavy structural elements upon which the side walls are “hung”. The sides connect to the ledge (holding it up as much as anything) with screws, up from the ledge into each rib. Then, the sheeting (structural, unlike modern houses) is screwed into the ledge from the outside.
Good luck! Once you dive in, it’s all down hill.
W o W!!! G r e a t W o r K !!!
Thank you, thank you. I just found this a couple of days ago. I’d been looking for a type of trailer to build, I have the trailer but needed the body to go on it. I’d forgotten about the gypsy trailers, and this one was perfect! After finding a gypsy camper, not yours, I started looking for instructions/plans for building, and there you were, all laid out with pictures and everything. Thank you, I’ll be starting mine in a couple of days, and your plans are forefront in my mind as I start. I just need to figure out the supply list before I start. I can’t wait.
I’m glad to be of help! You are the reason I documented this so that other people have an inspiration and starting point. Best of luck and I hope it goes well. Send updates if want!
D here from PuyeriaProblems again…
We took ours down the freeway for the first time. Only something like 30 miles from our house to our in laws who have offered to store it long term. Aside from just local driving, I won’t be doing any serious driving with it again! Burned a LOT of gas and was just generally unnerving… even though nothing went wrong.
We’re already talking about building our next one. Smaller and lighter this time.
We went with traditionally framed walls (though with 1×4’s instead of 2×4’s) so that we could thoroughly insulate, but I imagine this added a lot of weight. With a lot of trailers I’ve seen online, I get the impression that there might not have been any insulation. Just pretty wood. Is this likely the case? If I’m not mistaken, your wagon was just an outside skin of pretty wood. Is this viable in the South? Hot and Humid
Heavy is bad. Traditional house framing is best left for houses. Mine is just wood front and rear with double layer of wood with 1″ air gap inbetween. A white metal roof doesn’t hurt either to keep things cool.
Had to scroll through your images to see what you meant, but I had read that you reskinned the outside for insulation. You just attached another layer of wood to the exterior wall braces. The gap created by the braces became your air gap. Was there any thought to putting those 1″ foam panels between them?
I really wanted to avoid foam and most other potentially toxic materials. The tiny space is so easy to heat that insulation isn’t an issue.
Thank you for this. It is great to have everything in one pulled together and the extra details. I might have missed the answer to this question somewhere, but is the location of the stove the reason for offsetting the door?
… in one place …
Sort of. I felt that offsetting the door would give a single larger space to one side instead of tow smaller areas.
How much does it weigh?
ca 1500#, moderately loaded.
Love your blog – just starting on the journey – refurbishing trailer at present. The planning and research is so enjoyable. I’m lucky that you’ve done so much of the groundwork. Hope to visit Gordon Boswell’s Romany Museum on 30th October, as he closes for the winter a day later!
See: http://www.boswell-romany-museum.com/howToFindUs.htm
(From far away small village on the River Thames – England)
[Hope to attempt website of build]
Hello Ivan! Best of luck. Might I ask what small village on the Thames? I spent time in University in Reading, worked in Oxford and tramped about your neighborhood for a bit; but that was over 20 years ago!
Hello Paleotool, I’ve been looking at small campers for years on various websites. I always come back to your vardo as the perfect example of what I’m looking for. I’m finally retired and hope to start my camper project soon. Thanks for your blog and for sharing all your information with everyone. It’s very much appreciated!
Jack H. Columbus Oh.
Thanks Jack! That’s really nice to hear. I hope your build goes well.
Hello again, George,
I first wrote to you in April of this year, admiring your work. Well, I finally, after a great many starts and stops started my Caravan. I’ve made many changes, of course, and finally decided on a Bow Top Gypsy Caravan. Your designs and planning have played a major part in my design and I can’t tell you how much your journey in building and traveling with your Vardo have influenced my decisions. Again, I think you for all your help. I’ll send some photos when I get them taken.
Roux ‘b Doux (aka Janice)
Hello Janice,
That is great to hear. I’m glad my information was useful for your building project. Spelling out what worked for me will hopefully save you the headache of starting from absolute scratch. I look forward to seeing your photos as I learn something new from every one who builds their own vardo and puts a bit of themselves into it.
George
Great project! I am looking at making one of these myself, I was curious what size is the trailer that you used? also, how far away from the stove is your bed when fully extended? Thanks for the great instructions and inspiration!
Thanks. The original design is for a 5 x 8′. Read through the whole thing and check out the Instructable and I think all your questions will be answered. A lot of good conversations and specifics are answered in the comments as well.
Two questions:
I have a jeep wrangler sport, five foot wide. I’m considering either a 5×8 vardo build or 7×8 alike your build.
1. With a 5×8 build and 8′ total height, 2′ or so above the top of the Jeep, 6’6″ interior, how well would it pull down the crowd with that 2′ over height? Or too top heavy?
2. With the wider version, 7×8, would it be less top heavy as a tow behind and tow easier?
Thanks, chuck
Dear George: You have been such an inspiration to me and I am now ready to unveil my own home-built camper, the Coach. I went in a completely different direction from the Vardo, but I hope you will find this interesting: https://trailercoach.wordpress.com/
Best, ‘Possum
Glad to hear it! It looks great. I hope it brings you many happy journeys.
I couldn’t find a way to message you on your blog so I hope you see this. I haven’t put up any posts for quite some time but would love to add yours to the blog with a few photos and links back to you. Let me know if this is okay?
Absolutely! I appreciate everything you do and share most of your interest. My direct contact info, welcome to share, is tony@redwoods.info. Best, Tony Smithers
Wow. Just…. Wow.
Haha! That’s amazing. Great idea on the wheels, too. At first I wasn’t convinced that it was meant for road travel, but then I saw that they were decorative. Certainly makes Renn Faire presentability better.
I built a sheep wagon to sell my pottery out of…. https://youtu.be/cYLzyob9DaY
Cool. Can I repost it as a blog link to your Youtube?
Hello…thank you for your pics and postings re your vardo. Very informative and in the spirit of sharing. For me, the most challenging aspect would be the curved cut on top of the front and rear walls. (one chance to do it right without a big expense of screwing up!) Would you comment on how you approached that, i.e drawing the cut line (template? equal measurements?), type of saw. etc. Thanks!!
Thanks Vince. The curve isn’t too big of a deal really. I have done a few like this now on campers and the like. I just found where the center of the arc would be (in this case, in the door; see the sketch plan) and used a 1 x 4 board as the compass, atached with a screw at the center, to scribe the line in pencil. The cut was simply made with a sabre saw.
However, my more meticulous friend made an actual router jig to cut his and I suspect it is even more precise. Don’t fear it. It’s not as tricky as it looks. If you need more description, let me know.
Oh…of course…tack the 1×4 in the middle of the wall and swing the end at the top like a pencil compass. So simple. I get it! Thanks!
You got it! I left the 1 x 4 long then drilled a pencil hole at the appropriate.
Lovely. Glad to see your dream home coming true. Hope mine will soon enough..Personally, I recently joined the Tiny House Movement and am enjoying every bit of it.
p:s: You can share all your Tiny house living pics from your building process to plans used, for the benefit of others just joining our movement
Thanks, I’ve been sharing my pics, data, and info online for over seven years now.
George, thank you for the years of inspiration and helpful advice. I finished my vardo several years ago and have been fine tuning it on camping trips since. If you Google “solo built Gypsy wagon” I think you can still find an article on her on the school of woodworking site. Thank you again. Amber
Thanks Amber.
Beautiful wagon!
Somehow your blog disappeared from my reader. Noticed that you liked one of my posts the other day, and then I figured out you were out of my feed, and just re-added you! Anyway, I’m a huge admirer of your skills and a jealous drooler over your vardo, For years I fantasized about building my own gypsy wagon. This year I finally realized that I was never going to make time to take on a project of that size. So I pulled the trigger on the next best thing: I built an adventure trailer instead. Thought you might enjoy looking at it. Nowhere near your craftsmanship, but it sure makes camping a breeze. Keep doing what you do sir, you’re amazing! https://remitchelljr.com/2018/10/05/my-diy-adventure-trailer-build/
Robert, you’re still in my fees so I usually keep up with your own adventures, musings, and philosophy. I really liked the trailer and your other posts. Thanks for coming back and keep up the good work yourself!